HP Z3100 HP Designjet Z3100 Photo Printer Series - Users Guide - Page 102
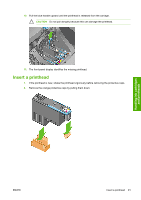
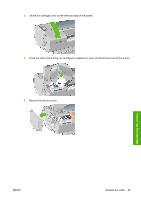
Insert the new printhead into its correct slot in the carriage.
 |
UPC - 882780677531
View all HP Z3100 manuals
Add to My Manuals
Save this manual to your list of manuals |
Page 102 highlights
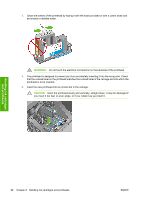
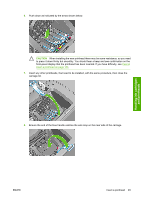
3. Clean the bottom of the printhead by wiping it with the swab provided or with a cotton swab and de-ionized or distilled water. WARNING! Do not touch the electrical connections on the backside of the printhead. 4. The printhead is designed to prevent you from accidentally inserting it into the wrong slot. Check that the colored label on the printhead matches the colored label of the carriage slot into which the printhead is to be inserted. 5. Insert the new printhead into its correct slot in the carriage. CAUTION Insert the printhead slowly and vertically, straight down. It may be damaged if you insert it too fast, or at an angle, or if you rotate it as you insert it. Handling ink cartridges and printheads 92 Chapter 8 Handling ink cartridges and printheads ENWW
-
 1
1 -
2
-
3
-
4
-
5
-
6
-
7
-
8
-
9
-
10
-
11
-
12
-
13
-
14
-
15
-
16
-
17
-
18
-
19
-
20
-
21
-
22
-
23
-
24
-
25
-
26
-
27
-
28
-
29
-
30
-
31
-
32
-
33
-
34
-
35
-
36
-
37
-
38
-
39
-
40
-
41
-
42
-
43
-
44
-
45
-
46
-
47
-
48
-
49
-
50
-
51
-
52
-
53
-
54
-
55
-
56
-
57
-
58
-
59
-
60
-
61
-
62
-
63
-
64
-
65
-
66
-
67
-
68
-
69
-
70
-
71
-
72
-
73
-
74
-
75
-
76
-
77
-
78
-
79
-
80
-
81
-
82
-
83
-
84
-
85
-
86
-
87
-
88
-
89
-
90
-
91
-
92
-
93
-
94
-
95
-
96
-
 97
97 -
 98
98 -
 99
99 -
 100
100 -
 101
101 -
 102
102 -
 103
103 -
 104
104 -
 105
105 -
 106
106 -
 107
107 -
108
-
109
-
110
-
111
-
112
-
113
-
114
-
115
-
116
-
117
-
118
-
119
-
120
-
121
-
122
-
123
-
124
-
125
-
126
-
127
-
128
-
129
-
130
-
131
-
132
-
133
-
134
-
135
-
136
-
137
-
138
-
139
-
140
-
141
-
142
-
143
-
144
-
145
-
146
-
147
-
148
-
149
-
150
-
151
-
152
-
153
-
154
-
155
-
156
-
157
-
158
-
159
-
160
-
161
-
162
-
163
-
164
-
165
-
166
-
167
-
168
-
169
-
170
-
171
-
172
-
173
-
174
-
175
-
176
-
177
-
178
-
179
-
180
-
181
-
182
-
183
-
184
-
185
 |
 |
