HP Z3100 HP Designjet Z3100 Photo Printer Series - Users Guide - Page 110
installed. Look at the front panel and follow its instructions if there is any problem.
 |
UPC - 882780677531
View all HP Z3100 manuals
Add to My Manuals
Save this manual to your list of manuals |
Page 110 highlights
11. Fit the cutter stop onto the end of the cutter rail, holding it there with one hand while you tighten the screw with the screwdriver in your other hand. Maintaining the printer 12. Put the left end cover back on the printer, aligning the protrusions with the holes in the printer. 13. Close the ink cartridge cover. 14. At the front panel, turn the printer back on. The printer checks that the cutter has been correctly installed. Look at the front panel and follow its instructions if there is any problem. 100 Chapter 9 Maintaining the printer ENWW
-
 1
1 -
2
-
3
-
4
-
5
-
6
-
7
-
8
-
9
-
10
-
11
-
12
-
13
-
14
-
15
-
16
-
17
-
18
-
19
-
20
-
21
-
22
-
23
-
24
-
25
-
26
-
27
-
28
-
29
-
30
-
31
-
32
-
33
-
34
-
35
-
36
-
37
-
38
-
39
-
40
-
41
-
42
-
43
-
44
-
45
-
46
-
47
-
48
-
49
-
50
-
51
-
52
-
53
-
54
-
55
-
56
-
57
-
58
-
59
-
60
-
61
-
62
-
63
-
64
-
65
-
66
-
67
-
68
-
69
-
70
-
71
-
72
-
73
-
74
-
75
-
76
-
77
-
78
-
79
-
80
-
81
-
82
-
83
-
84
-
85
-
86
-
87
-
88
-
89
-
90
-
91
-
92
-
93
-
94
-
95
-
96
-
97
-
98
-
99
-
100
-
101
-
102
-
103
-
104
-
 105
105 -
 106
106 -
 107
107 -
 108
108 -
 109
109 -
 110
110 -
 111
111 -
 112
112 -
 113
113 -
 114
114 -
 115
115 -
116
-
117
-
118
-
119
-
120
-
121
-
122
-
123
-
124
-
125
-
126
-
127
-
128
-
129
-
130
-
131
-
132
-
133
-
134
-
135
-
136
-
137
-
138
-
139
-
140
-
141
-
142
-
143
-
144
-
145
-
146
-
147
-
148
-
149
-
150
-
151
-
152
-
153
-
154
-
155
-
156
-
157
-
158
-
159
-
160
-
161
-
162
-
163
-
164
-
165
-
166
-
167
-
168
-
169
-
170
-
171
-
172
-
173
-
174
-
175
-
176
-
177
-
178
-
179
-
180
-
181
-
182
-
183
-
184
-
185
 |
 |

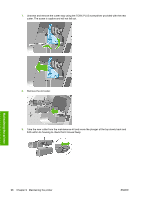
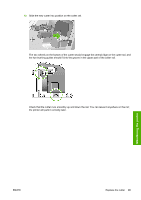
11.
Fit the cutter stop onto the end of the cutter rail, holding it there with one hand while you tighten
the screw with the screwdriver in your other hand.
12.
Put the left end cover back on the printer, aligning the protrusions with the holes in the printer.
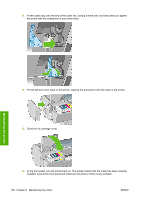
13.
Close the ink cartridge cover.
14.
At the front panel, turn the printer back on. The printer checks that the cutter has been correctly
installed. Look at the front panel and follow its instructions if there is any problem.
100
Chapter 9
Maintaining the printer
ENWW
Maintaining the printer