HP Z3100 HP Designjet Z3100 Photo Printer Series - Users Guide - Page 95
Remove an ink cartridge, Replace, ink cartridges
 |
UPC - 882780677531
View all HP Z3100 manuals
Add to My Manuals
Save this manual to your list of manuals |
Page 95 highlights
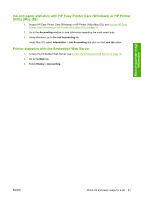
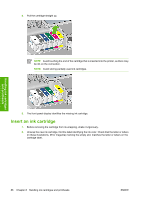
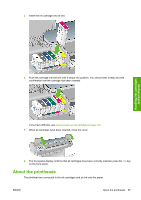
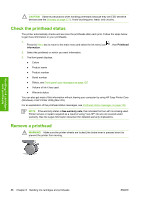
Handling ink cartridges and printheads Remove an ink cartridge There are three occasions when you need to remove an ink cartridge. ● The ink level in the cartridge is very low and you want to replace it with a full cartridge for unattended printing (you can use up the remaining ink in the first cartridge at a more convenient time). ● The ink cartridge is empty or faulty, and you must replace it to continue printing. ● The ink cartridge has expired. CAUTION Do not try to remove an ink cartridge while printing. CAUTION Remove an ink cartridge only if you are ready to insert another one. WARNING! Make sure the printer wheels are locked (the brake lever is pressed down) to prevent the printer from moving. 1. Press the Menu key to return to the main menu and select the Ink menu icon ink cartridges. , then Replace 2. Open the ink cartridge cover completely. Gloss enhancer, gray, blue, green, magenta and yellow are in the left side, while light magenta, light cyan, photo black, light gray, matte black, and red are in the right side. 3. Grip the cartridge you wish to remove. ENWW Remove an ink cartridge 85
-
 1
1 -
2
-
3
-
4
-
5
-
6
-
7
-
8
-
9
-
10
-
11
-
12
-
13
-
14
-
15
-
16
-
17
-
18
-
19
-
20
-
21
-
22
-
23
-
24
-
25
-
26
-
27
-
28
-
29
-
30
-
31
-
32
-
33
-
34
-
35
-
36
-
37
-
38
-
39
-
40
-
41
-
42
-
43
-
44
-
45
-
46
-
47
-
48
-
49
-
50
-
51
-
52
-
53
-
54
-
55
-
56
-
57
-
58
-
59
-
60
-
61
-
62
-
63
-
64
-
65
-
66
-
67
-
68
-
69
-
70
-
71
-
72
-
73
-
74
-
75
-
76
-
77
-
78
-
79
-
80
-
81
-
82
-
83
-
84
-
85
-
86
-
87
-
88
-
89
-
 90
90 -
 91
91 -
 92
92 -
 93
93 -
 94
94 -
 95
95 -
 96
96 -
 97
97 -
 98
98 -
 99
99 -
 100
100 -
101
-
102
-
103
-
104
-
105
-
106
-
107
-
108
-
109
-
110
-
111
-
112
-
113
-
114
-
115
-
116
-
117
-
118
-
119
-
120
-
121
-
122
-
123
-
124
-
125
-
126
-
127
-
128
-
129
-
130
-
131
-
132
-
133
-
134
-
135
-
136
-
137
-
138
-
139
-
140
-
141
-
142
-
143
-
144
-
145
-
146
-
147
-
148
-
149
-
150
-
151
-
152
-
153
-
154
-
155
-
156
-
157
-
158
-
159
-
160
-
161
-
162
-
163
-
164
-
165
-
166
-
167
-
168
-
169
-
170
-
171
-
172
-
173
-
174
-
175
-
176
-
177
-
178
-
179
-
180
-
181
-
182
-
183
-
184
-
185
 |
 |