HP Z3100 HP Designjet Z3100 Photo Printer Series - Users Guide - Page 141
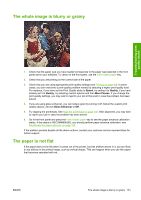
The whole image is blurry or grainy, The paper is not flat
 |
UPC - 882780677531
View all HP Z3100 manuals
Add to My Manuals
Save this manual to your list of manuals |
Page 141 highlights
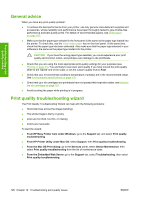
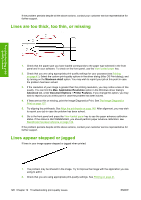
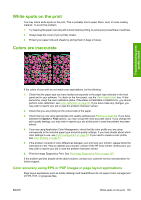
The whole image is blurry or grainy Troubleshooting printquality issues 1. Check that the paper type you have loaded corresponds to the paper type selected in the front panel and in your software. To check on the front panel, use the View loaded paper key. 2. Check that you are printing on the correct side of the paper. 3. Check that you are using appropriate print-quality settings (see Printing on page 41). In some cases, you can overcome a print-quality problem merely by selecting a higher print-quality level. For instance, if you have set the Print Quality slider to Speed, try setting it to Quality; if you have already set it to Quality, try selecting custom options and then More Passes. If you change the print-quality settings, you may wish to reprint your job at this point in case the problem has been solved. 4. If you are using gloss enhancer, you can reduce grain by turning it off. Select the custom print quality options, and set Gloss Enhancer to Off. 5. Try aligning the printheads. See Align the printheads on page 148. After alignment, you may wish to reprint your job in case the problem has been solved. 6. Go to the front panel and press the View loaded paper key to see the paper advance calibration status. If the status is RECOMMENDED, you should perform paper advance calibration: see Recalibrate the paper advance on page 122. If the problem persists despite all the above actions, contact your customer service representative for further support. The paper is not flat If the paper does not lie flat when it comes out of the printer, but has shallow waves in it, you are likely to see defects in the printed image, such as vertical stripes. This can happen when you use thin paper that becomes saturated with ink. ENWW The whole image is blurry or grainy 131
-
 1
1 -
2
-
3
-
4
-
5
-
6
-
7
-
8
-
9
-
10
-
11
-
12
-
13
-
14
-
15
-
16
-
17
-
18
-
19
-
20
-
21
-
22
-
23
-
24
-
25
-
26
-
27
-
28
-
29
-
30
-
31
-
32
-
33
-
34
-
35
-
36
-
37
-
38
-
39
-
40
-
41
-
42
-
43
-
44
-
45
-
46
-
47
-
48
-
49
-
50
-
51
-
52
-
53
-
54
-
55
-
56
-
57
-
58
-
59
-
60
-
61
-
62
-
63
-
64
-
65
-
66
-
67
-
68
-
69
-
70
-
71
-
72
-
73
-
74
-
75
-
76
-
77
-
78
-
79
-
80
-
81
-
82
-
83
-
84
-
85
-
86
-
87
-
88
-
89
-
90
-
91
-
92
-
93
-
94
-
95
-
96
-
97
-
98
-
99
-
100
-
101
-
102
-
103
-
104
-
105
-
106
-
107
-
108
-
109
-
110
-
111
-
112
-
113
-
114
-
115
-
116
-
117
-
118
-
119
-
120
-
121
-
122
-
123
-
124
-
125
-
126
-
127
-
128
-
129
-
130
-
131
-
132
-
133
-
134
-
135
-
 136
136 -
 137
137 -
 138
138 -
 139
139 -
 140
140 -
 141
141 -
 142
142 -
 143
143 -
 144
144 -
 145
145 -
 146
146 -
147
-
148
-
149
-
150
-
151
-
152
-
153
-
154
-
155
-
156
-
157
-
158
-
159
-
160
-
161
-
162
-
163
-
164
-
165
-
166
-
167
-
168
-
169
-
170
-
171
-
172
-
173
-
174
-
175
-
176
-
177
-
178
-
179
-
180
-
181
-
182
-
183
-
184
-
185
 |
 |