HP Z3100 HP Designjet Z3100 Photo Printer Series - Users Guide - Page 47
Add a custom paper type, Custom paper, Manage Papers, Add new paper - designjet ink
 |
UPC - 882780677531
View all HP Z3100 manuals
Add to My Manuals
Save this manual to your list of manuals |
Page 47 highlights
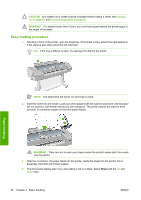
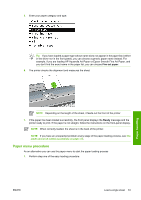
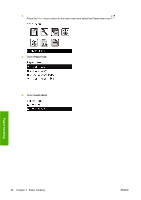
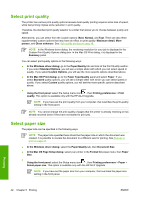
There are three ways to assign a profile for a new paper type. ● Use a HP factory paper profile by selecting the closest category and type in the front panel, HP Easy Printer Care (Windows), or HP Printer Utility (Mac OS) NOTE Colors may not be accurate. This method is not recommended for high-quality prints. ● Download the correct paper profile from: http://www.hp.com/go/designjet/downloads NOTE HP only provides profiles for HP paper types. If you do not find the paper profile you want on the Web, you may find that it has been added to the latest firmware for your printer. You can check the firmware release notes for information, see Update the firmware on page 102. ● Add custom paper type, see Add a custom paper type on page 37, and create an ICC profile, this works for both HP and non-HP papers Add a custom paper type Before you can use a custom paper with your printer you must add a custom paper type and allow the printer to run a color calibration. You can add a custom paper using the HP Color Center in HP Easy Printer Care (Windows) or HP Printer Utility (Mac OS). NOTE If you have already selected Custom paper > Add Custom Paper from HP Easy Printer Care (Windows) or HP Printer Utility (Mac OS), the first Add New Paper screen appears and you can start this procedure at step four. 1. Go to the Color Center in HP Easy Printer Care (Windows) or HP Printer Utility (Mac OS). 2. Select Manage Papers. 3. In Windows, select Add new paper. In Mac OS, click +. 4. Enter your paper's name. NOTE It is recommended to use the paper's commercial name to avoid confusion for other users. 5. Select a paper category. NOTE The paper category determines the amount of ink used and other basic printing parameters. To obtain satisfactory results, experiment with different categories and use the ones that work best. 6. Load your custom paper, see Load a roll into the printer on page 27 or Load a single sheet on page 31. 7. Click Next. The printer performs a color calibration and prints a calibration chart. This may take ten minutes. NOTE For more information on the processes available in the Color Center, see A summary of the color management process on page 59. Paper handling ENWW Add a custom paper type 37
-
 1
1 -
2
-
3
-
4
-
5
-
6
-
7
-
8
-
9
-
10
-
11
-
12
-
13
-
14
-
15
-
16
-
17
-
18
-
19
-
20
-
21
-
22
-
23
-
24
-
25
-
26
-
27
-
28
-
29
-
30
-
31
-
32
-
33
-
34
-
35
-
36
-
37
-
38
-
39
-
40
-
41
-
 42
42 -
 43
43 -
 44
44 -
 45
45 -
 46
46 -
 47
47 -
 48
48 -
 49
49 -
 50
50 -
 51
51 -
 52
52 -
53
-
54
-
55
-
56
-
57
-
58
-
59
-
60
-
61
-
62
-
63
-
64
-
65
-
66
-
67
-
68
-
69
-
70
-
71
-
72
-
73
-
74
-
75
-
76
-
77
-
78
-
79
-
80
-
81
-
82
-
83
-
84
-
85
-
86
-
87
-
88
-
89
-
90
-
91
-
92
-
93
-
94
-
95
-
96
-
97
-
98
-
99
-
100
-
101
-
102
-
103
-
104
-
105
-
106
-
107
-
108
-
109
-
110
-
111
-
112
-
113
-
114
-
115
-
116
-
117
-
118
-
119
-
120
-
121
-
122
-
123
-
124
-
125
-
126
-
127
-
128
-
129
-
130
-
131
-
132
-
133
-
134
-
135
-
136
-
137
-
138
-
139
-
140
-
141
-
142
-
143
-
144
-
145
-
146
-
147
-
148
-
149
-
150
-
151
-
152
-
153
-
154
-
155
-
156
-
157
-
158
-
159
-
160
-
161
-
162
-
163
-
164
-
165
-
166
-
167
-
168
-
169
-
170
-
171
-
172
-
173
-
174
-
175
-
176
-
177
-
178
-
179
-
180
-
181
-
182
-
183
-
184
-
185
 |
 |