HP Z6100ps HP Designjet Z6100 Printer Series - User's Guide - Page 127
Perform black point compensation
 |
UPC - 882780990135
View all HP Z6100ps manuals
Add to My Manuals
Save this manual to your list of manuals |
Page 127 highlights
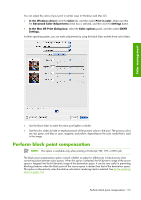
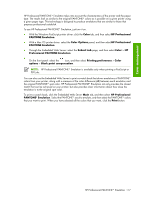
Color management You can adjust the colors of your print in similar ways In Windows and Mac OS: ● In the Windows driver: click the Color tab, and then select Print in color. Make sure that the Advanced Color Adjustments check box is selected, and then click the Settings button. ● In the Mac OS Print dialog box: select the Color options panel, and then select CMYK Settings. In either operating system, you can make adjustments by using the black slider and the three color sliders. ● Use the black slider to make the entire print lighter or darker. ● Use the color sliders to fade or emphasize each of the primary colors in the print. The primary colors are red, green, and blue or cyan, magenta, and yellow, depending on the color model that is used in the image. Perform black point compensation NOTE: This option is available only when printing a PostScript, PDF, TIFF, or JPEG job. The black point compensation option controls whether to adjust for differences in black points when converting colors between color spaces. When this option is selected, the full dynamic range of the source space is mapped into the full dynamic range of the destination space. It can be very useful in preventing blocking shadows when the black point of the source space is darker than that of the destination space. This option is allowed only when the relative colorimetric rendering intent is selected. See Set the rendering intent on page 116. Perform black point compensation 115
-
 1
1 -
2
-
3
-
4
-
5
-
6
-
7
-
8
-
9
-
10
-
11
-
12
-
13
-
14
-
15
-
16
-
17
-
18
-
19
-
20
-
21
-
22
-
23
-
24
-
25
-
26
-
27
-
28
-
29
-
30
-
31
-
32
-
33
-
34
-
35
-
36
-
37
-
38
-
39
-
40
-
41
-
42
-
43
-
44
-
45
-
46
-
47
-
48
-
49
-
50
-
51
-
52
-
53
-
54
-
55
-
56
-
57
-
58
-
59
-
60
-
61
-
62
-
63
-
64
-
65
-
66
-
67
-
68
-
69
-
70
-
71
-
72
-
73
-
74
-
75
-
76
-
77
-
78
-
79
-
80
-
81
-
82
-
83
-
84
-
85
-
86
-
87
-
88
-
89
-
90
-
91
-
92
-
93
-
94
-
95
-
96
-
97
-
98
-
99
-
100
-
101
-
102
-
103
-
104
-
105
-
106
-
107
-
108
-
109
-
110
-
111
-
112
-
113
-
114
-
115
-
116
-
117
-
118
-
119
-
120
-
121
-
 122
122 -
 123
123 -
 124
124 -
 125
125 -
 126
126 -
 127
127 -
 128
128 -
 129
129 -
 130
130 -
 131
131 -
 132
132 -
133
-
134
-
135
-
136
-
137
-
138
-
139
-
140
-
141
-
142
-
143
-
144
-
145
-
146
-
147
-
148
-
149
-
150
-
151
-
152
-
153
-
154
-
155
-
156
-
157
-
158
-
159
-
160
-
161
-
162
-
163
-
164
-
165
-
166
-
167
-
168
-
169
-
170
-
171
-
172
-
173
-
174
-
175
-
176
-
177
-
178
-
179
-
180
-
181
-
182
-
183
-
184
-
185
-
186
-
187
-
188
-
189
-
190
-
191
-
192
-
193
-
194
-
195
-
196
-
197
-
198
-
199
-
200
-
201
-
202
-
203
-
204
-
205
-
206
-
207
-
208
-
209
-
210
-
211
-
212
-
213
-
214
-
215
-
216
-
217
-
218
-
219
-
220
-
221
-
222
-
223
-
224
-
225
-
226
-
227
-
228
-
229
-
230
-
231
-
232
 |
 |
