HP Z6100ps HP Designjet Z6100 Printer Series - User's Guide - Page 42
Load a roll onto the spindle - adhesive back paper
 |
UPC - 882780990135
View all HP Z6100ps manuals
Add to My Manuals
Save this manual to your list of manuals |
Page 42 highlights
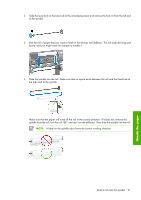
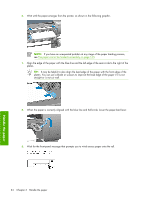
Table 4-1 Supported paper types (continued) Paper type Product name Technical Paper Natural Tracing Paper Translucent Bond Vellum Film Transparent/Clear Film Matte Film Proofing Paper HP Professional High-gloss Contract Proofing Paper HP Professional Semi-gloss Contract Proofing Paper HP Proofing Matte Proofing Gloss Paper Proofing Semi-Gloss/Satin Paper Proofing Matte Paper Self-Adhesive Material Adhesive Polypropylene Adhesive Vinyl Fabric/textile Material (Shown only if a custom paper is downloaded from the Internet) Front panel name Natural Tracing Paper Translucent Bond Vellum Transparent/Clear Film Matte Film HP HG Contract Proofing HP SG Contract Proofing HP Proofing Matte Proofing Gloss Paper Proofing SG/Satin Paper Proofing Matte Paper Adhesive Polypropylene Adhesive Vinyl TBD Load a roll onto the spindle 1. Make sure that the printer wheels are locked (the brake lever is pressed down) to prevent the printer from moving. 2. Remove the first end of the spindle from the right side of the printer, and then move the spindle to the right in order to extract the other end. Do not insert your fingers into the spindle supports during the removal process. Handle the paper The spindle has a hub at each end to keep the roll in position. Remove the blue hub at the left end to mount a new roll. The hub slides along the spindle to hold rolls of different widths. 30 Chapter 4 Handle the paper
-
 1
1 -
2
-
3
-
4
-
5
-
6
-
7
-
8
-
9
-
10
-
11
-
12
-
13
-
14
-
15
-
16
-
17
-
18
-
19
-
20
-
21
-
22
-
23
-
24
-
25
-
26
-
27
-
28
-
29
-
30
-
31
-
32
-
33
-
34
-
35
-
36
-
 37
37 -
 38
38 -
 39
39 -
 40
40 -
 41
41 -
 42
42 -
 43
43 -
 44
44 -
 45
45 -
 46
46 -
 47
47 -
48
-
49
-
50
-
51
-
52
-
53
-
54
-
55
-
56
-
57
-
58
-
59
-
60
-
61
-
62
-
63
-
64
-
65
-
66
-
67
-
68
-
69
-
70
-
71
-
72
-
73
-
74
-
75
-
76
-
77
-
78
-
79
-
80
-
81
-
82
-
83
-
84
-
85
-
86
-
87
-
88
-
89
-
90
-
91
-
92
-
93
-
94
-
95
-
96
-
97
-
98
-
99
-
100
-
101
-
102
-
103
-
104
-
105
-
106
-
107
-
108
-
109
-
110
-
111
-
112
-
113
-
114
-
115
-
116
-
117
-
118
-
119
-
120
-
121
-
122
-
123
-
124
-
125
-
126
-
127
-
128
-
129
-
130
-
131
-
132
-
133
-
134
-
135
-
136
-
137
-
138
-
139
-
140
-
141
-
142
-
143
-
144
-
145
-
146
-
147
-
148
-
149
-
150
-
151
-
152
-
153
-
154
-
155
-
156
-
157
-
158
-
159
-
160
-
161
-
162
-
163
-
164
-
165
-
166
-
167
-
168
-
169
-
170
-
171
-
172
-
173
-
174
-
175
-
176
-
177
-
178
-
179
-
180
-
181
-
182
-
183
-
184
-
185
-
186
-
187
-
188
-
189
-
190
-
191
-
192
-
193
-
194
-
195
-
196
-
197
-
198
-
199
-
200
-
201
-
202
-
203
-
204
-
205
-
206
-
207
-
208
-
209
-
210
-
211
-
212
-
213
-
214
-
215
-
216
-
217
-
218
-
219
-
220
-
221
-
222
-
223
-
224
-
225
-
226
-
227
-
228
-
229
-
230
-
231
-
232
 |
 |
