HP Z6100ps HP Designjet Z6100 Printer Series - User's Guide - Page 128
Set the rendering intent, HP Professional PANTONE* Emulation
 |
UPC - 882780990135
View all HP Z6100ps manuals
Add to My Manuals
Save this manual to your list of manuals |
Page 128 highlights
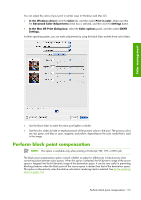
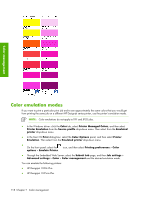
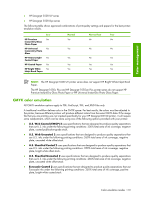
Color management Black point compensation can be specified in the following ways: ● With a Windows PostScript printer driver: click the Color tab, and then select Black point compensation. ● With a Mac OS printer driver: select the Color Options panel, and then select Black point compensation. ● Through the Embedded Web Server: select the Submit Job page, and then select Color > Black point compensation. ● On the front panel: select the icon, and then select Printing preferences > Color options > Black point compensation. Set the rendering intent NOTE: This option is available only when printing a PostScript, PDF, TIFF, or JPEG job. Rendering intent is one of the settings available when doing a color transformation. Because some of the colors you want to print might not be reproducible by the printer, using the rendering intent allows you to select one of four different ways of handling these out-of-gamut colors. ● Saturation (graphics): best used for presentation graphics, charts, or images that are made up of bright, saturated colors ● Perceptual (images): best used for photographs or images in which colors blend together. This setting attempts to preserve the overall color appearance. ● Relative colorimetric (proofing): best used when you want to match a particular color. This method is mainly used for proofing. It guarantees that if a color can be printed accurately, it will be printed accurately. The other methods provide a more pleasing range of colors but do not guarantee that any particular color will be printed accurately. This option maps the white of the input space to the white of the paper on which you are printing. ● Absolute colorimetric (proofing): this option is the same as relative colorimetric, but without mapping of the white. This rendering is also used mainly for proofing, where the goal is to simulate the output of one printer (including its white point). The rendering intent can be specified in the following ways: ● With a Windows PostScript printer driver: click the Color tab, and then select Rendering intent. ● With a Mac OS printer driver: select the Color Options panel, and then select Rendering intent. ● Through the Embedded Web Server: select the Submit Job page, and then select Color > Rendering intent. ● On the front panel: select the rendering intent. icon, then Printing preferences > Color options > Select HP Professional PANTONE* Emulation When you use a named PANTONE* color in an image, your software program normally sends a CMYK or RGB approximation to that color to the printer. However, instead of taking the printer or the paper type into account, the software merely produces a generic approximation of the PANTONE* color, that looks different on different printers and on different papers. 116 Chapter 7 Color management
-
 1
1 -
2
-
3
-
4
-
5
-
6
-
7
-
8
-
9
-
10
-
11
-
12
-
13
-
14
-
15
-
16
-
17
-
18
-
19
-
20
-
21
-
22
-
23
-
24
-
25
-
26
-
27
-
28
-
29
-
30
-
31
-
32
-
33
-
34
-
35
-
36
-
37
-
38
-
39
-
40
-
41
-
42
-
43
-
44
-
45
-
46
-
47
-
48
-
49
-
50
-
51
-
52
-
53
-
54
-
55
-
56
-
57
-
58
-
59
-
60
-
61
-
62
-
63
-
64
-
65
-
66
-
67
-
68
-
69
-
70
-
71
-
72
-
73
-
74
-
75
-
76
-
77
-
78
-
79
-
80
-
81
-
82
-
83
-
84
-
85
-
86
-
87
-
88
-
89
-
90
-
91
-
92
-
93
-
94
-
95
-
96
-
97
-
98
-
99
-
100
-
101
-
102
-
103
-
104
-
105
-
106
-
107
-
108
-
109
-
110
-
111
-
112
-
113
-
114
-
115
-
116
-
117
-
118
-
119
-
120
-
121
-
122
-
 123
123 -
 124
124 -
 125
125 -
 126
126 -
 127
127 -
 128
128 -
 129
129 -
 130
130 -
 131
131 -
 132
132 -
 133
133 -
134
-
135
-
136
-
137
-
138
-
139
-
140
-
141
-
142
-
143
-
144
-
145
-
146
-
147
-
148
-
149
-
150
-
151
-
152
-
153
-
154
-
155
-
156
-
157
-
158
-
159
-
160
-
161
-
162
-
163
-
164
-
165
-
166
-
167
-
168
-
169
-
170
-
171
-
172
-
173
-
174
-
175
-
176
-
177
-
178
-
179
-
180
-
181
-
182
-
183
-
184
-
185
-
186
-
187
-
188
-
189
-
190
-
191
-
192
-
193
-
194
-
195
-
196
-
197
-
198
-
199
-
200
-
201
-
202
-
203
-
204
-
205
-
206
-
207
-
208
-
209
-
210
-
211
-
212
-
213
-
214
-
215
-
216
-
217
-
218
-
219
-
220
-
221
-
222
-
223
-
224
-
225
-
226
-
227
-
228
-
229
-
230
-
231
-
232
 |
 |
