HP Z6100ps HP Designjet Z6100 Printer Series - User's Guide - Page 74
Replace printheads
 |
UPC - 882780990135
View all HP Z6100ps manuals
Add to My Manuals
Save this manual to your list of manuals |
Page 74 highlights
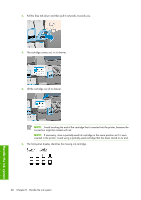
Printhead replacement must be performed after the printer has been turned on with the hard power switch at the back of the printer. 1. On the printer's front panel, select the icon, and then select Replace printheads. 2. The printer moves the carriage into the correct position. CAUTION: If the carriage remains in the removal position for more than 3 minutes without inserting or removing any printheads, it will attempt to return back to its home position to the right. 3. When the carriage has stopped moving, the front panel prompts you to open the printer window. 4. Locate the carriage on the right side of the printer. Handle the ink system 5. Pull up and release the latch on top of the carriage. 62 Chapter 5 Handle the ink system
-
 1
1 -
2
-
3
-
4
-
5
-
6
-
7
-
8
-
9
-
10
-
11
-
12
-
13
-
14
-
15
-
16
-
17
-
18
-
19
-
20
-
21
-
22
-
23
-
24
-
25
-
26
-
27
-
28
-
29
-
30
-
31
-
32
-
33
-
34
-
35
-
36
-
37
-
38
-
39
-
40
-
41
-
42
-
43
-
44
-
45
-
46
-
47
-
48
-
49
-
50
-
51
-
52
-
53
-
54
-
55
-
56
-
57
-
58
-
59
-
60
-
61
-
62
-
63
-
64
-
65
-
66
-
67
-
68
-
 69
69 -
 70
70 -
 71
71 -
 72
72 -
 73
73 -
 74
74 -
 75
75 -
 76
76 -
 77
77 -
 78
78 -
 79
79 -
80
-
81
-
82
-
83
-
84
-
85
-
86
-
87
-
88
-
89
-
90
-
91
-
92
-
93
-
94
-
95
-
96
-
97
-
98
-
99
-
100
-
101
-
102
-
103
-
104
-
105
-
106
-
107
-
108
-
109
-
110
-
111
-
112
-
113
-
114
-
115
-
116
-
117
-
118
-
119
-
120
-
121
-
122
-
123
-
124
-
125
-
126
-
127
-
128
-
129
-
130
-
131
-
132
-
133
-
134
-
135
-
136
-
137
-
138
-
139
-
140
-
141
-
142
-
143
-
144
-
145
-
146
-
147
-
148
-
149
-
150
-
151
-
152
-
153
-
154
-
155
-
156
-
157
-
158
-
159
-
160
-
161
-
162
-
163
-
164
-
165
-
166
-
167
-
168
-
169
-
170
-
171
-
172
-
173
-
174
-
175
-
176
-
177
-
178
-
179
-
180
-
181
-
182
-
183
-
184
-
185
-
186
-
187
-
188
-
189
-
190
-
191
-
192
-
193
-
194
-
195
-
196
-
197
-
198
-
199
-
200
-
201
-
202
-
203
-
204
-
205
-
206
-
207
-
208
-
209
-
210
-
211
-
212
-
213
-
214
-
215
-
216
-
217
-
218
-
219
-
220
-
221
-
222
-
223
-
224
-
225
-
226
-
227
-
228
-
229
-
230
-
231
-
232
 |
 |

Printhead replacement must be performed after the printer has been turned on with the hard power switch
at the back of the printer.
1
.
On the printer's front panel, select the
icon, and then select
Replace printheads
.
2
.
The printer moves the carriage into the correct position.
CAUTION:
If the carriage remains in the removal position for more than 3 minutes without
inserting or removing any printheads, it will attempt to return back to its home position to the
right.
3
.
When the carriage has stopped moving, the front panel prompts you to open the printer window.
4
.
Locate the carriage on the right side of the printer.
5
.
Pull up and release the latch on top of the carriage.
62
Chapter
5
Handle the ink system
Handle the ink system