HP Z6100ps HP Designjet Z6100 Printer Series - User's Guide - Page 49
The normal procedure roll attached to spindle, Roll is detached from spindle, No paper visible
 |
UPC - 882780990135
View all HP Z6100ps manuals
Add to My Manuals
Save this manual to your list of manuals |
Page 49 highlights
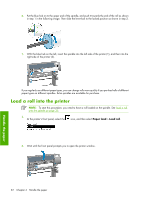
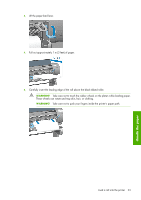
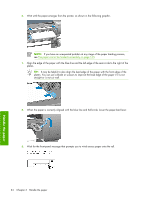
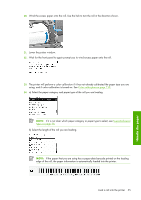
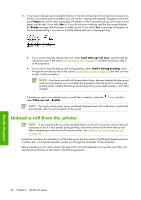
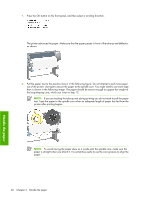
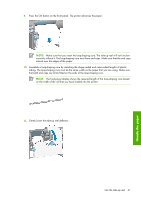
The normal procedure (roll attached to spindle) If the end of the roll is still attached to the spindle, use the following procedure. 1. On the printer's front panel, select the icon, and then select Unload paper. 2. The paper is ejected from the printer. If for some reason the paper is not automatically ejected from the printer, the front-panel display prompts you to lift the paper-load lever and wind the roll by hand until the paper leaves the printer. When you have finished, lower the paper-load lever. 3. Turn the hub by hand, until the paper is fully wound onto the roll. 4. Press the OK button. 5. Remove the roll from the printer, pulling out the right end on the right side of the printer first. Do not insert your fingers into the spindle supports during the removal process. Handle the paper Roll is detached from spindle Use the following procedure if the end of the roll is visible but no longer attached to the spindle: 1. If you have already selected Paper unload at the front panel, press the Cancel button to cancel that procedure. 2. Lift the paper-load lever. If the front panel shows a warning about the lever, ignore it. 3. Pull out the paper from the front of the printer. 4. Remove the empty spindle from the printer, pulling out the end on the right side of the printer first. Do not insert your fingers into the spindle supports during the removal process. 5. Lower the paper-load lever. 6. If the front panel shows a warning message, press the OK button to clear it. No paper visible Use this procedure if the end of the roll has entirely disappeared into the printer: 1. Press the Form Feed and Cut button on the front panel to eject the remaining paper. 2. Remove the empty spindle from the printer, pulling out the end on the right side of the printer first. Do not insert your fingers into the spindle supports during the removal process. Unload a roll from the printer 37
-
 1
1 -
2
-
3
-
4
-
5
-
6
-
7
-
8
-
9
-
10
-
11
-
12
-
13
-
14
-
15
-
16
-
17
-
18
-
19
-
20
-
21
-
22
-
23
-
24
-
25
-
26
-
27
-
28
-
29
-
30
-
31
-
32
-
33
-
34
-
35
-
36
-
37
-
38
-
39
-
40
-
41
-
42
-
43
-
 44
44 -
 45
45 -
 46
46 -
 47
47 -
 48
48 -
 49
49 -
 50
50 -
 51
51 -
 52
52 -
 53
53 -
 54
54 -
55
-
56
-
57
-
58
-
59
-
60
-
61
-
62
-
63
-
64
-
65
-
66
-
67
-
68
-
69
-
70
-
71
-
72
-
73
-
74
-
75
-
76
-
77
-
78
-
79
-
80
-
81
-
82
-
83
-
84
-
85
-
86
-
87
-
88
-
89
-
90
-
91
-
92
-
93
-
94
-
95
-
96
-
97
-
98
-
99
-
100
-
101
-
102
-
103
-
104
-
105
-
106
-
107
-
108
-
109
-
110
-
111
-
112
-
113
-
114
-
115
-
116
-
117
-
118
-
119
-
120
-
121
-
122
-
123
-
124
-
125
-
126
-
127
-
128
-
129
-
130
-
131
-
132
-
133
-
134
-
135
-
136
-
137
-
138
-
139
-
140
-
141
-
142
-
143
-
144
-
145
-
146
-
147
-
148
-
149
-
150
-
151
-
152
-
153
-
154
-
155
-
156
-
157
-
158
-
159
-
160
-
161
-
162
-
163
-
164
-
165
-
166
-
167
-
168
-
169
-
170
-
171
-
172
-
173
-
174
-
175
-
176
-
177
-
178
-
179
-
180
-
181
-
182
-
183
-
184
-
185
-
186
-
187
-
188
-
189
-
190
-
191
-
192
-
193
-
194
-
195
-
196
-
197
-
198
-
199
-
200
-
201
-
202
-
203
-
204
-
205
-
206
-
207
-
208
-
209
-
210
-
211
-
212
-
213
-
214
-
215
-
216
-
217
-
218
-
219
-
220
-
221
-
222
-
223
-
224
-
225
-
226
-
227
-
228
-
229
-
230
-
231
-
232
 |
 |
