JVC DVP9 Instruction Manual - Page 10
GETTING STARTED, Power, Charging The Battery Pack, About Batteries
 |
UPC - 046838161100
View all JVC DVP9 manuals
Add to My Manuals
Save this manual to your list of manuals |
Page 10 highlights
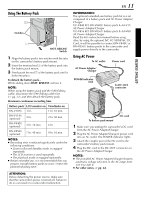
GETTING STARTED 10 EN Power This camcorder's 2-way power supply system lets you choose the most appropriate source of power. Do not use provided power supply units with other equipment. Charging The Battery Pack 1 Make sure you unplug the camcorder's DC cord from the AC Power Adapter/Charger. 2 Plug the AC Power Adapter/Charger's power cord into an AC outlet. The POWER indicator lights. 3 Attach the battery pack with the YZ mark aligned with the corresponding marks on the AC Power Adapter/Charger. The CHARGE indicator begins blinking to indicate charging has started. 4 When the CHARGE indicator stops blinking but stays lit, charging is finished. Remove the battery pack by pushing up the protruding part. 5 Unplug the AC Power Adapter/Charger's power cord from the AC outlet. POWER indicator (red) Battery CHARGE pack indicator (green) Protruding part To AC outlet AC Power Adapter/ Charger DC OUT connector Battery pack BN-V107U BN-V114U (optional) Charging time Approx. 1 hr. 30 min. Approx. 2 hr. ● If the battery operation time remains extremely short even after having been fully charged, the battery is worn out and needs to be replaced. Please purchase a new one. ● For other notes, ੬ pg. 64. About Batteries Lithium-ion is vulnerable in colder temperatures. DANGER! Do not attempt to take the batteries apart, or expose them to flame or excessive heat, as it may cause a fire or explosion. WARNING! Do not allow the battery or its terminals to come in contact with metals, as this can result in a short circuit and possibly start a fire. The Benefits Of Lithium-Ion Batteries Lithium-ion battery packs are small but have a large power capacity. However, when one is exposed to cold temperatures (below 10°C), its usage time becomes shorter and it may cease to function. If this happens, place the battery pack in your pocket or other warm, protected place for a short time, then re-attach it to the camcorder. As long as the battery pack itself is not cold, it should not affect performance. (If you're using a heating pad, make sure the battery pack does not come in direct contact with it.) For other notes, ੬ pg. 64. NOTES: ● If the protective cap is attached to the battery pack, remove it first. ● If you connect the camcorder's DC cord to the AC Power Adapter/Charger during battery charging, power is supplied to the camcorder and charging stops. ● When charging the battery pack for the first time or after a long storage period, the CHARGE indicator may not light. In this case, remove the battery pack from the AC Power Adapter/Charger, then try charging again.
-
 1
1 -
2
-
3
-
4
-
 5
5 -
 6
6 -
 7
7 -
 8
8 -
 9
9 -
 10
10 -
 11
11 -
 12
12 -
 13
13 -
 14
14 -
 15
15 -
16
-
17
-
18
-
19
-
20
-
21
-
22
-
23
-
24
-
25
-
26
-
27
-
28
-
29
-
30
-
31
-
32
-
33
-
34
-
35
-
36
-
37
-
38
-
39
-
40
-
41
-
42
-
43
-
44
-
45
-
46
-
47
-
48
-
49
-
50
-
51
-
52
-
53
-
54
-
55
-
56
-
57
-
58
-
59
-
60
-
61
-
62
-
63
-
64
-
65
-
66
-
67
-
68
-
69
-
70
-
71
-
72
-
73
-
74
-
75
-
76
-
77
-
78
-
79
-
80
-
81
-
82
-
83
-
84
-
85
-
86
-
87
-
88
-
89
-
90
-
91
-
92
-
93
-
94
-
95
-
96
-
97
-
98
-
99
-
100
-
101
-
102
-
103
-
104
-
105
-
106
-
107
-
108
-
109
-
110
-
111
-
112
-
113
-
114
-
115
-
116
-
117
-
118
-
119
-
120
-
121
-
122
-
123
-
124
-
125
-
126
-
127
-
128
-
129
-
130
-
131
-
132
-
133
-
134
-
135
-
136
-
137
-
138
-
139
-
140
-
141
-
142
-
143
-
144
-
145
-
146
-
147
-
148
-
149
-
150
 |
 |
