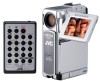
JVC DVP9 Instruction Manual - Page 14
Date/Time Settings, Built-in Clock's Rechargeable Lithium Battery
 |
UPC - 046838161100
View all JVC DVP9 manuals
Add to My Manuals
Save this manual to your list of manuals |
Page 14 highlights
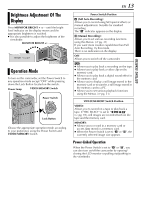
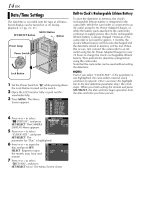
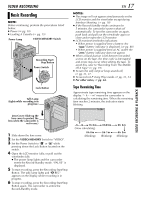
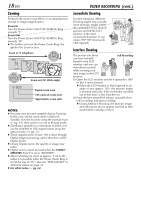
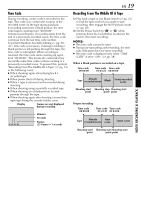
14 EN Date/Time Settings The date/time is recorded onto the tape at all times, but its display can be turned on or off during playback. (੬ pg. 31, 41) MENU Button SET/SELECT Button +, - Button Power Lamp Power Switch Lock Button 1 Set the Power Switch to "M" while pressing down the Lock Button located on the switch. 2 Open the LCD monitor fully, or pull out the viewfinder fully. 3 Press MENU. The Menu Screen appears. WI PE / FADER OF F FADER-WH I TE FADER-B LACK FADER-B .W W I PE-CORNER W I PE-W I NDOW WI PE-SL I DE W I PE-DOOR W I PE- SCROLL WI PE-SHUTTER 4 Press + or - to select "n DISPLAY", and press SET/SELECT. The CAMERA DISPLAY Menu appears. CAMERA DISPLAY ON SCREEN - LCD / T V DATE / T I ME - AUTO T I ME CODE - OFF CLOCK 20 . 12 . 03 ADJ . 17 : 30 5 Press + or - to select "CLOCK ADJ.", and press RETURN SET/SELECT. The parameter for "Day" is highlighted. 6 Press + or - to input the CAMERA DISPLAY day, and press SET/ SELECT. Repeat to input the month, year, hour and CLOCK ADJ . 20 . 12 . 03 17: 30 minute. 7 Press + or - to select RETURN "BRETURN", and press SET/SELECT twice. The Menu Screen closes. Built-in Clock's Rechargeable Lithium Battery To store the date/time in memory, the clock's rechargeable lithium battery is integrated in the camcorder. While the camcorder is connected to an AC outlet using the AC Power Adapter/Charger, or while the battery pack attached to the camcorder continues to supply power, the clock's rechargeable lithium battery is always charged. However, if the camcorder is not used for approx. 3 months, the clock's lithium battery will become discharged and the date/time stored in memory will be lost. When this occurs, first connect the camcorder to an AC outlet using the AC Power Adapter/Charger for over 24 hours to charge the clock's rechargeable lithium battery. Then perform the date/time setting before using the camcorder. Note that the camcorder can be used without setting the date/time. NOTE: Even if you select "CLOCK ADJ.", if the parameter is not highlighted, the camcorder's internal clock continues to operate. Once you move the highlight bar to the first date/time parameter (day), the clock stops. When you finish setting the minute and press SET/SELECT, the date and time begin operation from the date and time you have just set.
-
 1
1 -
2
-
3
-
4
-
5
-
6
-
7
-
8
-
 9
9 -
 10
10 -
 11
11 -
 12
12 -
 13
13 -
 14
14 -
 15
15 -
 16
16 -
 17
17 -
 18
18 -
 19
19 -
20
-
21
-
22
-
23
-
24
-
25
-
26
-
27
-
28
-
29
-
30
-
31
-
32
-
33
-
34
-
35
-
36
-
37
-
38
-
39
-
40
-
41
-
42
-
43
-
44
-
45
-
46
-
47
-
48
-
49
-
50
-
51
-
52
-
53
-
54
-
55
-
56
-
57
-
58
-
59
-
60
-
61
-
62
-
63
-
64
-
65
-
66
-
67
-
68
-
69
-
70
-
71
-
72
-
73
-
74
-
75
-
76
-
77
-
78
-
79
-
80
-
81
-
82
-
83
-
84
-
85
-
86
-
87
-
88
-
89
-
90
-
91
-
92
-
93
-
94
-
95
-
96
-
97
-
98
-
99
-
100
-
101
-
102
-
103
-
104
-
105
-
106
-
107
-
108
-
109
-
110
-
111
-
112
-
113
-
114
-
115
-
116
-
117
-
118
-
119
-
120
-
121
-
122
-
123
-
124
-
125
-
126
-
127
-
128
-
129
-
130
-
131
-
132
-
133
-
134
-
135
-
136
-
137
-
138
-
139
-
140
-
141
-
142
-
143
-
144
-
145
-
146
-
147
-
148
-
149
-
150
 |
 |
