JVC DVP9 Instruction Manual - Page 13
Brightness Adjustment Of The Display, Operation Mode, Power-Linked Operation
 |
UPC - 046838161100
View all JVC DVP9 manuals
Add to My Manuals
Save this manual to your list of manuals |
Page 13 highlights
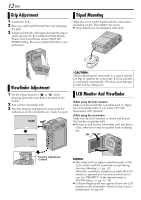
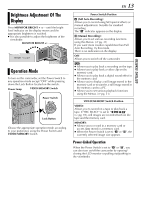
Brightness Adjustment Of The Display Press MONITOR BRIGHT + or - until the bright level indicator on the display moves and the appropriate brightness is reached. ● It is also possible to adjust the brightness of the viewfinder. MONITOR BRIGHT +/- BR I GHT Operation Mode To turn on the camcorder, set the Power Switch to any operation mode except "OFF" while pressing down the Lock Button located on the switch. Power Lamp VIDEO/MEMORY Switch Power Switch Lock Button Choose the appropriate operation mode according to your preference using the Power Switch and VIDEO/MEMORY Switch. EN 13 Power Switch Position A (Full Auto Recording): Allows you to record using NO special effects or manual adjustments. Suitable for standard recording. The "A" indicator appears on the display. M (Manual Recording): Allows you to set various recording functions using the Menus. (੬ pg. 31) If you want more creative capabilities than Full Auto Recording, try this mode. There is no indication on the display. OFF: Allows you to switch off the camcorder. P: ● Allows you to play back a recording on the tape. ● Allows you to play back a video clip on the memory card. ● Allows you to play back a digital sound effect in the memory card. ● Allows you to display a still image stored in the memory card or to transfer a still image stored in the memory card to a PC. ● Allows you to set various playback functions using the Menus. (੬ pg. 31) VIDEO/MEMORY Switch Position VIDEO: Allows you to record on a tape or play back a tape. If "REC SELECT" is set to " /" (੬ pg. 39), still images are recorded both on the tape and the memory card. MEMORY: ● Allows you to record in a memory card or access data stored in a memory card. ● When the Power Switch is set to "A" or "M", the currently selected image size appears. Power-Linked Operation When the Power Switch is set to "A" or "M", you can also turn on/off the camcorder by opening/ closing the LCD monitor or pulling out/pushing in the viewfinder. GETTING STARTED
-
 1
1 -
2
-
3
-
4
-
5
-
6
-
7
-
 8
8 -
 9
9 -
 10
10 -
 11
11 -
 12
12 -
 13
13 -
 14
14 -
 15
15 -
 16
16 -
 17
17 -
 18
18 -
19
-
20
-
21
-
22
-
23
-
24
-
25
-
26
-
27
-
28
-
29
-
30
-
31
-
32
-
33
-
34
-
35
-
36
-
37
-
38
-
39
-
40
-
41
-
42
-
43
-
44
-
45
-
46
-
47
-
48
-
49
-
50
-
51
-
52
-
53
-
54
-
55
-
56
-
57
-
58
-
59
-
60
-
61
-
62
-
63
-
64
-
65
-
66
-
67
-
68
-
69
-
70
-
71
-
72
-
73
-
74
-
75
-
76
-
77
-
78
-
79
-
80
-
81
-
82
-
83
-
84
-
85
-
86
-
87
-
88
-
89
-
90
-
91
-
92
-
93
-
94
-
95
-
96
-
97
-
98
-
99
-
100
-
101
-
102
-
103
-
104
-
105
-
106
-
107
-
108
-
109
-
110
-
111
-
112
-
113
-
114
-
115
-
116
-
117
-
118
-
119
-
120
-
121
-
122
-
123
-
124
-
125
-
126
-
127
-
128
-
129
-
130
-
131
-
132
-
133
-
134
-
135
-
136
-
137
-
138
-
139
-
140
-
141
-
142
-
143
-
144
-
145
-
146
-
147
-
148
-
149
-
150
 |
 |
