JVC DVP9 Instruction Manual - Page 27
Protecting Files, To Remove Protection
 |
UPC - 046838161100
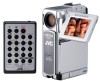
View all JVC DVP9 manuals
Add to My Manuals
Save this manual to your list of manuals |
Page 27 highlights
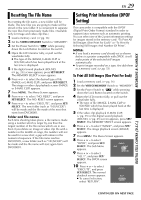
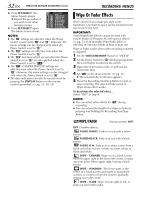
RECORDING & PLAYBACK Protecting Files The Protect mode helps prevent the accidental erasure of files. VIDEO/MEMORY Switch Power Switch Lock Button SHUTTLE SEARCH Ring (3/5) MENU Button SET/SELECT Button +, - Button 1 Load a memory card. (੬ pg. 16) 2 Set the VIDEO/MEMORY Switch to "MEMORY". 3 Set the Power Switch to "P" while pressing down the Lock Button located on the switch. 4 Open the LCD monitor fully, or pull out the viewfinder fully. ● The type of file (IMAGE, E-MAIL CLIP or SOUND) which has been played back at the last time is displayed. If you want to select another type of file, go to step 5. If not, go to step 7. 5 Press SET/SELECT. The MEMORY SELECT screen appears. 6 Press + or - to select the desired type of file, and press SET/SELECT. 7 Press MENU. The Menu Screen appears. 8 Press + or - to select "PROTECT", and press SET/SELECT. The Sub Menu appears. MENU PROT EC T DELETE DPOF NO . RESET FORMAT D I SPLAY END EN 27 To protect the currently displayed file 9 Press + or - to select "CURRENT", and press SET/SELECT. The PROTECT screen appears. 10 Turn the SHUTTLE MENU PROTECT CURRENT PROT . AL L CANC . ALL RETURN SEARCH Ring to the left (3) or to the right (5) to select the desired file. 11 Press + or - to select "EXECUTE", and press PROT EC T SET/SELECT. ● To cancel protection, PROT EC T ED select "RETURN". ● Repeat steps 10 and 11 RETURN for all files you want to protect. To protect all files stored in the memory card 9 Press + or - to select "PROT.ALL", and press SET/ SELECT. The PROTECT screen appears. 10 Press + or - to select "EXECUTE", and press SET/SELECT. ● To cancel protection, select "RETURN". NOTES: ● If the " " mark appears, the currently displayed file is protected. ● When the memory card is initialised or corrupted, even protected files are deleted. If you do not want to lose important files, transfer them to a PC and save them. To Remove Protection Before doing the following, perform steps 1 - 8 in "Protecting Files" in the left column. To remove protection from the currently displayed file 9 Press + or - to select "CURRENT", and press SET/ SELECT. The PROTECT screen appears. 10 Turn the SHUTTLE SEARCH Ring to the left (3) or to the right (5) to select the desired file. 11 Press + or - to select "EXECUTE", and press SET/SELECT. ● To cancel selection, select "RETURN". ● Repeat steps 10 and 11 for all files you want to remove protection. DIGITAL STILL CAMERA (D.S.C.) CONTINUED ON NEXT PAGE
-
 1
1 -
2
-
3
-
4
-
5
-
6
-
7
-
8
-
9
-
10
-
11
-
12
-
13
-
14
-
15
-
16
-
17
-
18
-
19
-
20
-
21
-
 22
22 -
 23
23 -
 24
24 -
 25
25 -
 26
26 -
 27
27 -
 28
28 -
 29
29 -
 30
30 -
 31
31 -
 32
32 -
33
-
34
-
35
-
36
-
37
-
38
-
39
-
40
-
41
-
42
-
43
-
44
-
45
-
46
-
47
-
48
-
49
-
50
-
51
-
52
-
53
-
54
-
55
-
56
-
57
-
58
-
59
-
60
-
61
-
62
-
63
-
64
-
65
-
66
-
67
-
68
-
69
-
70
-
71
-
72
-
73
-
74
-
75
-
76
-
77
-
78
-
79
-
80
-
81
-
82
-
83
-
84
-
85
-
86
-
87
-
88
-
89
-
90
-
91
-
92
-
93
-
94
-
95
-
96
-
97
-
98
-
99
-
100
-
101
-
102
-
103
-
104
-
105
-
106
-
107
-
108
-
109
-
110
-
111
-
112
-
113
-
114
-
115
-
116
-
117
-
118
-
119
-
120
-
121
-
122
-
123
-
124
-
125
-
126
-
127
-
128
-
129
-
130
-
131
-
132
-
133
-
134
-
135
-
136
-
137
-
138
-
139
-
140
-
141
-
142
-
143
-
144
-
145
-
146
-
147
-
148
-
149
-
150
 |
 |
