JVC DVP9 Instruction Manual - Page 126
Creating a slide show or an animation, Select either [Slide Show] or [Animation], which
 |
UPC - 046838161100
View all JVC DVP9 manuals
Add to My Manuals
Save this manual to your list of manuals |
Page 126 highlights
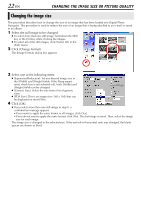
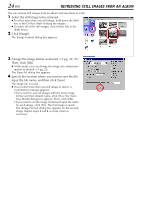
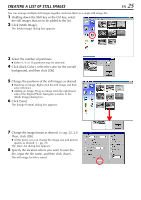
26 EN CREATING A SLIDE SHOW OR AN ANIMATION You can create a slide show or an animation in which a series of still images are displayed, and then save those images as a movie file (extension ".avi"). [Slide Show]: Still images are displayed for several seconds each, one at a time. [Animation]: Several still images are displayed per second. We recommend that you select a series of still images that create the appearance of continuous movement. 1 Holding down the Shift key or the Ctrl key, select several still images. 2 Click [Movie]. The [Movie Settings] dialog box appears. 3 Select either [Slide Show] or [Animation], which ever is desired. ● For a slide show, set the length of the interval (in seconds). ● For an animation, set the number of displayed frames (images) per second. 4 Set the following items when necessary. ● [Image Size]: Select the size of the movie file. ● [Compressor]: Select the type of compressor. ● [Back Color]: This item is used if the aspect ratio of the images is not 4:3. 5 Click [OK]. The [Save As] dialog box appears. 6 Specify the location where you want to save the file, input the file name, and then click [Save]. ● The file name can be changed. The movie file is saved, and a confirmation message that asks if you want to play the movie now appears. 7 Click [Yes]. The movie file is played back. NOTES: ● If you change the [Compressor] item, make sure that the playback system supports that type of compressor. ● Depending on the selected type for [Compressor], a movie file cannot be created. ● In some cases, the settings in the [Video Compression] dialog box are invalid.
-
 1
1 -
2
-
3
-
4
-
5
-
6
-
7
-
8
-
9
-
10
-
11
-
12
-
13
-
14
-
15
-
16
-
17
-
18
-
19
-
20
-
21
-
22
-
23
-
24
-
25
-
26
-
27
-
28
-
29
-
30
-
31
-
32
-
33
-
34
-
35
-
36
-
37
-
38
-
39
-
40
-
41
-
42
-
43
-
44
-
45
-
46
-
47
-
48
-
49
-
50
-
51
-
52
-
53
-
54
-
55
-
56
-
57
-
58
-
59
-
60
-
61
-
62
-
63
-
64
-
65
-
66
-
67
-
68
-
69
-
70
-
71
-
72
-
73
-
74
-
75
-
76
-
77
-
78
-
79
-
80
-
81
-
82
-
83
-
84
-
85
-
86
-
87
-
88
-
89
-
90
-
91
-
92
-
93
-
94
-
95
-
96
-
97
-
98
-
99
-
100
-
101
-
102
-
103
-
104
-
105
-
106
-
107
-
108
-
109
-
110
-
111
-
112
-
113
-
114
-
115
-
116
-
117
-
118
-
119
-
120
-
 121
121 -
 122
122 -
 123
123 -
 124
124 -
 125
125 -
 126
126 -
 127
127 -
 128
128 -
 129
129 -
 130
130 -
 131
131 -
132
-
133
-
134
-
135
-
136
-
137
-
138
-
139
-
140
-
141
-
142
-
143
-
144
-
145
-
146
-
147
-
148
-
149
-
150
 |
 |
