JVC DVP9 Instruction Manual - Page 29
Resetting The File Name, Setting Print Information (DPOF Setting)
 |
UPC - 046838161100
View all JVC DVP9 manuals
Add to My Manuals
Save this manual to your list of manuals |
Page 29 highlights
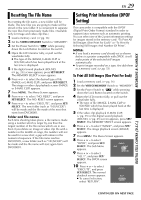
RECORDING & PLAYBACK EN 29 Resetting The File Name By resetting the file name, a new folder will be made. The new files you are going to make will be stored in the new folder. It is convenient to separate the new files from previously made files. (Available only for Image and video clip files.) 1 Load a memory card. (੬ pg. 16) 2 Set the VIDEO/MEMORY Switch to "MEMORY". 3 Set the Power Switch to "P" while pressing down the Lock Button located on the switch. 4 Open the LCD monitor fully, or pull out the viewfinder fully. ● The type of file (IMAGE, E-MAIL CLIP or SOUND) which has been played back at the last time is displayed. 5 If the digital sound playback (SOUND, (੬ pg. 25)) screen appears, press SET/SELECT. The MEMORY SELECT screen appears. 6 Press + or - to select the desired type of file (IMAGE or E-MAIL CLIP), and press SET/SELECT. The image or video clip playback screen (IMAGE or E-MAIL CLIP) appears. 7 Press MENU. The Menu Screen appears. 8 Press + or - to select "NO. RESET", and press SET/SELECT. The NO. RESET screen appears. 9 Press + or - to select "EXECUTE", and press SET/ SELECT. The new folder (such as "101JVCGR") will be made and the file made of the next shot starts from DVC00001. Folder and File names Each time shooting takes place, a file name is made using a number which is larger by one than the largest number of the file names which are in use. Even if you delete an image or video clip file with a number in the middle of range, the number will not be used for a new shot; a gap will remain in the numerical sequence. If the file name reaches DVC09999, a new folder (such as "101JVCGR") will be made and the file name will start again from DVC00001. Setting Print Information (DPOF Setting) This camcorder is compatible with the DPOF (Digital Print Order Format) standard in order to support future systems such as automatic printing. You can select one of the 2 print information settings for images stored in the memory card: "To Print All Still Images (One Print For Each)" or "To Print By Selecting Still Images And Number Of Prints". NOTES: ● If you load a memory card already set as shown below in a printer compatible with DPOF, it will make prints of the selected still images automatically. ● To print images recorded on a tape, first dub them to a memory card. (੬ pg. 53) To Print All Still Images (One Print For Each) 1 Load a memory card. (੬ pg. 16) 2 Set the VIDEO/MEMORY Switch to "MEMORY". 3 Set the Power Switch to "P" while pressing down the Lock Button located on the switch. 4 Open the LCD monitor fully, or pull out the viewfinder fully. ● The type of file (IMAGE, E-MAIL CLIP or SOUND) which has been played back at the last time is displayed. 5 If the video clip playback (E-MAIL CLIP, ੬ pg. 25) or the digital sound playback (SOUND, ੬ pg. 25) screen appears, press SET/ SELECT. The MEMORY SELECT screen appears. 6 Press + or - to select "IMAGE", and press SET/ SELECT. The image playback screen (IMAGE) appears. 7 Press MENU. The Menu Screen appears. 8 Press + or - to select "DPOF", and press SET/ MENU SELECT. The Sub Menu appears. 9 Press + or - to select DPOF CURRENT ALL 1 RESET RETURN "ALL 1", and press SET/ SELECT. The DPOF screen appears. 10 Press + or - to select "EXECUTE", and press DPOF SET/SELECT. The normal playback screen appears. ALL1? ● To cancel selection, select "RETURN". EXECUTE RETURN DIGITAL STILL CAMERA (D.S.C.) CONTINUED ON NEXT PAGE
-
 1
1 -
2
-
3
-
4
-
5
-
6
-
7
-
8
-
9
-
10
-
11
-
12
-
13
-
14
-
15
-
16
-
17
-
18
-
19
-
20
-
21
-
22
-
23
-
 24
24 -
 25
25 -
 26
26 -
 27
27 -
 28
28 -
 29
29 -
 30
30 -
 31
31 -
 32
32 -
 33
33 -
 34
34 -
35
-
36
-
37
-
38
-
39
-
40
-
41
-
42
-
43
-
44
-
45
-
46
-
47
-
48
-
49
-
50
-
51
-
52
-
53
-
54
-
55
-
56
-
57
-
58
-
59
-
60
-
61
-
62
-
63
-
64
-
65
-
66
-
67
-
68
-
69
-
70
-
71
-
72
-
73
-
74
-
75
-
76
-
77
-
78
-
79
-
80
-
81
-
82
-
83
-
84
-
85
-
86
-
87
-
88
-
89
-
90
-
91
-
92
-
93
-
94
-
95
-
96
-
97
-
98
-
99
-
100
-
101
-
102
-
103
-
104
-
105
-
106
-
107
-
108
-
109
-
110
-
111
-
112
-
113
-
114
-
115
-
116
-
117
-
118
-
119
-
120
-
121
-
122
-
123
-
124
-
125
-
126
-
127
-
128
-
129
-
130
-
131
-
132
-
133
-
134
-
135
-
136
-
137
-
138
-
139
-
140
-
141
-
142
-
143
-
144
-
145
-
146
-
147
-
148
-
149
-
150
 |
 |
