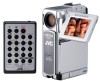
JVC DVP9 Instruction Manual - Page 41
FEATURES FOR RECORDING, Snapshot (For Video Recording), PLAYBACK MENUS cont.
 |
UPC - 046838161100
View all JVC DVP9 manuals
Add to My Manuals
Save this manual to your list of manuals |
Page 41 highlights
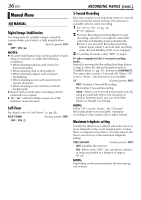
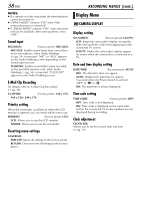
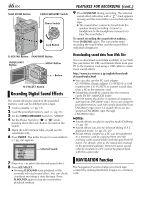
ADVANCED FEATURES PLAYBACK MENUS (cont.) FEATURES FOR RECORDING EN 41 Display Menu Snapshot (For Video Recording) VIDEO DISPLAY The parameters (except "OFF" in ON SCREEN settings) are the same as in the description on page 38. ON SCREEN (Factory-preset: LCD) OFF / LCD / LCD/TV When set to "OFF", the camcorder's display disappears. DATE/TIME (Factory-preset: OFF) OFF / AUTO / ON When set to "AUTO", the date/time are displayed in the following cases: • When playback starts. The camcorder displays the date/time when scenes are recorded. • When the date is changed during playback. TIME CODE OFF / ON (Factory-preset: OFF) NOTE: The date indication can also be turned on/off by pressing the DISPLAY Button on the remote control (provided). (੬ pg. 22, 50, 59) Display 12b i t / SOUND1 L ON SCREEN Setting: 4 For playback sound, tape speed and tape running during video playback. DATE/TIME Setting: For date/time. 12 : 34 : 24 25 . 12 .03 17 :30 TIME CODE Setting: For time code. Minutes Seconds Frames* * 25 frames = 1 second MENU Button SET/SELECT Button +, - Button VIDEO/MEMORY Switch SNAPSHOT Button Power Switch Lock Button This feature lets you record still images that look like photographs onto a tape. 1 Set the VIDEO/MEMORY Switch to "VIDEO". 2 Set the Power Switch to "M" while pressing down the Lock Button located on the switch. 3 Open the LCD monitor fully, or pull out the viewfinder fully. 4 Set "SNAP MODE" to the desired mode. (੬ pg. 31, 35) 5 Press SNAPSHOT. ● The "O" indication appears and a still image will be recorded for approx. 6 seconds, then the camcorder re-enters the RecordStandby mode. ● You can perform Snapshot also during recording. A still image will be recorded for approx. 6 seconds, then the normal recording resumes. ● Regardless of the Power Switch position ("A" or "M"), Snapshot recording takes place using the selected Snapshot mode. NOTES: ● To remove the shutter sound, refer to "BEEP" on page 37. CONTINUED ON NEXT PAGE
-
 1
1 -
2
-
3
-
4
-
5
-
6
-
7
-
8
-
9
-
10
-
11
-
12
-
13
-
14
-
15
-
16
-
17
-
18
-
19
-
20
-
21
-
22
-
23
-
24
-
25
-
26
-
27
-
28
-
29
-
30
-
31
-
32
-
33
-
34
-
35
-
 36
36 -
 37
37 -
 38
38 -
 39
39 -
 40
40 -
 41
41 -
 42
42 -
 43
43 -
 44
44 -
 45
45 -
 46
46 -
47
-
48
-
49
-
50
-
51
-
52
-
53
-
54
-
55
-
56
-
57
-
58
-
59
-
60
-
61
-
62
-
63
-
64
-
65
-
66
-
67
-
68
-
69
-
70
-
71
-
72
-
73
-
74
-
75
-
76
-
77
-
78
-
79
-
80
-
81
-
82
-
83
-
84
-
85
-
86
-
87
-
88
-
89
-
90
-
91
-
92
-
93
-
94
-
95
-
96
-
97
-
98
-
99
-
100
-
101
-
102
-
103
-
104
-
105
-
106
-
107
-
108
-
109
-
110
-
111
-
112
-
113
-
114
-
115
-
116
-
117
-
118
-
119
-
120
-
121
-
122
-
123
-
124
-
125
-
126
-
127
-
128
-
129
-
130
-
131
-
132
-
133
-
134
-
135
-
136
-
137
-
138
-
139
-
140
-
141
-
142
-
143
-
144
-
145
-
146
-
147
-
148
-
149
-
150
 |
 |
