JVC DVP9 Instruction Manual - Page 138
Creating A Video Cd Cont
 |
UPC - 046838161100
View all JVC DVP9 manuals
Add to My Manuals
Save this manual to your list of manuals |
Page 138 highlights
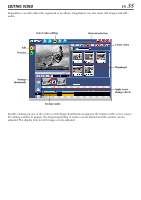
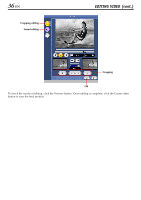
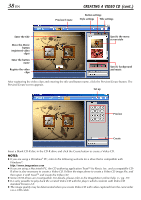
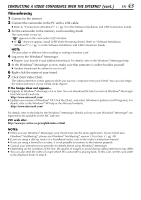
38 EN Preview/Create CREATING A VIDEO CD (cont.) Button settings Style settings Title settings Enter the title Move the Movie button (registered video clips) Enter the button name Register the video clips Specify the menu screen style Specify background and music After registering the video clips and entering the title and button name, click the Preview/Create button. The Preview/Create screen appears. Set up Preview Create Insert a blank CD-R disc in the CD-R drive and click the Create button to create a Video CD. NOTES: ● If you are using a Windows® PC, refer to the following web site for a drive that is compatible with Windows®: http://www.imagemixer.com ● If you are using a Macintosh PC, the CD authoring application Toast™ by Roxio, Inc. and a compatible CDR drive is also necessary to create a Video CD. Follow the steps above to create a Video CD image file, and then open it with ToastTM and create the Video CD. ● Some CD-R drives are incompatible. For details, please refer to the ImageMixer online help. (੬ pg. 29) ● It is only possible to play back the created Video CD with the player which conform with Video CD standard Version 2.0. ● The image quality may be deteriorated when you create Video CD with video captured from the camcorder via a USB cable.
-
 1
1 -
2
-
3
-
4
-
5
-
6
-
7
-
8
-
9
-
10
-
11
-
12
-
13
-
14
-
15
-
16
-
17
-
18
-
19
-
20
-
21
-
22
-
23
-
24
-
25
-
26
-
27
-
28
-
29
-
30
-
31
-
32
-
33
-
34
-
35
-
36
-
37
-
38
-
39
-
40
-
41
-
42
-
43
-
44
-
45
-
46
-
47
-
48
-
49
-
50
-
51
-
52
-
53
-
54
-
55
-
56
-
57
-
58
-
59
-
60
-
61
-
62
-
63
-
64
-
65
-
66
-
67
-
68
-
69
-
70
-
71
-
72
-
73
-
74
-
75
-
76
-
77
-
78
-
79
-
80
-
81
-
82
-
83
-
84
-
85
-
86
-
87
-
88
-
89
-
90
-
91
-
92
-
93
-
94
-
95
-
96
-
97
-
98
-
99
-
100
-
101
-
102
-
103
-
104
-
105
-
106
-
107
-
108
-
109
-
110
-
111
-
112
-
113
-
114
-
115
-
116
-
117
-
118
-
119
-
120
-
121
-
122
-
123
-
124
-
125
-
126
-
127
-
128
-
129
-
130
-
131
-
132
-
 133
133 -
 134
134 -
 135
135 -
 136
136 -
 137
137 -
 138
138 -
 139
139 -
 140
140 -
 141
141 -
 142
142 -
 143
143 -
144
-
145
-
146
-
147
-
148
-
149
-
150
 |
 |
