JVC DVP9 Instruction Manual - Page 49
To make video clips from real-time camera, image, To make video clips from recorded video, footage
 |
UPC - 046838161100
View all JVC DVP9 manuals
Add to My Manuals
Save this manual to your list of manuals |
Page 49 highlights
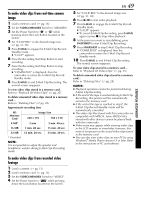
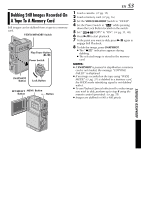
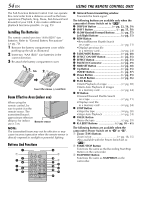
To make video clips from real-time camera image 1 Load a memory card. (੬ pg. 16) 2 Set the VIDEO/MEMORY Switch to "MEMORY". 3 Set the Power Switch to "A" or "M" while pressing down the Lock Button located on the switch. 4 Set "E-CLIP REC" to the desired image size. (੬ pg. 31, 38) 5 Press E-MAIL to engage the E-Mail Clip Record- Standby mode. ● "E-CLIP" appears. 6 Press the Recording Start/Stop Button to start recording. 7 Press the Recording Start/Stop Button to stop recording. ● "COMPLETED" is displayed, then the camcorder re-enters the E-Mail Clip RecordStandby mode. 8 Press E-MAIL to end E-Mail Clip Recording. The normal screen reappears. To view video clips stored in a memory card... Refer to "Playback Of Video Clips" (੬ pg. 25). To delete unwanted video clips stored in a memory card... Refer to "Deleting Files" (੬ pg. 28). Approximate recording time SD Memory Card Image Size 240 x 176 160 x 120 8 MB* 2 min. 5 min. 40 sec. 16 MB 5 min. 40 sec. 15 min. 40 sec. 32 MB 12 min. 20 sec. 33 min. 20 sec. * Provided NOTE: It is not possible to adjust the speaker and headphone volume during E-Mail Clip Recording mode. To make video clips from recorded video footage 1 Load a cassette. (੬ pg. 15) 2 Load a memory card. (੬ pg. 16) 3 Set the VIDEO/MEMORY Switch to "VIDEO". 4 Set the Power Switch to "P" while pressing down the Lock Button located on the switch. EN 49 5 Set "E-CLIP REC" to the desired image size. (੬ pg. 31, 38) 6 Press 4/9 to start video playback. 7 Press E-MAIL to engage the E-Mail Clip Record- Standby mode. ● "E-CLIP" appears. ● To cancel E-Mail Clip Recording, press E-MAIL again or press 8 to stop video playback. 8 At the point you want to start dubbing, press SNAPSHOT to start E-Mail Clip Recording. 9 Press SNAPSHOT to stop E-Mail Clip Recording. ● "COMPLETED" is displayed, then the camcorder re-enters the E-Mail Clip RecordStandby mode. 10 Press E-MAIL to end E-Mail Clip Recording. The normal screen reappears. To view video clips stored in a memory card... Refer to "Playback Of Video Clips" (੬ pg. 25). To delete unwanted video clips stored in a memory card... Refer to "Deleting Files" (੬ pg. 28). NOTES: ● Playback operation cannot be performed during E-Mail Clip Recording. ● If the end of the tape is reached during E-Mail Clip Recording, that portion will be automatically stored in the memory card. ● If the end of the tape is reached in step 7, the E-Mail Clip Record-Standby mode will be automatically cancelled. ● The video clip files stored with this camcorder are compatible with MPEG4. Some MPEG4 files stored with other devices cannot be played back with this camcorder. ● Video noise may appear while viewing video clips in the LCD monitor or viewfinder, however, this noise is not present in the actual video clips stored in the memory card. ● You can also view video clips on your PC by using Windows® Media Player version 6.4 or later. Refer to the instructions of PC and software. ADVANCED FEATURES
-
 1
1 -
2
-
3
-
4
-
5
-
6
-
7
-
8
-
9
-
10
-
11
-
12
-
13
-
14
-
15
-
16
-
17
-
18
-
19
-
20
-
21
-
22
-
23
-
24
-
25
-
26
-
27
-
28
-
29
-
30
-
31
-
32
-
33
-
34
-
35
-
36
-
37
-
38
-
39
-
40
-
41
-
42
-
43
-
 44
44 -
 45
45 -
 46
46 -
 47
47 -
 48
48 -
 49
49 -
 50
50 -
 51
51 -
 52
52 -
 53
53 -
 54
54 -
55
-
56
-
57
-
58
-
59
-
60
-
61
-
62
-
63
-
64
-
65
-
66
-
67
-
68
-
69
-
70
-
71
-
72
-
73
-
74
-
75
-
76
-
77
-
78
-
79
-
80
-
81
-
82
-
83
-
84
-
85
-
86
-
87
-
88
-
89
-
90
-
91
-
92
-
93
-
94
-
95
-
96
-
97
-
98
-
99
-
100
-
101
-
102
-
103
-
104
-
105
-
106
-
107
-
108
-
109
-
110
-
111
-
112
-
113
-
114
-
115
-
116
-
117
-
118
-
119
-
120
-
121
-
122
-
123
-
124
-
125
-
126
-
127
-
128
-
129
-
130
-
131
-
132
-
133
-
134
-
135
-
136
-
137
-
138
-
139
-
140
-
141
-
142
-
143
-
144
-
145
-
146
-
147
-
148
-
149
-
150
 |
 |
