JVC DVP9 Instruction Manual - Page 143
Videoconferencing, Click [Start Video Chat].
 |
UPC - 046838161100
View all JVC DVP9 manuals
Add to My Manuals
Save this manual to your list of manuals |
Page 143 highlights
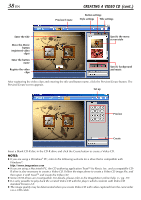
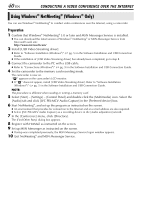
CONDUCTING A VIDEO CONFERENCE OVER THE INTERNET (cont.) EN 43 Videoconferencing 1 Connect to the internet. 2 Connect the camcorder to the PC with a USB cable. ● Refer to "Connections (Windows®)" (੬ pg. 9) in the Software Installation and USB Connection Guide. 3 Set the camcorder to the memory card recording mode. The camcorder is now on. " " appears on the camcorder's LCD monitor. ● If " " does not appear, install [USB Video Streaming driver]. Refer to "Software Installation (Windows®)" (੬ pg. 5) in the Software Installation and USB Connection Guide. NOTE: The procedure is different when reading or writing a memory card. 4 Log on to the Windows® Messenger. ● Register your friend's e-mail address beforehand. For details, refer to the Windows® Messenger help. 5 In the Windows® Messenger screen, make sure that someone is online besides yourself. ● Another friend must be online for you to call. 6 Right-click the name of your friend. 7 Click [Start Video Chat]. The videoconference screen appears while you wait for a response from your friend. You can now begin the videoconference if your friend clicks [Agree]. If the Image does not appear... ● Upgrade to Windows® Messenger 4.6 or later. You can download the latest version of Windows® Messenger from Microsoft's web site. http://www.microsoft.com/ ● Update your version of Windows® XP. Click the [Start], and select [Windows Update] in [All Programs]. For details, refer to the Windows® XP help or the Microsoft website. http://www.microsoft.com/ For details, refer to the help for the Windows® Messenger. Details on how to uses Windows® Messenger® are expected to be available on the JVC web site. JVC web site: http://www.jvc-victor.co.jp/english/index-e.html NOTES: ● When you use Windows® Messenger, your friend must use the same application. If your friend uses Windows® NetMeeting®, please use Windows® NetMeeting® version 3.0 or later. (੬ pg. 40) ● If you are using a dial-up router or a broadband router, refer to the router's instruction manual. ● If you are using a firewall or a router, it is not possible to connect to the internet properly. ● Consult your Internet service provider for details before using Windows® Messenger. ● Depending on the condition of the line, the quality of images or sound during videoconferences may differ. ● You can also send the video of a tape which the camcorder is playing back. In this case, set the camcorder to the playback mode in step 3.
-
 1
1 -
2
-
3
-
4
-
5
-
6
-
7
-
8
-
9
-
10
-
11
-
12
-
13
-
14
-
15
-
16
-
17
-
18
-
19
-
20
-
21
-
22
-
23
-
24
-
25
-
26
-
27
-
28
-
29
-
30
-
31
-
32
-
33
-
34
-
35
-
36
-
37
-
38
-
39
-
40
-
41
-
42
-
43
-
44
-
45
-
46
-
47
-
48
-
49
-
50
-
51
-
52
-
53
-
54
-
55
-
56
-
57
-
58
-
59
-
60
-
61
-
62
-
63
-
64
-
65
-
66
-
67
-
68
-
69
-
70
-
71
-
72
-
73
-
74
-
75
-
76
-
77
-
78
-
79
-
80
-
81
-
82
-
83
-
84
-
85
-
86
-
87
-
88
-
89
-
90
-
91
-
92
-
93
-
94
-
95
-
96
-
97
-
98
-
99
-
100
-
101
-
102
-
103
-
104
-
105
-
106
-
107
-
108
-
109
-
110
-
111
-
112
-
113
-
114
-
115
-
116
-
117
-
118
-
119
-
120
-
121
-
122
-
123
-
124
-
125
-
126
-
127
-
128
-
129
-
130
-
131
-
132
-
133
-
134
-
135
-
136
-
137
-
 138
138 -
 139
139 -
 140
140 -
 141
141 -
 142
142 -
 143
143 -
 144
144 -
 145
145 -
 146
146 -
 147
147 -
 148
148 -
149
-
150
 |
 |