JVC DVP9 Instruction Manual - Page 68
Other Problems, Symptom, Possible Causes, Corrective Action
 |
UPC - 046838161100
View all JVC DVP9 manuals
Add to My Manuals
Save this manual to your list of manuals |
Page 68 highlights
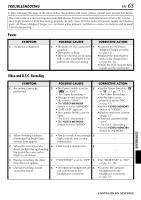
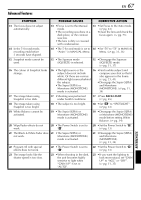
68 EN Other problems TROUBLESHOOTING (cont.) SYMPTOM POSSIBLE CAUSES CORRECTIVE ACTION 24. The CHARGE indicator on the 24. • The temperature of the 24. • To protect the battery, it is AC Power Adapter/Charger battery is extremely high/low. recommended to charge it in does not light. • Charging is difficult in places places with a temperature of subject to extremely high/ 10°C to 35°C. (੬ pg. 70) low temperatures. 25. "SET DATE/TIME!" appears. 25. • The built-in clock's rechargeable lithium battery is discharged. • The previously set date/time is erased. 25. • Connect the camcorder to an AC outlet using the AC Power Adapter/Charger for over 24 hours to charge the clock's lithium battery. (੬ pg. 14) 26. There is no picture. 26. • The camcorder is not getting 26. • Turn the camcorder's power power, or some other off and on again. (੬ pg. 13) malfunction exists. 27. Some functions are not available using the MENU Button. 27. • The Power Switch is set to "A". 27. • Set the Power Switch to "M". (੬ pg. 13) 28. Files stored in the memory card cannot be deleted. 28. • Files stored in the memory card are protected. 28. • Remove protection from the files stored in the memory card and delete them. (੬ pg. 27 -28) 29. When the image is printed from the printer, a black bar appears at the bottom of the screen. 29. • This is not a malfunction. 29. • By recording with "DIS" activated (੬ pg. 31, 36) this can be avoided. 30. When the camcorder is 30. • The DV cable was plugged/ connected via the DV unplugged with power connector, the camcorder does turned on. not operate. 30. • Turn the camcorder's power off and on again, then operate it. 31. The rear of the LCD monitor is 31. • The light used to illuminate 31. • Close the LCD monitor to hot. the LCD monitor causes it to turn it off or set the Power become hot. Switch to "OFF", and let the unit cool down. 32. Images on the LCD monitor appear dark or whitish. 32. • In places subject to high 32. • Adjust the brightness and temperature, images become angle of the LCD monitor. dark due to the (੬ pg. 12, 13) characteristics of the LCD monitor. When this happens, the displayed colours differ from those that are actually recorded. This is not a defect of the camcorder. • When the LCD monitor's LED light reaches the end of its service life, images on the LCD monitor become dark. Consult your nearest JVC dealer.
-
 1
1 -
2
-
3
-
4
-
5
-
6
-
7
-
8
-
9
-
10
-
11
-
12
-
13
-
14
-
15
-
16
-
17
-
18
-
19
-
20
-
21
-
22
-
23
-
24
-
25
-
26
-
27
-
28
-
29
-
30
-
31
-
32
-
33
-
34
-
35
-
36
-
37
-
38
-
39
-
40
-
41
-
42
-
43
-
44
-
45
-
46
-
47
-
48
-
49
-
50
-
51
-
52
-
53
-
54
-
55
-
56
-
57
-
58
-
59
-
60
-
61
-
62
-
 63
63 -
 64
64 -
 65
65 -
 66
66 -
 67
67 -
 68
68 -
 69
69 -
 70
70 -
 71
71 -
 72
72 -
 73
73 -
74
-
75
-
76
-
77
-
78
-
79
-
80
-
81
-
82
-
83
-
84
-
85
-
86
-
87
-
88
-
89
-
90
-
91
-
92
-
93
-
94
-
95
-
96
-
97
-
98
-
99
-
100
-
101
-
102
-
103
-
104
-
105
-
106
-
107
-
108
-
109
-
110
-
111
-
112
-
113
-
114
-
115
-
116
-
117
-
118
-
119
-
120
-
121
-
122
-
123
-
124
-
125
-
126
-
127
-
128
-
129
-
130
-
131
-
132
-
133
-
134
-
135
-
136
-
137
-
138
-
139
-
140
-
141
-
142
-
143
-
144
-
145
-
146
-
147
-
148
-
149
-
150
 |
 |
