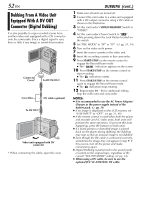
JVC DVP9 Instruction Manual - Page 54
USING THE REMOTE CONTROL UNIT, Installing The Batteries, Beam Effective Area indoor use
 |
UPC - 046838161100
View all JVC DVP9 manuals
Add to My Manuals
Save this manual to your list of manuals |
Page 54 highlights
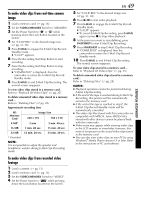
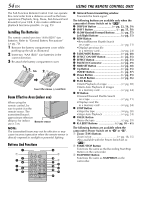
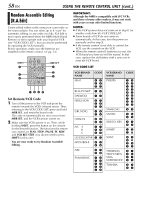
54 EN The Full-Function Remote Control Unit can operate this camcorder from a distance as well as the basic operations (Playback, Stop, Pause, Fast-Forward and Rewind) of your VCR. It also makes additional playback functions possible. (੬ pg. 55) Installing The Batteries The remote control uses two "AAA (R03)" size batteries. Refer to "General Battery Precautions" (੬ pg. 70). 1 Remove the battery compartment cover while pushing up the tab as illustrated. 2 Insert two "AAA (R03)" size batteries in the correct direction. 3 Re-attach the battery compartment cover. 1 3 Tab 2+ - +- Insert the minus (-) end first. Beam Effective Area (indoor use) When using the remote control, be sure to point it at the remote sensor. The transmitted beam's approximate effective distance for indoor Remote sensor use is 5 m. NOTE: The transmitted beam may not be effective or may cause incorrect operation when the remote sensor is directly exposed to sunlight or powerful lighting. Buttons And Functions USING THE REMOTE CONTROL UNIT A Infrared beam transmitting window Transmits the beam signal. The following buttons are available only when the camcorder's Power Switch set to "P". B DISPLAY Button pg. 22, 50, 59) C SHIFT Button pg. 55, 58) D SLOW Rewind/Forward Buttons pg. 55) Left/Right Buttons pg. 55) E REW Button •Rewind/Reverse Shuttle Search on a tape pg. 21) •Displays previous file in a memory card pg. 24) F FADE/WIPE Button pg. 60) G EFFECT ON/OFF Button pg. 55) H EFFECT Button pg. 55) I PAUSE IN Connector pg. 59) J MBR SET Button pg. 58) K Up Button pg. 55) INSERT Button pg. 57) L Down Button pg. 55) A. DUB Button pg. 56) M PLAY Button •Starts Playback of a tape pg. 20) •Starts Auto Playback of images in a memory card pg. 24) N FF Button •Forward/Forward Shuttle Search on a tape pg. 21) •Displays next file in a memory card pg. 24) O STOP Button •Stops the tape pg. 20) •Stops Auto Playback pg. 24) P PAUSE Button Pauses the tape pg. 55) Q R.A.EDIT Buttons pg. 58 - 61) The following buttons are available when the camcorder's Power Switch set to "A" or "M". a Zoom (T/W) Buttons Zoom in/out pg. 18, 55) (Also available with the Power Switch set to "P") b START/STOP Button Functions the same as the Recording Start/Stop Button on the camcorder. c SNAPSHOT Button Functions the same as SNAPSHOT on the camcorder.
-
 1
1 -
2
-
3
-
4
-
5
-
6
-
7
-
8
-
9
-
10
-
11
-
12
-
13
-
14
-
15
-
16
-
17
-
18
-
19
-
20
-
21
-
22
-
23
-
24
-
25
-
26
-
27
-
28
-
29
-
30
-
31
-
32
-
33
-
34
-
35
-
36
-
37
-
38
-
39
-
40
-
41
-
42
-
43
-
44
-
45
-
46
-
47
-
48
-
 49
49 -
 50
50 -
 51
51 -
 52
52 -
 53
53 -
 54
54 -
 55
55 -
 56
56 -
 57
57 -
 58
58 -
 59
59 -
60
-
61
-
62
-
63
-
64
-
65
-
66
-
67
-
68
-
69
-
70
-
71
-
72
-
73
-
74
-
75
-
76
-
77
-
78
-
79
-
80
-
81
-
82
-
83
-
84
-
85
-
86
-
87
-
88
-
89
-
90
-
91
-
92
-
93
-
94
-
95
-
96
-
97
-
98
-
99
-
100
-
101
-
102
-
103
-
104
-
105
-
106
-
107
-
108
-
109
-
110
-
111
-
112
-
113
-
114
-
115
-
116
-
117
-
118
-
119
-
120
-
121
-
122
-
123
-
124
-
125
-
126
-
127
-
128
-
129
-
130
-
131
-
132
-
133
-
134
-
135
-
136
-
137
-
138
-
139
-
140
-
141
-
142
-
143
-
144
-
145
-
146
-
147
-
148
-
149
-
150
 |
 |
