JVC DVP9 Instruction Manual - Page 69
REFERENCES, An error indication E01, E02
 |
UPC - 046838161100
View all JVC DVP9 manuals
Add to My Manuals
Save this manual to your list of manuals |
Page 69 highlights
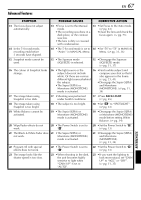
EN 69 33. Coloured bright spots appear 33. • The LCD monitor and the 33. all over the LCD monitor or the viewfinder are made with viewfinder. high-precision technology. However, black spots or bright spots of light (red, green or blue) may appear constantly on the LCD - monitor or the viewfinder. These spots are not recorded on the tape. This is not due to any defect of the unit. (Effective dots: more than 99.99 %) 34. The indicators and the image 34. • This may occur when the 34. colour on the LCD monitor are surface or the edge of the - not clear. LCD monitor is pressed. 35. The cassette will not load properly. 35. • The battery's charge is low. 35. • Install a fully charged battery. (੬ pg. 10, 11) 36. The memory card cannot be 36. removed from the camcorder. - 36. • Push in the memory card a few more times. (੬ pg. 16) 37. Picture does not appear on the 37. • The viewfinder is pulled out 37. • Push the viewfinder back in LCD monitor. and "PRIORITY" is set to or set "PRIORITY" to "LCD". "FINDER". (੬ pg. 12, 31, 38) • The LCD monitor's brightness • Adjust the brightness of the setting is too dark. LCD monitor. (੬ pg. 13) • If the monitor is tilted upward 180 degrees, open the monitor fully. (੬ pg. 12) 38. Images on the LCD monitor 38. • The speaker volume is too 38. • Turn the speaker volume are jittery. great. down. (੬ pg. 20) 39. The LCD monitor, the 39. 39. • Wipe them gently with soft viewfinder and the lens have - cloth. Wiping strongly can become dirty (ex. fingerprints). cause damage. (੬ pg. 73) 40. Time code does not appear. 40. • "TIME CODE" is set to "OFF". 40. • Set "TIME CODE" to "ON". (੬ pg. 31, 38, 41) 41. An error indication (E01, E02 or E06) appears. 41. • A malfunction of some kind 41. • ੬ pg. 81. has occurred. In this case the camcorder's functions become unusable. 42. An error indication (E03 or E04) appears. 42. • A malfunction of some kind 42. • ੬ pg. 81. has occurred. In this case the camcorder's functions become unusable. 43. The remote control does not work. 43. • "REMOTE" is set to "OFF". • The remote control does not point at the remote sensor. • The remote control batteries are exhausted. 43. • Set "REMOTE" to "ON". (੬ pg. 31, 37) • Point at the remote sensor. (੬ pg. 54) • Replace the batteries with fresh ones. (੬ pg. 54) REFERENCES
-
 1
1 -
2
-
3
-
4
-
5
-
6
-
7
-
8
-
9
-
10
-
11
-
12
-
13
-
14
-
15
-
16
-
17
-
18
-
19
-
20
-
21
-
22
-
23
-
24
-
25
-
26
-
27
-
28
-
29
-
30
-
31
-
32
-
33
-
34
-
35
-
36
-
37
-
38
-
39
-
40
-
41
-
42
-
43
-
44
-
45
-
46
-
47
-
48
-
49
-
50
-
51
-
52
-
53
-
54
-
55
-
56
-
57
-
58
-
59
-
60
-
61
-
62
-
63
-
 64
64 -
 65
65 -
 66
66 -
 67
67 -
 68
68 -
 69
69 -
 70
70 -
 71
71 -
 72
72 -
 73
73 -
 74
74 -
75
-
76
-
77
-
78
-
79
-
80
-
81
-
82
-
83
-
84
-
85
-
86
-
87
-
88
-
89
-
90
-
91
-
92
-
93
-
94
-
95
-
96
-
97
-
98
-
99
-
100
-
101
-
102
-
103
-
104
-
105
-
106
-
107
-
108
-
109
-
110
-
111
-
112
-
113
-
114
-
115
-
116
-
117
-
118
-
119
-
120
-
121
-
122
-
123
-
124
-
125
-
126
-
127
-
128
-
129
-
130
-
131
-
132
-
133
-
134
-
135
-
136
-
137
-
138
-
139
-
140
-
141
-
142
-
143
-
144
-
145
-
146
-
147
-
148
-
149
-
150
 |
 |
