JVC GY-HM200U Instruction Manual - Page 140
Connecting Wired Remote Control, Loading Clips to the PC
 |
View all JVC GY-HM200U manuals
Add to My Manuals
Save this manual to your list of manuals |
Page 140 highlights
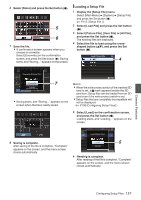
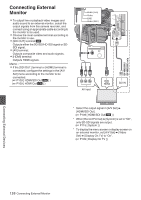
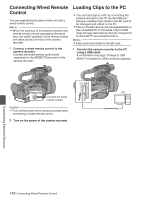
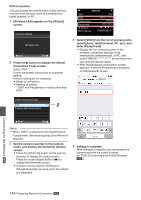
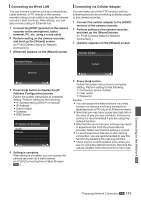
Connecting Wired Remote Control You can operate the functions of this unit with a wired remote control. Memo : 0 When the switches of the camera recorder and remote control unit are operated at the same time, the switch operation of the remote control unit takes priority over that of the camera recorder. 1 Connect a wired remote control to the camera recorder. Connect the wired remote control (sold separately) to the [REMOTE] terminal of this camera recorder. Loading Clips to the PC 0 You can load clips to a PC by connecting the camera recorder to the PC via the USB port. Doing so enables clips stored in the SD card to be managed and edited on the PC. 0 Files on the SD card can be managed/edited on the connected PC in this mode only for USB mass storage class devices that are recognized by the said PC as a peripheral drive. Memo : 0 Files cannot be written to the SD card. 1 Connect the camera recorder to the PC using a USB cable. A confirmation message "Change to USB Mode?" to enable the USB connection appears. REMOTE PC Connect the wired remote control . Caution : 0 Turn off the power of the camera recorder when . connecting a wired remote control. 2 Turn on the power of the camera recorder. Connecting External Devices 140 Connecting Wired Remote Control
-
 1
1 -
2
-
3
-
4
-
5
-
6
-
7
-
8
-
9
-
10
-
11
-
12
-
13
-
14
-
15
-
16
-
17
-
18
-
19
-
20
-
21
-
22
-
23
-
24
-
25
-
26
-
27
-
28
-
29
-
30
-
31
-
32
-
33
-
34
-
35
-
36
-
37
-
38
-
39
-
40
-
41
-
42
-
43
-
44
-
45
-
46
-
47
-
48
-
49
-
50
-
51
-
52
-
53
-
54
-
55
-
56
-
57
-
58
-
59
-
60
-
61
-
62
-
63
-
64
-
65
-
66
-
67
-
68
-
69
-
70
-
71
-
72
-
73
-
74
-
75
-
76
-
77
-
78
-
79
-
80
-
81
-
82
-
83
-
84
-
85
-
86
-
87
-
88
-
89
-
90
-
91
-
92
-
93
-
94
-
95
-
96
-
97
-
98
-
99
-
100
-
101
-
102
-
103
-
104
-
105
-
106
-
107
-
108
-
109
-
110
-
111
-
112
-
113
-
114
-
115
-
116
-
117
-
118
-
119
-
120
-
121
-
122
-
123
-
124
-
125
-
126
-
127
-
128
-
129
-
130
-
131
-
132
-
133
-
134
-
 135
135 -
 136
136 -
 137
137 -
 138
138 -
 139
139 -
 140
140 -
 141
141 -
 142
142 -
 143
143 -
 144
144 -
 145
145 -
146
-
147
-
148
-
149
-
150
-
151
-
152
-
153
-
154
-
155
-
156
-
157
-
158
-
159
-
160
-
161
-
162
-
163
-
164
-
165
-
166
-
167
-
168
-
169
-
170
-
171
-
172
-
173
-
174
-
175
-
176
-
177
-
178
-
179
-
180
-
181
-
182
-
183
-
184
 |
 |
