JVC GY-HM200U Instruction Manual - Page 32
Turning On/Off the Power
 |
View all JVC GY-HM200U manuals
Add to My Manuals
Save this manual to your list of manuals |
Page 32 highlights
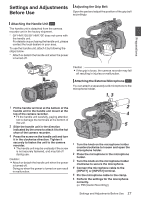
Menu Screen (A P93 [Display and Description of the Menu Screen] ) Display Settings 0 If the battery is not fully charged, the battery will be charged at the same time. 0 Even when a fully charged battery is used, charge the battery briefly to confirm the remaining battery power. (A P29 [Power Supply] ) (A P31 [Power Status Display] ) Preparations . Warnings by Lamp and Warning Tone Warning status is indicated by tally lamp and warning tone. 0 The tally lamp blinks. 0 Setting [Main Menu] B [A/V Set] B [Audio Set] B [Alarm Level] to "High" or "Low" sounds the warning tone. The warning tone is output from the monitor speaker or [x] terminal. (A P112 [ Alarm Level ] ) Memo : 0 In the event that the battery level runs low while it is being used, the camera recorder will stop operating automatically. Caution : 0 The remaining battery power and time are displayed as they are from the battery information. Accurate data may not be displayed depending on the battery condition. Replace the battery as soon as possible when the remaining battery power and time are low. Turning On/Off the Power Turning On the Power 1 Hold down the lock button (blue) at the center of the [POWER ON/OFF] switch to set to "ON". The camera recorder starts up in Camera mode and is ready for shooting. Memo : 0 The camera recorder always start up in Camera mode when the [POWER ON/OFF] switch is set to "ON". Use the [MODE] button at the side of the camera recorder to switch mode. (A P18 [Operation Modes] ) . Turning Off the Power Sets the camera recorder to the recording standby or stop mode. 1 Hold down the lock button (blue) at the center of the [POWER ON/OFF] switch to set to "OFF". 2 Remove the battery and the power to the [DC] terminal (when not in use for a long time). Caution : 0 Do not set the [POWER ON/OFF] switch to "OFF" during recording. Check that the operation mode display is "STBY" or "STOP" before you turn off the power. 0 If you have mistakenly set the [POWER ON/OFF] switch to "OFF" during recording, wait for 5 seconds or more before you turn on the power again. 0 When turning off the power, first set the [POWER ON/OFF] switch of the camera recorder to "OFF". Do not remove the battery or turn off the AC power while the [POWER ON/OFF] switch is set to "ON". 32 Power Status Display
-
 1
1 -
2
-
3
-
4
-
5
-
6
-
7
-
8
-
9
-
10
-
11
-
12
-
13
-
14
-
15
-
16
-
17
-
18
-
19
-
20
-
21
-
22
-
23
-
24
-
25
-
26
-
 27
27 -
 28
28 -
 29
29 -
 30
30 -
 31
31 -
 32
32 -
 33
33 -
 34
34 -
 35
35 -
 36
36 -
 37
37 -
38
-
39
-
40
-
41
-
42
-
43
-
44
-
45
-
46
-
47
-
48
-
49
-
50
-
51
-
52
-
53
-
54
-
55
-
56
-
57
-
58
-
59
-
60
-
61
-
62
-
63
-
64
-
65
-
66
-
67
-
68
-
69
-
70
-
71
-
72
-
73
-
74
-
75
-
76
-
77
-
78
-
79
-
80
-
81
-
82
-
83
-
84
-
85
-
86
-
87
-
88
-
89
-
90
-
91
-
92
-
93
-
94
-
95
-
96
-
97
-
98
-
99
-
100
-
101
-
102
-
103
-
104
-
105
-
106
-
107
-
108
-
109
-
110
-
111
-
112
-
113
-
114
-
115
-
116
-
117
-
118
-
119
-
120
-
121
-
122
-
123
-
124
-
125
-
126
-
127
-
128
-
129
-
130
-
131
-
132
-
133
-
134
-
135
-
136
-
137
-
138
-
139
-
140
-
141
-
142
-
143
-
144
-
145
-
146
-
147
-
148
-
149
-
150
-
151
-
152
-
153
-
154
-
155
-
156
-
157
-
158
-
159
-
160
-
161
-
162
-
163
-
164
-
165
-
166
-
167
-
168
-
169
-
170
-
171
-
172
-
173
-
174
-
175
-
176
-
177
-
178
-
179
-
180
-
181
-
182
-
183
-
184
 |
 |
