JVC GY-HM200U Instruction Manual - Page 62
Memory A Mode A, Memory B Mode
 |
View all JVC GY-HM200U manuals
Add to My Manuals
Save this manual to your list of manuals |
Page 62 highlights
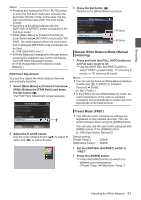
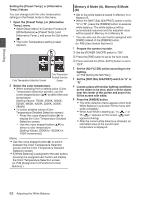
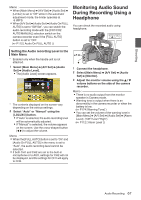
Shooting Setting the [Preset Temp.] or [Alternative Temp.] Values You can change both the color temperature settings in the Preset mode in the menu. 1 Open the [Preset Temp.] or [Alternative Temp.] menu. 0 Select [Main Menu] B [Camera Process] B [White Balance] B [Preset Temp.] and [Alternative Temp.], and press the Set button (R). 0 The Color Temperature setting screen appears. Color Temperature Detailed Selection Color Temperature Selection Screen Screen . 2 Select the color temperature. 0 When selecting from a setting value (Color Temperature Selection screen), use the cross-shaped button (JK) to select the color temperature. [Setting Values: 7500K, 6500K, 5600K, 5200K, 4800K, 4200K, 3200K, 3000K, 2800K] 0 To select detailed values (Color Temperature Detailed Selection screen) 0 Press the cross-shaped button (I) to display the Color Temperature Detailed Selection screen. 0 Use the cross-shaped button (JK) to select a color temperature. [Setting Values: 2300K to 15000K (in 100K increments)] Memo : 0 Use the cross-shaped button (I) to switch between the Color Temperature Selection screen and the Color Temperature Detailed Selection screen. 0 If [White Balance] is assigned to the user button, pressing the assigned user button will display the Color Temperature Selection screen. (A P39 [Assignment of Functions to User Buttons] ) Memory A Mode (A), Memory B Mode (B) 0 Set to the white balance saved in Memory A or Memory B. 0 When the [WHT.BAL B/A/PRST] switch is set to "A" or "B", press the [AWB/9] button to execute white balance. The white balance will be automatically adjusted and the adjusted value will be saved in Memory A or Memory B. * You can also use the user button assigned with [AWB] instead of the [AWB/9] button. (A P98 [User Switch Set Item] ) 1 Prepare the camera recorder. A Set the [POWER ON/OFF] switch to "ON". B Press the [IRIS] button to set to the Auto mode. C Press and hold the [FULL AUTO] button to set to "OFF". 2 Set the [ND FILTER] switch according to the lighting. (A P59 [Setting the ND Filter] ) 3 Set the [WHT.BAL B/A/PRST] switch to "A" or "B". 4 Locate a place with similar lighting conditions as the object to be shot, place a white object near the center of the screen and zoom in to fill the screen with white. 5 Press the [AWB/9] button. 0 The white detection frame appears when Auto White Balance is activated. Fill the frame with white completely. 0 While Auto White is starting up, "A< y >" or "B< y >" appears on the screen. (y mark appears blinking) 0 After the correct white balance is obtained, an estimated value of the current color temperature is displayed. 62 Adjusting the White Balance
-
 1
1 -
2
-
3
-
4
-
5
-
6
-
7
-
8
-
9
-
10
-
11
-
12
-
13
-
14
-
15
-
16
-
17
-
18
-
19
-
20
-
21
-
22
-
23
-
24
-
25
-
26
-
27
-
28
-
29
-
30
-
31
-
32
-
33
-
34
-
35
-
36
-
37
-
38
-
39
-
40
-
41
-
42
-
43
-
44
-
45
-
46
-
47
-
48
-
49
-
50
-
51
-
52
-
53
-
54
-
55
-
56
-
 57
57 -
 58
58 -
 59
59 -
 60
60 -
 61
61 -
 62
62 -
 63
63 -
 64
64 -
 65
65 -
 66
66 -
 67
67 -
68
-
69
-
70
-
71
-
72
-
73
-
74
-
75
-
76
-
77
-
78
-
79
-
80
-
81
-
82
-
83
-
84
-
85
-
86
-
87
-
88
-
89
-
90
-
91
-
92
-
93
-
94
-
95
-
96
-
97
-
98
-
99
-
100
-
101
-
102
-
103
-
104
-
105
-
106
-
107
-
108
-
109
-
110
-
111
-
112
-
113
-
114
-
115
-
116
-
117
-
118
-
119
-
120
-
121
-
122
-
123
-
124
-
125
-
126
-
127
-
128
-
129
-
130
-
131
-
132
-
133
-
134
-
135
-
136
-
137
-
138
-
139
-
140
-
141
-
142
-
143
-
144
-
145
-
146
-
147
-
148
-
149
-
150
-
151
-
152
-
153
-
154
-
155
-
156
-
157
-
158
-
159
-
160
-
161
-
162
-
163
-
164
-
165
-
166
-
167
-
168
-
169
-
170
-
171
-
172
-
173
-
174
-
175
-
176
-
177
-
178
-
179
-
180
-
181
-
182
-
183
-
184
 |
 |
