JVC GY-HM200U Instruction Manual - Page 148
Uploading a Recorded Video Clip, Configuring the FTP Server for Uploading, Uploading Video Clip
 |
View all JVC GY-HM200U manuals
Add to My Manuals
Save this manual to your list of manuals |
Page 148 highlights
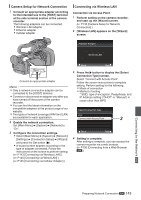
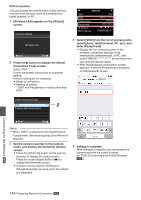
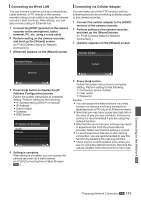
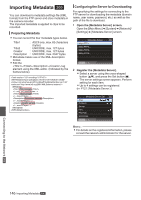
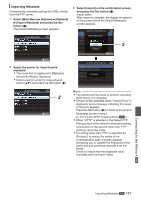
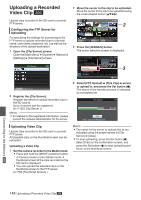
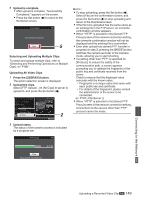
Uploading a Recorded Video Clip K Upload clips recorded in the SD card to a preset FTP server. Configuring the FTP Server for Uploading For specifying the settings for connecting to the FTP server to upload recorded clips to (domain name, user name, password, etc.) as well as the directory of the upload destination. 1 Open the [Clip Server] screen. Open the [Main Menu] B [System] B [Network]/ [Settings] B [Clip Server] screen. 2 Move the cursor to the clip to be uploaded. Move the cursor to the clip to be uploaded using the cross-shaped button (JKH I). 2 . 3 Press the [ZEBRA/5] button. The action selection screen is displayed. Clip Server This Clip 3 Selected Clips All Clips . 2 Register the [Clip Server]. Register the server to upload recorded clips in the SD card to. Up to 4 servers can be registered. (A P122 [ Clip Server ] ) Memo : 0 For details on the registered information, please consult the network administrator for the server. Uploading Video Clip Upload clips recorded in the SD card to a preset FTP server. All playable clips on the thumbnail screen can be uploaded. Uploading a Video Clip 1 Set the camera recorder to the Media mode. 0 Press and hold the [MODE] selection button in Camera mode to enter Media mode. A thumbnail screen of the clips recorded on the SD card is displayed. 0 You can upload the selected clips on the thumbnail screen to the FTP server. (A P83 [Thumbnail Screen] ) . 4 Select [FTP Upload] B [This Clip] B server to upload to, and press the Set button (R). The status of the transfer process is indicated by a progress bar. FTP Upload Stop Upload in Background . Memo : 0 The name for the server to upload files to are indicated using the preset names in [Clip Server] B [Alias]. 0 To stop uploading, press the Set button (R). Select [Yes] on the confirmation screen, and press the Set button (R) to stop uploading and return to the thumbnail screen. Connecting to the Network K 148 Uploading a Recorded Video Clip K
-
 1
1 -
2
-
3
-
4
-
5
-
6
-
7
-
8
-
9
-
10
-
11
-
12
-
13
-
14
-
15
-
16
-
17
-
18
-
19
-
20
-
21
-
22
-
23
-
24
-
25
-
26
-
27
-
28
-
29
-
30
-
31
-
32
-
33
-
34
-
35
-
36
-
37
-
38
-
39
-
40
-
41
-
42
-
43
-
44
-
45
-
46
-
47
-
48
-
49
-
50
-
51
-
52
-
53
-
54
-
55
-
56
-
57
-
58
-
59
-
60
-
61
-
62
-
63
-
64
-
65
-
66
-
67
-
68
-
69
-
70
-
71
-
72
-
73
-
74
-
75
-
76
-
77
-
78
-
79
-
80
-
81
-
82
-
83
-
84
-
85
-
86
-
87
-
88
-
89
-
90
-
91
-
92
-
93
-
94
-
95
-
96
-
97
-
98
-
99
-
100
-
101
-
102
-
103
-
104
-
105
-
106
-
107
-
108
-
109
-
110
-
111
-
112
-
113
-
114
-
115
-
116
-
117
-
118
-
119
-
120
-
121
-
122
-
123
-
124
-
125
-
126
-
127
-
128
-
129
-
130
-
131
-
132
-
133
-
134
-
135
-
136
-
137
-
138
-
139
-
140
-
141
-
142
-
 143
143 -
 144
144 -
 145
145 -
 146
146 -
 147
147 -
 148
148 -
 149
149 -
 150
150 -
 151
151 -
 152
152 -
 153
153 -
154
-
155
-
156
-
157
-
158
-
159
-
160
-
161
-
162
-
163
-
164
-
165
-
166
-
167
-
168
-
169
-
170
-
171
-
172
-
173
-
174
-
175
-
176
-
177
-
178
-
179
-
180
-
181
-
182
-
183
-
184
 |
 |
