JVC GY-HM620U Instruction Manual - Page 148
Connecting the Headphone, Connecting Wired Remote Control
 |
View all JVC GY-HM620U manuals
Add to My Manuals
Save this manual to your list of manuals |
Page 148 highlights
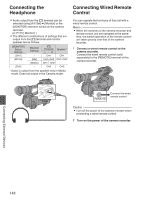
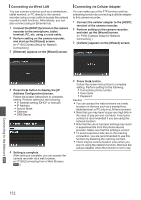
Connecting the Headphone 0 Audio output from the [x] terminal can be selected using [A/V Set] B [Monitor] or the [MONITOR] selection switch on the camera recorder. (A P115 [ Monitor ] ) 0 The different combinations of settings that are output from the [x] terminal and monitor speaker are as follows. [MONITOR] Switch Settings [CH1] [Monitor] Settings - [x] Terminal LR CH1 Speaker * CH1 [BOTH] [Mix] [Stereo] CH1+CH2 CH1+CH2 CH1 CH2 [CH2] - CH2 CH2 * Audio is output from the speaker only in Media mode. Does not output in the Camera mode. Connecting Wired Remote Control You can operate the functions of this unit with a wired remote control. Memo : 0 When the switches of the camera recorder and remote control unit are operated at the same time, the switch operation of the remote control unit takes priority over that of the camera recorder. 1 Connect a wired remote control to the camera recorder. Connect the wired remote control (sold separately) to the [REMOTE] terminal of this camera recorder. INPUT2 INPUT1 BATT.RELEASE A AUX P/OCWHGER DEVICE AV HD/SD B SDI HDMI REMOTE DC HOST P/OCWHGER INPUT2 INPUT1 AUX REC . BATT.RELEASE A AUX P/OCWHGER REC DEVICE AV HD/SD B SDI HDMI REMOTE DC HOST REMOTE Connect the wired remote control . Caution : 0 Turn off the power of the camera recorder when connecting a wired remote control. 2 Turn on the power of the camera recorder. Connecting External Devices 148
-
 1
1 -
2
-
3
-
4
-
5
-
6
-
7
-
8
-
9
-
10
-
11
-
12
-
13
-
14
-
15
-
16
-
17
-
18
-
19
-
20
-
21
-
22
-
23
-
24
-
25
-
26
-
27
-
28
-
29
-
30
-
31
-
32
-
33
-
34
-
35
-
36
-
37
-
38
-
39
-
40
-
41
-
42
-
43
-
44
-
45
-
46
-
47
-
48
-
49
-
50
-
51
-
52
-
53
-
54
-
55
-
56
-
57
-
58
-
59
-
60
-
61
-
62
-
63
-
64
-
65
-
66
-
67
-
68
-
69
-
70
-
71
-
72
-
73
-
74
-
75
-
76
-
77
-
78
-
79
-
80
-
81
-
82
-
83
-
84
-
85
-
86
-
87
-
88
-
89
-
90
-
91
-
92
-
93
-
94
-
95
-
96
-
97
-
98
-
99
-
100
-
101
-
102
-
103
-
104
-
105
-
106
-
107
-
108
-
109
-
110
-
111
-
112
-
113
-
114
-
115
-
116
-
117
-
118
-
119
-
120
-
121
-
122
-
123
-
124
-
125
-
126
-
127
-
128
-
129
-
130
-
131
-
132
-
133
-
134
-
135
-
136
-
137
-
138
-
139
-
140
-
141
-
142
-
 143
143 -
 144
144 -
 145
145 -
 146
146 -
 147
147 -
 148
148 -
 149
149 -
 150
150 -
 151
151 -
 152
152 -
 153
153 -
154
-
155
-
156
-
157
-
158
-
159
-
160
-
161
-
162
-
163
-
164
-
165
-
166
-
167
-
168
-
169
-
170
-
171
-
172
-
173
-
174
-
175
-
176
-
177
-
178
-
179
-
180
-
181
-
182
-
183
-
184
-
185
-
186
-
187
-
188
-
189
-
190
-
191
-
192
 |
 |
