JVC GY-HM620U Instruction Manual - Page 72
Setting Spot Meter
 |
View all JVC GY-HM620U manuals
Add to My Manuals
Save this manual to your list of manuals |
Page 72 highlights
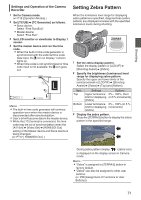
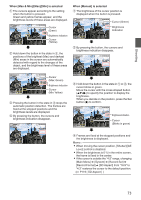
Shooting Setting Spot Meter The brightness of the object during shooting is displayed. This function is useful when setting video or stage lighting or when specifying camera exposure. A cursor indicating the location and the brightness (%) of that location are displayed in the images shown on the LCD monitor and viewfinder screen. 0 Zebra patterns display the brightness of output video signals. (A P71 [Setting Zebra Pattern] ) 0 This function allows you to check the brightness of input images from the lens without depending on image processing such as gamma curve. The dynamic range of the camera recorder is 400 % and a brightness range of 0 % to 400 % and above is displayed. Memo : 0 Spot meter may not be consistent with the zebra display range. When [Camera Process] B [Gamma] is set to "Cinema", the 100IRE output is not consistent with the 100 % display. When an object of more than 400 % luminance is detected, it is displayed as "400 %". (A P103 [ Gamma ] ) MENU/THUMB AE LEVEL MENU/THUMB CANCEL CANCEL . 1 Select one of the following from [Main Menu] B [Camera Function] B [User Switch Set] B [Spot Meter]. (A P100 [ Spot Meter ] ) Item Max & Min Color of Frame Settings Indicating the Position Displays the brightness (%) 0 Max: Green 0 Min: Yellow and positions of the brightest and darkest areas in the screen. Frames may also be stopped at the current positions. Max Displays the Green brightness (%) and position of the brightest area in the screen. Frames may also be stopped at the current positions. Min Displays the Yellow brightness (%) and position of the darkest area in the screen. Frame may also be stopped at the current positions. Manual Displays the Green brightness (%) of (Blinks in green the specified when specifying position. the position) 2 Assign the "Spot Meter" function to any of the user buttons. (A P38 [Assignment of Functions to User Buttons] ) 3 Press the user button that is assigned with "Spot Meter". The operation switches as below when the button is pressed. 72
-
 1
1 -
2
-
3
-
4
-
5
-
6
-
7
-
8
-
9
-
10
-
11
-
12
-
13
-
14
-
15
-
16
-
17
-
18
-
19
-
20
-
21
-
22
-
23
-
24
-
25
-
26
-
27
-
28
-
29
-
30
-
31
-
32
-
33
-
34
-
35
-
36
-
37
-
38
-
39
-
40
-
41
-
42
-
43
-
44
-
45
-
46
-
47
-
48
-
49
-
50
-
51
-
52
-
53
-
54
-
55
-
56
-
57
-
58
-
59
-
60
-
61
-
62
-
63
-
64
-
65
-
66
-
 67
67 -
 68
68 -
 69
69 -
 70
70 -
 71
71 -
 72
72 -
 73
73 -
 74
74 -
 75
75 -
 76
76 -
 77
77 -
78
-
79
-
80
-
81
-
82
-
83
-
84
-
85
-
86
-
87
-
88
-
89
-
90
-
91
-
92
-
93
-
94
-
95
-
96
-
97
-
98
-
99
-
100
-
101
-
102
-
103
-
104
-
105
-
106
-
107
-
108
-
109
-
110
-
111
-
112
-
113
-
114
-
115
-
116
-
117
-
118
-
119
-
120
-
121
-
122
-
123
-
124
-
125
-
126
-
127
-
128
-
129
-
130
-
131
-
132
-
133
-
134
-
135
-
136
-
137
-
138
-
139
-
140
-
141
-
142
-
143
-
144
-
145
-
146
-
147
-
148
-
149
-
150
-
151
-
152
-
153
-
154
-
155
-
156
-
157
-
158
-
159
-
160
-
161
-
162
-
163
-
164
-
165
-
166
-
167
-
168
-
169
-
170
-
171
-
172
-
173
-
174
-
175
-
176
-
177
-
178
-
179
-
180
-
181
-
182
-
183
-
184
-
185
-
186
-
187
-
188
-
189
-
190
-
191
-
192
 |
 |
