Kyocera ECOSYS M3550idn ECOSYS M3040idn/M3540idn/M3550idn/M3560idn Operation G - Page 151
Printing Data Saved on the Printer, Specifying the Job Box from a Computer and Storing the Job
 |
View all Kyocera ECOSYS M3550idn manuals
Add to My Manuals
Save this manual to your list of manuals |
Page 151 highlights
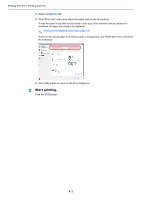
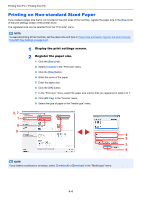
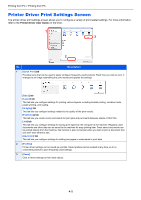
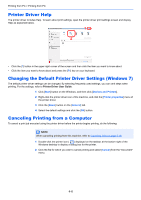
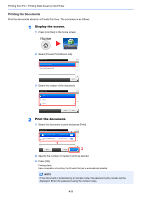
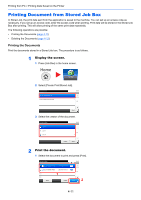
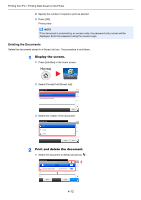
Printing from PC > Printing Data Saved on the Printer Printing Data Saved on the Printer If you configure settings in the [Job] tab of the printer driver and then print, the print job will be saved in the Job Box (memory) and printing can be executed at the machine. Follow the work flow below when using Job Box. Specifying the Job Box from a computer and sending the print job. (page 4-8) Using the operation panel to specify a file within a Box and printing it. You can print the documents from the following boxes. • Private Print Box (page 4-8) • Stored Job Box (page 4-11) • Quick Copy Box (page 4-14) • Proof-and-Hold Box (page 4-17) Specifying the Job Box from a Computer and Storing the Job Use the procedure below to store data in a Job Box. 1 Click [File] and select [Print] in the application. The Print dialog box displays. 2 Select the machine from the "Name" menu. 3 Click the [Properties] button. The Properties dialog box displays. 4 Click the [Job] tab and select the [Job storage (e-MPS)] check box to set the function. NOTE • To use Stored Job Box and Quick Copy Box, an optional SSD must be installed in the machine. • For information on how to use the printer driver software, refer to the Printer Driver User Guide. Printing Documents from Private Print Box In Private Printing, you can specify that a job is not to be printed until you operate the machine. When sending the job from the application software, specify a 4-digit access code in the printer driver. The job is released for printing by entering the access code on the operation panel, ensuring confidentiality of the print job. The data will be deleted upon completion of the print job or after the power switch is turned off. The following operations are possible: • Printing the Documents (page 4-9) • Deleting the Documents (page 4-10) 4-8
-
 1
1 -
2
-
3
-
4
-
5
-
6
-
7
-
8
-
9
-
10
-
11
-
12
-
13
-
14
-
15
-
16
-
17
-
18
-
19
-
20
-
21
-
22
-
23
-
24
-
25
-
26
-
27
-
28
-
29
-
30
-
31
-
32
-
33
-
34
-
35
-
36
-
37
-
38
-
39
-
40
-
41
-
42
-
43
-
44
-
45
-
46
-
47
-
48
-
49
-
50
-
51
-
52
-
53
-
54
-
55
-
56
-
57
-
58
-
59
-
60
-
61
-
62
-
63
-
64
-
65
-
66
-
67
-
68
-
69
-
70
-
71
-
72
-
73
-
74
-
75
-
76
-
77
-
78
-
79
-
80
-
81
-
82
-
83
-
84
-
85
-
86
-
87
-
88
-
89
-
90
-
91
-
92
-
93
-
94
-
95
-
96
-
97
-
98
-
99
-
100
-
101
-
102
-
103
-
104
-
105
-
106
-
107
-
108
-
109
-
110
-
111
-
112
-
113
-
114
-
115
-
116
-
117
-
118
-
119
-
120
-
121
-
122
-
123
-
124
-
125
-
126
-
127
-
128
-
129
-
130
-
131
-
132
-
133
-
134
-
135
-
136
-
137
-
138
-
139
-
140
-
141
-
142
-
143
-
144
-
145
-
 146
146 -
 147
147 -
 148
148 -
 149
149 -
 150
150 -
 151
151 -
 152
152 -
 153
153 -
 154
154 -
 155
155 -
 156
156 -
157
-
158
-
159
-
160
-
161
-
162
-
163
-
164
-
165
-
166
-
167
-
168
-
169
-
170
-
171
-
172
-
173
-
174
-
175
-
176
-
177
-
178
-
179
-
180
-
181
-
182
-
183
-
184
-
185
-
186
-
187
-
188
-
189
-
190
-
191
-
192
-
193
-
194
-
195
-
196
-
197
-
198
-
199
-
200
-
201
-
202
-
203
-
204
-
205
-
206
-
207
-
208
-
209
-
210
-
211
-
212
-
213
-
214
-
215
-
216
-
217
-
218
-
219
-
220
-
221
-
222
-
223
-
224
-
225
-
226
-
227
-
228
-
229
-
230
-
231
-
232
-
233
-
234
-
235
-
236
-
237
-
238
-
239
-
240
-
241
-
242
-
243
-
244
-
245
-
246
-
247
-
248
-
249
-
250
-
251
-
252
-
253
-
254
-
255
-
256
-
257
-
258
-
259
-
260
-
261
-
262
-
263
-
264
-
265
-
266
-
267
-
268
-
269
-
270
-
271
-
272
-
273
-
274
-
275
-
276
-
277
-
278
-
279
-
280
-
281
-
282
-
283
-
284
-
285
-
286
-
287
-
288
-
289
-
290
-
291
-
292
-
293
-
294
-
295
-
296
-
297
-
298
-
299
-
300
-
301
-
302
-
303
-
304
-
305
-
306
-
307
-
308
-
309
-
310
-
311
-
312
-
313
-
314
-
315
-
316
-
317
-
318
-
319
-
320
-
321
-
322
-
323
-
324
-
325
-
326
-
327
-
328
-
329
-
330
-
331
-
332
-
333
-
334
-
335
-
336
-
337
-
338
-
339
-
340
-
341
-
342
-
343
-
344
-
345
-
346
-
347
-
348
-
349
-
350
-
351
-
352
-
353
-
354
-
355
-
356
-
357
-
358
-
359
-
360
-
361
-
362
-
363
-
364
-
365
-
366
-
367
-
368
-
369
-
370
-
371
-
372
-
373
-
374
-
375
-
376
-
377
-
378
-
379
-
380
-
381
-
382
-
383
-
384
-
385
-
386
-
387
-
388
-
389
-
390
-
391
-
392
-
393
-
394
-
395
-
396
-
397
-
398
-
399
-
400
-
401
-
402
-
403
-
404
-
405
-
406
-
407
-
408
-
409
-
410
-
411
-
412
-
413
-
414
-
415
-
416
-
417
-
418
-
419
-
420
-
421
-
422
-
423
-
424
-
425
-
426
-
427
 |
 |