Kyocera ECOSYS M3550idn ECOSYS M3040idn/M3540idn/M3550idn/M3560idn Operation G - Page 368

Message, Checkpoints, Corrective Actions, Reference, Authentication Server.

Page 368 highlights

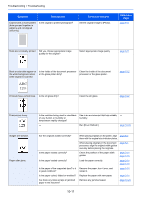
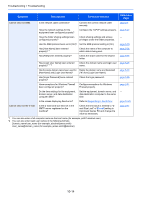
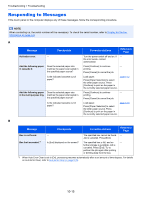
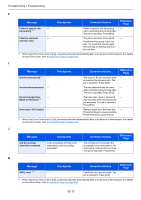
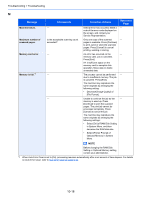
Troubleshooting > Troubleshooting C Message Checkpoints Corrective Actions Reference Page Cannot connect to - Authentication Server.*1 Set machine time to match the server's time. page 2-11 - Check the domain name. page 9-2 - Check the domain name. page 9-2 - Check the connection status with - the server. Cannot connect to - Server. Check the connection status with - the server. Cannot duplex print on the following paper.*1 Did you select a paper size/type that cannot be duplex printed? Press [Paper Selection] to select the available paper. Press [Continue] to print without using Duplex function. page 6-18 Cannot print the - specified number of copies.*1 Only one copy is available. Press - [Continue] to continue printing. Press [Cancel] to cancel the job. The machine may reproduce the same originals by arranging the following settings: • Uncheck [RAM Disk] in the [Device Settings] tab of the printer's properties. NOTE If you unchecked the [RAM Disk], check the [RAM Disk] again after the printing is completed. If not, print speed may be reduced. Cannot process this ― job.*1 This job is canceled because it is ― restricted by User Authorization or Job Accounting. Press [End]. Cassette is not installed. ― Cannot feed paper. Set the cassette ― indicated on the screen. Check the envelope switch. Does the envelope lever setting match the paper type? Match the paper type and the envelope lever position. page 3-20 Check the document Is the document processor open? Close the document processor. ― processor. Check the toner - container. The toner container is not installed page 10-5 correctly. Set it correctly. *1 When Auto Error Clear is set to [On], processing resumes automatically after a set amount of time elapses. For details on Auto Error Clear, refer to Auto Error Clear on page 8-39. E Message Error occurred at cassette #. Checkpoints ― Corrective Actions Remove the indicated cassette. Press [Next >] to follow the instructions. Reference Page ― 10-16
  • 1
  • 2
  • 3
  • 4
  • 5
  • 6
  • 7
  • 8
  • 9
  • 10
  • 11
  • 12
  • 13
  • 14
  • 15
  • 16
  • 17
  • 18
  • 19
  • 20
  • 21
  • 22
  • 23
  • 24
  • 25
  • 26
  • 27
  • 28
  • 29
  • 30
  • 31
  • 32
  • 33
  • 34
  • 35
  • 36
  • 37
  • 38
  • 39
  • 40
  • 41
  • 42
  • 43
  • 44
  • 45
  • 46
  • 47
  • 48
  • 49
  • 50
  • 51
  • 52
  • 53
  • 54
  • 55
  • 56
  • 57
  • 58
  • 59
  • 60
  • 61
  • 62
  • 63
  • 64
  • 65
  • 66
  • 67
  • 68
  • 69
  • 70
  • 71
  • 72
  • 73
  • 74
  • 75
  • 76
  • 77
  • 78
  • 79
  • 80
  • 81
  • 82
  • 83
  • 84
  • 85
  • 86
  • 87
  • 88
  • 89
  • 90
  • 91
  • 92
  • 93
  • 94
  • 95
  • 96
  • 97
  • 98
  • 99
  • 100
  • 101
  • 102
  • 103
  • 104
  • 105
  • 106
  • 107
  • 108
  • 109
  • 110
  • 111
  • 112
  • 113
  • 114
  • 115
  • 116
  • 117
  • 118
  • 119
  • 120
  • 121
  • 122
  • 123
  • 124
  • 125
  • 126
  • 127
  • 128
  • 129
  • 130
  • 131
  • 132
  • 133
  • 134
  • 135
  • 136
  • 137
  • 138
  • 139
  • 140
  • 141
  • 142
  • 143
  • 144
  • 145
  • 146
  • 147
  • 148
  • 149
  • 150
  • 151
  • 152
  • 153
  • 154
  • 155
  • 156
  • 157
  • 158
  • 159
  • 160
  • 161
  • 162
  • 163
  • 164
  • 165
  • 166
  • 167
  • 168
  • 169
  • 170
  • 171
  • 172
  • 173
  • 174
  • 175
  • 176
  • 177
  • 178
  • 179
  • 180
  • 181
  • 182
  • 183
  • 184
  • 185
  • 186
  • 187
  • 188
  • 189
  • 190
  • 191
  • 192
  • 193
  • 194
  • 195
  • 196
  • 197
  • 198
  • 199
  • 200
  • 201
  • 202
  • 203
  • 204
  • 205
  • 206
  • 207
  • 208
  • 209
  • 210
  • 211
  • 212
  • 213
  • 214
  • 215
  • 216
  • 217
  • 218
  • 219
  • 220
  • 221
  • 222
  • 223
  • 224
  • 225
  • 226
  • 227
  • 228
  • 229
  • 230
  • 231
  • 232
  • 233
  • 234
  • 235
  • 236
  • 237
  • 238
  • 239
  • 240
  • 241
  • 242
  • 243
  • 244
  • 245
  • 246
  • 247
  • 248
  • 249
  • 250
  • 251
  • 252
  • 253
  • 254
  • 255
  • 256
  • 257
  • 258
  • 259
  • 260
  • 261
  • 262
  • 263
  • 264
  • 265
  • 266
  • 267
  • 268
  • 269
  • 270
  • 271
  • 272
  • 273
  • 274
  • 275
  • 276
  • 277
  • 278
  • 279
  • 280
  • 281
  • 282
  • 283
  • 284
  • 285
  • 286
  • 287
  • 288
  • 289
  • 290
  • 291
  • 292
  • 293
  • 294
  • 295
  • 296
  • 297
  • 298
  • 299
  • 300
  • 301
  • 302
  • 303
  • 304
  • 305
  • 306
  • 307
  • 308
  • 309
  • 310
  • 311
  • 312
  • 313
  • 314
  • 315
  • 316
  • 317
  • 318
  • 319
  • 320
  • 321
  • 322
  • 323
  • 324
  • 325
  • 326
  • 327
  • 328
  • 329
  • 330
  • 331
  • 332
  • 333
  • 334
  • 335
  • 336
  • 337
  • 338
  • 339
  • 340
  • 341
  • 342
  • 343
  • 344
  • 345
  • 346
  • 347
  • 348
  • 349
  • 350
  • 351
  • 352
  • 353
  • 354
  • 355
  • 356
  • 357
  • 358
  • 359
  • 360
  • 361
  • 362
  • 363
  • 364
  • 365
  • 366
  • 367
  • 368
  • 369
  • 370
  • 371
  • 372
  • 373
  • 374
  • 375
  • 376
  • 377
  • 378
  • 379
  • 380
  • 381
  • 382
  • 383
  • 384
  • 385
  • 386
  • 387
  • 388
  • 389
  • 390
  • 391
  • 392
  • 393
  • 394
  • 395
  • 396
  • 397
  • 398
  • 399
  • 400
  • 401
  • 402
  • 403
  • 404
  • 405
  • 406
  • 407
  • 408
  • 409
  • 410
  • 411
  • 412
  • 413
  • 414
  • 415
  • 416
  • 417
  • 418
  • 419
  • 420
  • 421
  • 422
  • 423
  • 424
  • 425
  • 426
  • 427

10-16
Troubleshooting > Troubleshooting
C
E
Message
Checkpoints
Corrective Actions
Reference
Page
Cannot connect to
Authentication Server.
*1
*1
When Auto Error Clear is set to [On], processing resumes automatically after a set amount of time elapses. For details
on Auto Error Clear, refer to
Auto Error Clear
on page 8-39
.
Set machine time to match the
server's time.
page 2-11
Check the domain name.
page 9-2
Check the domain name.
page 9-2
Check the connection status with
the server.
Cannot connect to
Server.
Check the connection status with
the server.
Cannot duplex print on
the following paper.
*1
Did you select a paper size/type
that cannot be duplex printed?
Press [Paper Selection] to select
the available paper. Press
[Continue] to print without using
Duplex function.
page 6-18
Cannot print the
specified number of
copies.
*1
Only one copy is available. Press
[Continue] to continue printing.
Press [Cancel] to cancel the job.
The machine may reproduce the
same originals by arranging the
following settings:
Uncheck [RAM Disk] in the
[Device Settings] tab of the
printer's properties.
NOTE
If you unchecked the [RAM Disk],
check the [RAM Disk] again after
the printing is completed. If not,
print speed may be reduced.
Cannot process this
job.
*1
This job is canceled because it is
restricted by User Authorization or
Job Accounting. Press [End].
Cassette is not installed.
Cannot feed paper. Set the cassette
indicated on the screen.
Check the envelope
switch.
Does the envelope lever setting
match the paper type?
Match the paper type and the
envelope lever position.
page 3-20
Check the document
processor.
Is the document processor open?
Close the document processor.
Check the toner
container.
The toner container is not installed
correctly. Set it correctly.
page 10-5
Message
Checkpoints
Corrective Actions
Reference
Page
Error occurred at
cassette #.
Remove the indicated cassette.
Press [Next >] to follow the
instructions.