Lexmark X7550 User's Guide - Page 110
Using the Change Scan Default Settings submenu, Changing the default scan settings, Scan Mode
 |
View all Lexmark X7550 manuals
Add to My Manuals
Save this manual to your list of manuals |
Page 110 highlights
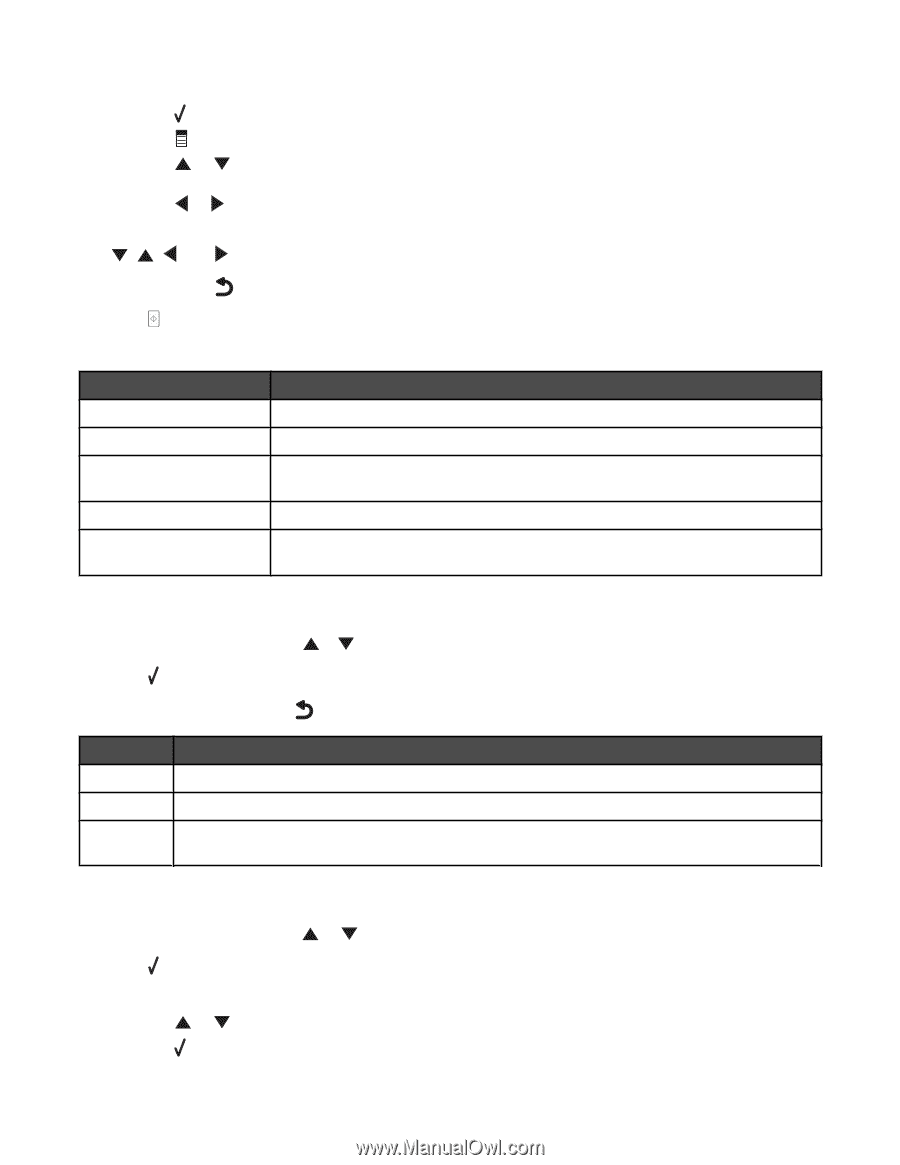
3 From the Scan Mode menu, you can: • Press to preview the job. • Press to return to the Scan Mode menu from the preview if you need to change a value. • Press or repeatedly to scroll through the menu items or submenu until you reach the one you want to change. • Press or repeatedly to reach the value you want. 4 To go into other menu items and values to make additional changes, continue to use the navigation buttons ( , , , and ). 5 If needed, press repeatedly to return to the previous menu. 6 Press to start the scan job. The following table explains the function of each menu item and the one submenu in the Scan Mode menu. Use this Scan to Color Quality Original Size Change Scan Default Settings To Specify the destination of the scan job (where the scanned image is sent). Specify the color of the scanned image (Color or Black & White). Adjust the quality of the scanned image based on your choice of dots per inch (dpi) or automatic values. Specify the size of the original document. Access the Scan Default Settings menu. You can specify the values you want as user default settings for the Color, Quality, and Original Size menu items. Using the Change Scan Default Settings submenu 1 From the Setup menu, press or repeatedly until Change Scan Default Settings is highlighted. 2 Press . 3 After changing values, press to save these values and exit this submenu. Use this To Color Choose to scan in black and white or color. Quality Choose a resolution in dots per inch (dpi). Values are Automatic 150 dpi, 300 dpi, and 600 dpi. Original Size Specify the size of the original document. Values are Auto Detect, L, 2L, A6, A5, B5, A4, Wallet, 3 x 5 in., 4 x 6 in., 5 x 7 in., 8 x 10 in., and 8.5 x 11 in. Changing the default scan settings 1 From the control panel, press or repeatedly until Scan is highlighted. 2 Press . 3 If your printer is connected to more than one computer: a Press or repeatedly until the computer to which you want to scan is highlighted. b Press . 110
-
 1
1 -
2
-
3
-
4
-
5
-
6
-
7
-
8
-
9
-
10
-
11
-
12
-
13
-
14
-
15
-
16
-
17
-
18
-
19
-
20
-
21
-
22
-
23
-
24
-
25
-
26
-
27
-
28
-
29
-
30
-
31
-
32
-
33
-
34
-
35
-
36
-
37
-
38
-
39
-
40
-
41
-
42
-
43
-
44
-
45
-
46
-
47
-
48
-
49
-
50
-
51
-
52
-
53
-
54
-
55
-
56
-
57
-
58
-
59
-
60
-
61
-
62
-
63
-
64
-
65
-
66
-
67
-
68
-
69
-
70
-
71
-
72
-
73
-
74
-
75
-
76
-
77
-
78
-
79
-
80
-
81
-
82
-
83
-
84
-
85
-
86
-
87
-
88
-
89
-
90
-
91
-
92
-
93
-
94
-
95
-
96
-
97
-
98
-
99
-
100
-
101
-
102
-
103
-
104
-
 105
105 -
 106
106 -
 107
107 -
 108
108 -
 109
109 -
 110
110 -
 111
111 -
 112
112 -
 113
113 -
 114
114 -
 115
115 -
116
-
117
-
118
-
119
-
120
-
121
-
122
-
123
-
124
-
125
-
126
-
127
-
128
-
129
-
130
-
131
-
132
-
133
-
134
-
135
-
136
-
137
-
138
-
139
-
140
-
141
-
142
-
143
-
144
-
145
-
146
-
147
-
148
-
149
-
150
-
151
-
152
-
153
-
154
-
155
-
156
-
157
-
158
-
159
-
160
-
161
-
162
-
163
-
164
-
165
-
166
-
167
-
168
-
169
-
170
-
171
-
172
-
173
-
174
-
175
-
176
-
177
-
178
-
179
-
180
-
181
-
182
-
183
-
184
-
185
-
186
-
187
-
188
-
189
-
190
-
191
-
192
-
193
-
194
-
195
-
196
-
197
-
198
-
199
-
200
-
201
-
202
-
203
-
204
-
205
-
206
-
207
-
208
-
209
-
210
-
211
-
212
-
213
-
214
-
215
-
216
-
217
-
218
-
219
-
220
-
221
-
222
-
223
-
224
-
225
-
226
-
227
-
228
-
229
 |
 |