Lexmark X7550 User's Guide - Page 74
Changing printer settings, Saving and deleting print settings
 |
View all Lexmark X7550 manuals
Add to My Manuals
Save this manual to your list of manuals |
Page 74 highlights
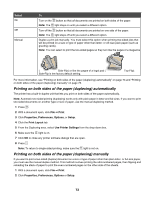
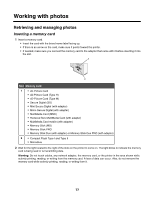
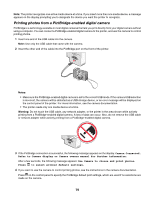
3 Click the Print Layout tab. 4 From the Duplexing area, select Manual from the drop-down box. 5 Select the Print manual duplex instructions check box. 6 Press . 7 The printer prints the odd-numbered pages and the instruction sheet, which describes how to flip and reload the paper. 8 Following the instruction sheet, flip and reload the paper with the printed side facing away from you. 9 The printer then prints the even-numbered pages on the reverse sides of the odd-numbered pages, completing the two-sided sheets. Note: If you want to return to automatic duplexing, go to the Duplexing drop-down box and select Use Printer Settings. Changing printer settings Saving and deleting print settings 1 With a document open, click File Œ Print. 2 Click Properties, Preferences, Options, or Setup. 3 Click the Quality/Copies tab. 4 Make necessary adjustments to any of the settings in the Quality/Speed, Paper Type, and Multiple Copies sections. 5 From the Save Settings drop-down menu, select Save your current settings. 6 Click a radio button next to the number of the location where you want to save your settings, then type a name for your settings in the selected box. Note: The first location contains Factory Default Settings, which cannot be changed or deleted. 7 Click Save. Notes: • To retrieve your print settings, click the Save Settings drop-down menu, and select them from the list. • To delete settings, choose Delete a setting from the list from the Save Settings drop-down menu. Select the radio button next to the setting you want to delete, and then click Delete. Using the Change Printer Default Settings submenu 1 From the Setup menu, press or repeatedly until Change Printer Default Settings is highlighted. 2 Press . 3 After changing values, press to save the values as default settings and exit this submenu. Use this Set Time Set Date To Set the current time using the keypad numbers. Set the current date using the keypad numbers. 74
-
 1
1 -
2
-
3
-
4
-
5
-
6
-
7
-
8
-
9
-
10
-
11
-
12
-
13
-
14
-
15
-
16
-
17
-
18
-
19
-
20
-
21
-
22
-
23
-
24
-
25
-
26
-
27
-
28
-
29
-
30
-
31
-
32
-
33
-
34
-
35
-
36
-
37
-
38
-
39
-
40
-
41
-
42
-
43
-
44
-
45
-
46
-
47
-
48
-
49
-
50
-
51
-
52
-
53
-
54
-
55
-
56
-
57
-
58
-
59
-
60
-
61
-
62
-
63
-
64
-
65
-
66
-
67
-
68
-
 69
69 -
 70
70 -
 71
71 -
 72
72 -
 73
73 -
 74
74 -
 75
75 -
 76
76 -
 77
77 -
 78
78 -
 79
79 -
80
-
81
-
82
-
83
-
84
-
85
-
86
-
87
-
88
-
89
-
90
-
91
-
92
-
93
-
94
-
95
-
96
-
97
-
98
-
99
-
100
-
101
-
102
-
103
-
104
-
105
-
106
-
107
-
108
-
109
-
110
-
111
-
112
-
113
-
114
-
115
-
116
-
117
-
118
-
119
-
120
-
121
-
122
-
123
-
124
-
125
-
126
-
127
-
128
-
129
-
130
-
131
-
132
-
133
-
134
-
135
-
136
-
137
-
138
-
139
-
140
-
141
-
142
-
143
-
144
-
145
-
146
-
147
-
148
-
149
-
150
-
151
-
152
-
153
-
154
-
155
-
156
-
157
-
158
-
159
-
160
-
161
-
162
-
163
-
164
-
165
-
166
-
167
-
168
-
169
-
170
-
171
-
172
-
173
-
174
-
175
-
176
-
177
-
178
-
179
-
180
-
181
-
182
-
183
-
184
-
185
-
186
-
187
-
188
-
189
-
190
-
191
-
192
-
193
-
194
-
195
-
196
-
197
-
198
-
199
-
200
-
201
-
202
-
203
-
204
-
205
-
206
-
207
-
208
-
209
-
210
-
211
-
212
-
213
-
214
-
215
-
216
-
217
-
218
-
219
-
220
-
221
-
222
-
223
-
224
-
225
-
226
-
227
-
228
-
229
 |
 |