Lexmark X7550 User's Guide - Page 80
Understanding Photo and the Photo Card Mode menu, Photo, Photo Card Mode
 |
View all Lexmark X7550 manuals
Add to My Manuals
Save this manual to your list of manuals |
Page 80 highlights
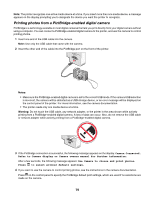
Understanding Photo and the Photo Card Mode menu Make sure you have inserted a memory card or flash drive into the printer. 1 From the control panel, press or repeatedly until Photo is highlighted. 2 Press to view a quick slideshow of the photos on your memory card. Press for more photo options. The Photo Card Mode menu appears. 3 From the Photo Card Mode menu, you can: • Press or • Press or to change. • Press or panel. to enter any of the submenus in this menu. repeatedly to scroll through the submenus or menu items until you reach the one you want repeatedly to reach the value you want or to move through each photo shown on the control • Press to select a photo when the control panel instructions indicate this is possible. Control panel instructions also indicate when you can press to edit a photo, view it full screen, change print settings, or see a print preview. • To go into other submenus, menu items, and values to make additional changes, continue to use the navigation buttons ( , , , and ). • Press repeatedly to return to the previous menu, if needed. 4 Press to start printing the photo job. The following table explains the function of submenus, menu items, and values in the Photo Card Mode menu. Use this To Browse and Print Photos • View photos. • Choose photos for editing and printing. • Specify the number of copies to print. Select Computer Choose a network host computer. This selection is displayed only if the internal wireless print server of the printer is properly configured. Photo Proof Sheet Print and then scan a proof sheet: • For all photos • For the most recent 20 photos • By date 80
-
 1
1 -
2
-
3
-
4
-
5
-
6
-
7
-
8
-
9
-
10
-
11
-
12
-
13
-
14
-
15
-
16
-
17
-
18
-
19
-
20
-
21
-
22
-
23
-
24
-
25
-
26
-
27
-
28
-
29
-
30
-
31
-
32
-
33
-
34
-
35
-
36
-
37
-
38
-
39
-
40
-
41
-
42
-
43
-
44
-
45
-
46
-
47
-
48
-
49
-
50
-
51
-
52
-
53
-
54
-
55
-
56
-
57
-
58
-
59
-
60
-
61
-
62
-
63
-
64
-
65
-
66
-
67
-
68
-
69
-
70
-
71
-
72
-
73
-
74
-
 75
75 -
 76
76 -
 77
77 -
 78
78 -
 79
79 -
 80
80 -
 81
81 -
 82
82 -
 83
83 -
 84
84 -
 85
85 -
86
-
87
-
88
-
89
-
90
-
91
-
92
-
93
-
94
-
95
-
96
-
97
-
98
-
99
-
100
-
101
-
102
-
103
-
104
-
105
-
106
-
107
-
108
-
109
-
110
-
111
-
112
-
113
-
114
-
115
-
116
-
117
-
118
-
119
-
120
-
121
-
122
-
123
-
124
-
125
-
126
-
127
-
128
-
129
-
130
-
131
-
132
-
133
-
134
-
135
-
136
-
137
-
138
-
139
-
140
-
141
-
142
-
143
-
144
-
145
-
146
-
147
-
148
-
149
-
150
-
151
-
152
-
153
-
154
-
155
-
156
-
157
-
158
-
159
-
160
-
161
-
162
-
163
-
164
-
165
-
166
-
167
-
168
-
169
-
170
-
171
-
172
-
173
-
174
-
175
-
176
-
177
-
178
-
179
-
180
-
181
-
182
-
183
-
184
-
185
-
186
-
187
-
188
-
189
-
190
-
191
-
192
-
193
-
194
-
195
-
196
-
197
-
198
-
199
-
200
-
201
-
202
-
203
-
204
-
205
-
206
-
207
-
208
-
209
-
210
-
211
-
212
-
213
-
214
-
215
-
216
-
217
-
218
-
219
-
220
-
221
-
222
-
223
-
224
-
225
-
226
-
227
-
228
-
229
 |
 |