Lexmark X7550 User's Guide - Page 147
Understanding Warning levels, Removing and reinstalling the software, Enabling the USB port - drivers
 |
View all Lexmark X7550 manuals
Add to My Manuals
Save this manual to your list of manuals |
Page 147 highlights
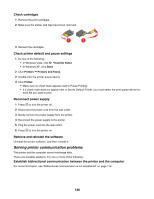
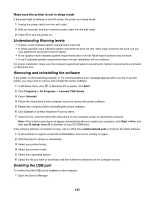
Make sure the printer is not in sleep mode If the power light is blinking on and off slowly, the printer is in sleep mode. 1 Unplug the power cable from the wall outlet. 2 Wait ten seconds, and then insert the power cable into the wall outlet. 3 Press to turn the printer on. Understanding Warning levels • A green check indicates system requirements were met. • A yellow question mark indicates system requirements were not met. Most major functions will work, but you may experience some performance impact. • A red question mark indicates system requirements were not met. Most major functions may not work. • A red X indicates system requirements were not met. Installation will not continue. For proper installation, make sure the computer supports all system requirements. System requirements are located on the printer box. Removing and reinstalling the software If the printer is not functioning properly, or if a communications error message appears when you try to use the printer, you may need to remove and reinstall the printer software. 1 In Windows Vista, click . In Windows XP or earlier, click Start. 2 Click Programs or All Programs Œ Lexmark 7500 Series. 3 Select Uninstall. 4 Follow the instructions on the computer screen to remove the printer software. 5 Restart the computer before reinstalling the printer software. 6 Click Cancel on all New Hardware Found screens. 7 Insert the CD, and then follow the instructions on the computer screen to reinstall the software. Note: If the install screen does not appear automatically after you restart your computer, click Start Œ Run, and then type D:\setup, where D is the letter of your CD-ROM drive. If the software still does not install correctly, visit our Web site at www.lexmark.com to check for the latest software. 1 In all countries or regions except the United States, select your country or region. 2 Click the links for drivers or downloads. 3 Select your printer family. 4 Select your printer model. 5 Select your operating system. 6 Select the file you want to download, and then follow the directions on the computer screen. Enabling the USB port To confirm that the USB port is enabled on the computer: 1 Open the Device Manager. 147
-
 1
1 -
2
-
3
-
4
-
5
-
6
-
7
-
8
-
9
-
10
-
11
-
12
-
13
-
14
-
15
-
16
-
17
-
18
-
19
-
20
-
21
-
22
-
23
-
24
-
25
-
26
-
27
-
28
-
29
-
30
-
31
-
32
-
33
-
34
-
35
-
36
-
37
-
38
-
39
-
40
-
41
-
42
-
43
-
44
-
45
-
46
-
47
-
48
-
49
-
50
-
51
-
52
-
53
-
54
-
55
-
56
-
57
-
58
-
59
-
60
-
61
-
62
-
63
-
64
-
65
-
66
-
67
-
68
-
69
-
70
-
71
-
72
-
73
-
74
-
75
-
76
-
77
-
78
-
79
-
80
-
81
-
82
-
83
-
84
-
85
-
86
-
87
-
88
-
89
-
90
-
91
-
92
-
93
-
94
-
95
-
96
-
97
-
98
-
99
-
100
-
101
-
102
-
103
-
104
-
105
-
106
-
107
-
108
-
109
-
110
-
111
-
112
-
113
-
114
-
115
-
116
-
117
-
118
-
119
-
120
-
121
-
122
-
123
-
124
-
125
-
126
-
127
-
128
-
129
-
130
-
131
-
132
-
133
-
134
-
135
-
136
-
137
-
138
-
139
-
140
-
141
-
 142
142 -
 143
143 -
 144
144 -
 145
145 -
 146
146 -
 147
147 -
 148
148 -
 149
149 -
 150
150 -
 151
151 -
 152
152 -
153
-
154
-
155
-
156
-
157
-
158
-
159
-
160
-
161
-
162
-
163
-
164
-
165
-
166
-
167
-
168
-
169
-
170
-
171
-
172
-
173
-
174
-
175
-
176
-
177
-
178
-
179
-
180
-
181
-
182
-
183
-
184
-
185
-
186
-
187
-
188
-
189
-
190
-
191
-
192
-
193
-
194
-
195
-
196
-
197
-
198
-
199
-
200
-
201
-
202
-
203
-
204
-
205
-
206
-
207
-
208
-
209
-
210
-
211
-
212
-
213
-
214
-
215
-
216
-
217
-
218
-
219
-
220
-
221
-
222
-
223
-
224
-
225
-
226
-
227
-
228
-
229
 |
 |