Lexmark X7550 User's Guide - Page 83
Using the Change Photo Default Settings submenu
 |
View all Lexmark X7550 manuals
Add to My Manuals
Save this manual to your list of manuals |
Page 83 highlights
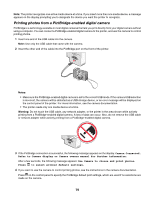
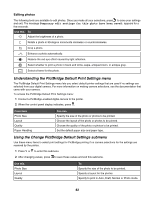
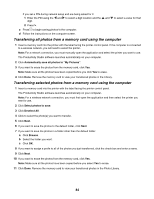
Use this Paper Handling To Specify the size and type of paper loaded. For more information, see "Using the Paper Handling submenu" on page 63. Using the Change Photo Default Settings submenu 1 From the Setup menu, press or repeatedly until Change Photo Default Settings is highlighted. 2 Press . 3 After changing values, press to save these values and exit this submenu. Use this To Photo Size Set the photo size. Layout Specify a layout for the photos. Quality Specify a print quality for the photos. Paper Handling Specify the size and type of paper loaded. For more information, see "Using the Paper Handling submenu" on page 63. Transferring photos from a memory device to the computer using the control panel If the printer is connected directly to a computer, or connected to a computer through a wireless network connection, you can transfer photos from a memory card or flash drive to the computer. Notes: • You cannot transfer photos from a memory device to a computer through an external network adapter that does not support memory device connection. • The printer may require that you select a computer (and a PIN if required by that computer). 1 Insert a memory card or a flash drive that contains the images you want to transfer. 2 After the memory device is detected, press . 3 Press repeatedly until Save Photos is highlighted. 4 Press . 5 Press or to select Computer. 6 Press . If the computer is connected directly to the printer through a USB cable: a Press to begin saving photos to your computer. b Follow the instructions on the computer screen. If the printer is connected to a wireless network, you will be asked to select the computer that you want to use. a Press or to select a computer. b Press . 83
-
 1
1 -
2
-
3
-
4
-
5
-
6
-
7
-
8
-
9
-
10
-
11
-
12
-
13
-
14
-
15
-
16
-
17
-
18
-
19
-
20
-
21
-
22
-
23
-
24
-
25
-
26
-
27
-
28
-
29
-
30
-
31
-
32
-
33
-
34
-
35
-
36
-
37
-
38
-
39
-
40
-
41
-
42
-
43
-
44
-
45
-
46
-
47
-
48
-
49
-
50
-
51
-
52
-
53
-
54
-
55
-
56
-
57
-
58
-
59
-
60
-
61
-
62
-
63
-
64
-
65
-
66
-
67
-
68
-
69
-
70
-
71
-
72
-
73
-
74
-
75
-
76
-
77
-
 78
78 -
 79
79 -
 80
80 -
 81
81 -
 82
82 -
 83
83 -
 84
84 -
 85
85 -
 86
86 -
 87
87 -
 88
88 -
89
-
90
-
91
-
92
-
93
-
94
-
95
-
96
-
97
-
98
-
99
-
100
-
101
-
102
-
103
-
104
-
105
-
106
-
107
-
108
-
109
-
110
-
111
-
112
-
113
-
114
-
115
-
116
-
117
-
118
-
119
-
120
-
121
-
122
-
123
-
124
-
125
-
126
-
127
-
128
-
129
-
130
-
131
-
132
-
133
-
134
-
135
-
136
-
137
-
138
-
139
-
140
-
141
-
142
-
143
-
144
-
145
-
146
-
147
-
148
-
149
-
150
-
151
-
152
-
153
-
154
-
155
-
156
-
157
-
158
-
159
-
160
-
161
-
162
-
163
-
164
-
165
-
166
-
167
-
168
-
169
-
170
-
171
-
172
-
173
-
174
-
175
-
176
-
177
-
178
-
179
-
180
-
181
-
182
-
183
-
184
-
185
-
186
-
187
-
188
-
189
-
190
-
191
-
192
-
193
-
194
-
195
-
196
-
197
-
198
-
199
-
200
-
201
-
202
-
203
-
204
-
205
-
206
-
207
-
208
-
209
-
210
-
211
-
212
-
213
-
214
-
215
-
216
-
217
-
218
-
219
-
220
-
221
-
222
-
223
-
224
-
225
-
226
-
227
-
228
-
229
 |
 |
