Lexmark X7550 User's Guide - Page 76
Resetting factory default settings, Saving settings, Resetting all settings
 |
View all Lexmark X7550 manuals
Add to My Manuals
Save this manual to your list of manuals |
Page 76 highlights
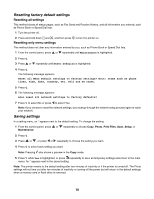
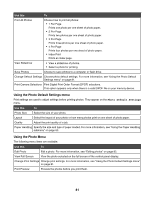
Resetting factory default settings Resetting all settings This method clears all status pages, such as Fax Send and Receive History, and all information you entered, such as Phone Book or Speed Dial lists. 1 Turn the printer off. 2 Press and hold down and , and then press Resetting only menu settings to turn the printer on. This method does not clear any information entered by you, such as Phone Book or Speed Dial lists. 1 From the control panel, press or repeatedly until Maintenance is highlighted. 2 Press . 3 Press or repeatedly until Reset Defaults is highlighted. 4 Press . The following message appears: Reset all Menu Default settings to factory settings? Note: Items such as phone lists, time, date, country, etc. will not be reset. 5 Press . 6 The following message appears: Also reset all network settings to factory defaults? 7 Press to select No or press to select Yes. Note: If you choose to reset the network settings, you must go through the network setup process again to rejoin your network. Saving settings In a setting menu, an * appears next to the default setting. To change the setting: 1 From the control panel, press or repeatedly to choose Copy, Photo, Print Files, Scan, Setup, or Maintenance. 2 Press . 3 Press or , or press or repeatedly to choose the setting you want. 4 Press to select each setting you want. Note: Pressing also shows a preview in the Copy mode. 5 Press while Yes is highlighted, or press repeatedly to save all temporary settings and return to the main menu. An * appears next to the saved setting. Note: The printer reverts to the default setting after two minutes of inactivity or if the printer is turned off. The Photo settings will not time out after two minutes of inactivity or turning off the power but will return to the default settings when a memory card or flash drive is removed. 76
-
 1
1 -
2
-
3
-
4
-
5
-
6
-
7
-
8
-
9
-
10
-
11
-
12
-
13
-
14
-
15
-
16
-
17
-
18
-
19
-
20
-
21
-
22
-
23
-
24
-
25
-
26
-
27
-
28
-
29
-
30
-
31
-
32
-
33
-
34
-
35
-
36
-
37
-
38
-
39
-
40
-
41
-
42
-
43
-
44
-
45
-
46
-
47
-
48
-
49
-
50
-
51
-
52
-
53
-
54
-
55
-
56
-
57
-
58
-
59
-
60
-
61
-
62
-
63
-
64
-
65
-
66
-
67
-
68
-
69
-
70
-
 71
71 -
 72
72 -
 73
73 -
 74
74 -
 75
75 -
 76
76 -
 77
77 -
 78
78 -
 79
79 -
 80
80 -
 81
81 -
82
-
83
-
84
-
85
-
86
-
87
-
88
-
89
-
90
-
91
-
92
-
93
-
94
-
95
-
96
-
97
-
98
-
99
-
100
-
101
-
102
-
103
-
104
-
105
-
106
-
107
-
108
-
109
-
110
-
111
-
112
-
113
-
114
-
115
-
116
-
117
-
118
-
119
-
120
-
121
-
122
-
123
-
124
-
125
-
126
-
127
-
128
-
129
-
130
-
131
-
132
-
133
-
134
-
135
-
136
-
137
-
138
-
139
-
140
-
141
-
142
-
143
-
144
-
145
-
146
-
147
-
148
-
149
-
150
-
151
-
152
-
153
-
154
-
155
-
156
-
157
-
158
-
159
-
160
-
161
-
162
-
163
-
164
-
165
-
166
-
167
-
168
-
169
-
170
-
171
-
172
-
173
-
174
-
175
-
176
-
177
-
178
-
179
-
180
-
181
-
182
-
183
-
184
-
185
-
186
-
187
-
188
-
189
-
190
-
191
-
192
-
193
-
194
-
195
-
196
-
197
-
198
-
199
-
200
-
201
-
202
-
203
-
204
-
205
-
206
-
207
-
208
-
209
-
210
-
211
-
212
-
213
-
214
-
215
-
216
-
217
-
218
-
219
-
220
-
221
-
222
-
223
-
224
-
225
-
226
-
227
-
228
-
229
 |
 |