Lexmark X7550 User's Guide - Page 130
Creating a fax cover using the control panel, Blocking junk faxes
 |
View all Lexmark X7550 manuals
Add to My Manuals
Save this manual to your list of manuals |
Page 130 highlights
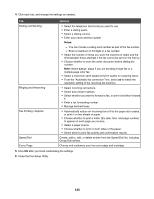
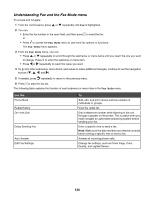
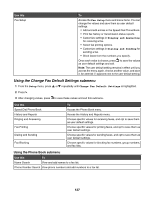
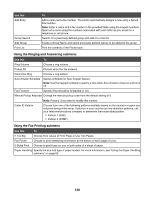
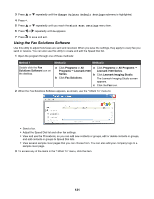
6 Press . 7 Press or repeatedly until you reach the Fax Footer menu item. 8 Press or repeatedly until On appears. 9 Press to save and exit. Creating a fax cover page using the control panel 1 From the control panel, press or repeatedly until Fax is highlighted. 2 Press . 3 Press or repeatedly until the Edit Fax Settings submenu is highlighted. 4 Press . 5 Press or repeatedly until you reach Fax Cover Page. 6 Press or repeatedly until Yes appears. 7 Press . Wait for the fax Cover Page menu to appear. Use this menu to edit items for your fax cover page, such as your From #, your name, your fax number, and the priority of the fax you plan to send. 8 Press or to choose a From #. 9 Press to edit other items for the cover page. Use the keypad to enter numbers or characters. 10 Press to save and exit when you finish creating the cover page. Blocking junk faxes 1 From the desktop, double-click the Productivity Studio icon. 2 From the Settings area of the Welcome Screen, click Fax History and Settings. The Fax Solution Software appears. 3 From the "I Want To" menu, click Adjust speed dial list and other fax settings. 4 Click the Ringing and Answering tab. 5 From the "Block Faxes from particular senders/numbers" area, select Manage Blocked Faxes. 6 If you want to block faxes from senders missing a valid Caller ID, select the check box, and enable fax blocking. 7 If you want to block faxes from specific fax numbers, list them in the box provided. You can also edit this list. 8 Click OK to save the setting. Blocking unwanted changes to fax settings This feature blocks network users from changing fax settings through the Fax Setup Utility. 1 From the control panel, press or repeatedly until Setup is highlighted. 2 Press . 130
-
 1
1 -
2
-
3
-
4
-
5
-
6
-
7
-
8
-
9
-
10
-
11
-
12
-
13
-
14
-
15
-
16
-
17
-
18
-
19
-
20
-
21
-
22
-
23
-
24
-
25
-
26
-
27
-
28
-
29
-
30
-
31
-
32
-
33
-
34
-
35
-
36
-
37
-
38
-
39
-
40
-
41
-
42
-
43
-
44
-
45
-
46
-
47
-
48
-
49
-
50
-
51
-
52
-
53
-
54
-
55
-
56
-
57
-
58
-
59
-
60
-
61
-
62
-
63
-
64
-
65
-
66
-
67
-
68
-
69
-
70
-
71
-
72
-
73
-
74
-
75
-
76
-
77
-
78
-
79
-
80
-
81
-
82
-
83
-
84
-
85
-
86
-
87
-
88
-
89
-
90
-
91
-
92
-
93
-
94
-
95
-
96
-
97
-
98
-
99
-
100
-
101
-
102
-
103
-
104
-
105
-
106
-
107
-
108
-
109
-
110
-
111
-
112
-
113
-
114
-
115
-
116
-
117
-
118
-
119
-
120
-
121
-
122
-
123
-
124
-
 125
125 -
 126
126 -
 127
127 -
 128
128 -
 129
129 -
 130
130 -
 131
131 -
 132
132 -
 133
133 -
 134
134 -
 135
135 -
136
-
137
-
138
-
139
-
140
-
141
-
142
-
143
-
144
-
145
-
146
-
147
-
148
-
149
-
150
-
151
-
152
-
153
-
154
-
155
-
156
-
157
-
158
-
159
-
160
-
161
-
162
-
163
-
164
-
165
-
166
-
167
-
168
-
169
-
170
-
171
-
172
-
173
-
174
-
175
-
176
-
177
-
178
-
179
-
180
-
181
-
182
-
183
-
184
-
185
-
186
-
187
-
188
-
189
-
190
-
191
-
192
-
193
-
194
-
195
-
196
-
197
-
198
-
199
-
200
-
201
-
202
-
203
-
204
-
205
-
206
-
207
-
208
-
209
-
210
-
211
-
212
-
213
-
214
-
215
-
216
-
217
-
218
-
219
-
220
-
221
-
222
-
223
-
224
-
225
-
226
-
227
-
228
-
229
 |
 |