Lexmark X7550 User's Guide - Page 129
Printing the Fax Settings List, Setting up a fax footer, Using the Dialing and Sending submenu
 |
View all Lexmark X7550 manuals
Add to My Manuals
Save this manual to your list of manuals |
Page 129 highlights
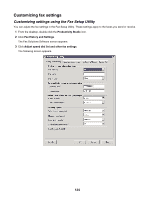
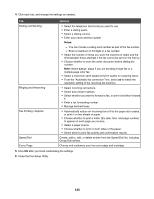
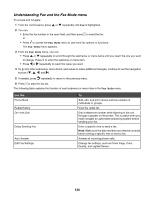
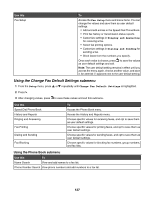
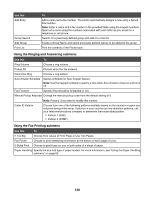
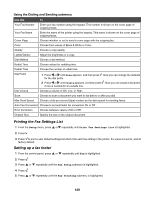
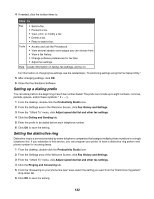
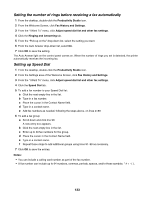
Using the Dialing and Sending submenu Use this To Your Fax Number Enter your fax number using the keypad. This number is shown on the cover page of outgoing faxes. Your Fax Name Enter the name of the printer using the keypad. This name is shown on the cover page of outgoing faxes. Cover Page Choose whether or not to send a cover page with the outgoing fax. Color Choose from values of Black & White or Color. Quality Choose a copy quality. Lighter/Darker Adjust the brightness of a copy. Dial Method Choose a dial method. Redial Time Choose values for redialing time. Redial Tries Choose the number of redial tries. Dial Prefix 1 Press or until None appears, and then press . Now you can change the defaults for the dial prefix. 2 Press or until Create appears, and then press . Now you can create a dial prefix if one is needed for an outside line. Dial Volume Choose a volume of Off, Low, or High. Scan Choose to scan a document you want to fax before or after you dial. Max Send Speed Choose a bits per second (bps) number as the data speed for sending faxes. Auto Fax Conversion Choose to set automatic fax conversion On or Off . Error Correction Original Size Choose between values of On or Off. Specify the size of the original document. Printing the Fax Settings List 1 From the Setup menu, press or repeatedly until Print Fax Settings List is highlighted. 2 Press . 3 Press to print a user default settings list which lists each fax setting in the printer, the value it is set to, and its factory default. Setting up a fax footer 1 From the control panel, press or repeatedly until Fax is highlighted. 2 Press . 3 Press or repeatedly until the Fax Setup submenu is highlighted. 4 Press . 5 Press or repeatedly until the Fax Printing submenu is highlighted. 129
-
 1
1 -
2
-
3
-
4
-
5
-
6
-
7
-
8
-
9
-
10
-
11
-
12
-
13
-
14
-
15
-
16
-
17
-
18
-
19
-
20
-
21
-
22
-
23
-
24
-
25
-
26
-
27
-
28
-
29
-
30
-
31
-
32
-
33
-
34
-
35
-
36
-
37
-
38
-
39
-
40
-
41
-
42
-
43
-
44
-
45
-
46
-
47
-
48
-
49
-
50
-
51
-
52
-
53
-
54
-
55
-
56
-
57
-
58
-
59
-
60
-
61
-
62
-
63
-
64
-
65
-
66
-
67
-
68
-
69
-
70
-
71
-
72
-
73
-
74
-
75
-
76
-
77
-
78
-
79
-
80
-
81
-
82
-
83
-
84
-
85
-
86
-
87
-
88
-
89
-
90
-
91
-
92
-
93
-
94
-
95
-
96
-
97
-
98
-
99
-
100
-
101
-
102
-
103
-
104
-
105
-
106
-
107
-
108
-
109
-
110
-
111
-
112
-
113
-
114
-
115
-
116
-
117
-
118
-
119
-
120
-
121
-
122
-
123
-
 124
124 -
 125
125 -
 126
126 -
 127
127 -
 128
128 -
 129
129 -
 130
130 -
 131
131 -
 132
132 -
 133
133 -
 134
134 -
135
-
136
-
137
-
138
-
139
-
140
-
141
-
142
-
143
-
144
-
145
-
146
-
147
-
148
-
149
-
150
-
151
-
152
-
153
-
154
-
155
-
156
-
157
-
158
-
159
-
160
-
161
-
162
-
163
-
164
-
165
-
166
-
167
-
168
-
169
-
170
-
171
-
172
-
173
-
174
-
175
-
176
-
177
-
178
-
179
-
180
-
181
-
182
-
183
-
184
-
185
-
186
-
187
-
188
-
189
-
190
-
191
-
192
-
193
-
194
-
195
-
196
-
197
-
198
-
199
-
200
-
201
-
202
-
203
-
204
-
205
-
206
-
207
-
208
-
209
-
210
-
211
-
212
-
213
-
214
-
215
-
216
-
217
-
218
-
219
-
220
-
221
-
222
-
223
-
224
-
225
-
226
-
227
-
228
-
229
 |
 |
