Netgear FS728TLP Web Management User Guide - Page 273
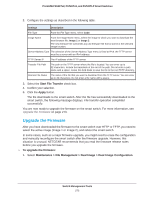
Upgrade the Firmware, Start File Transfer, Apply
 |
View all Netgear FS728TLP manuals
Add to My Manuals
Save this manual to your list of manuals |
Page 273 highlights
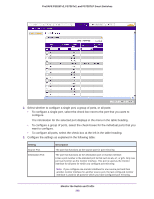
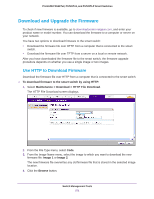
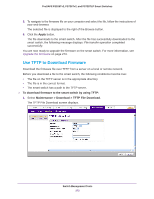
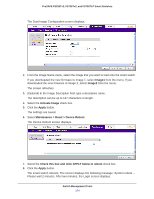
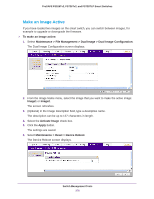
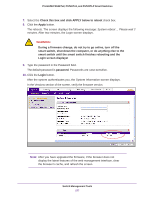
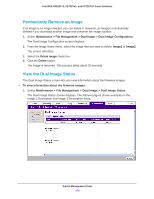
ProSAFE FS526Tv2, FS726Tv2, and FS728TLP Smart Switches 2. Configure the settings as described in the following table. Settings Description File Type From the File Type menu, select Code. Image Name From the Image Name menu, select the image to which you want to download the new firmware file: Image 1 or Image 2. The new firmware file overwrites any old firmware file that is stored in the selected image location. Server Address Type The selection of the Server Address Type menu is fixed at IPv4. the TFTP server must be a server with an IPv4 address. TFTP Server IP The IP address of the TFTP server. Transfer File Path Remote File Name The path on the TFTP server where the file is located. You can enter up to 32 characters. Include the backslash at the end of the path. Do not enter a path name with a space. Leave this field blank to save the file to the root TFTP directory. The name of the file that you want to download from the TFTP server. You can enter up to 32 characters. Do not enter a file name with a space. 3. Select the Start File Transfer check box. 4. Confirm your selection. 5. Click the Apply button. The file downloads to the smart switch. After the file has successfully downloaded to the smart switch, the following message displays: File transfer operation completed successfully. You are now ready to upgrade the firmware on the smart switch. For more information, see Upgrade the Firmware on page 273. Upgrade the Firmware After you have downloaded the firmware to the smart switch over HTTP or TFTP, you need to select the active image (Image 1 or Image 2), and reboot the smart switch. In some cases, such as a major firmware upgrade, you might need to erase the configuration and manually reconfigure the smart switch after the firmware upgrade. However, this situation is unusual. NETGEAR recommends that you read the firmware release notes before you upgrade the firmware. To upgrade the firmware: 1. Select Maintenance > File Management > Dual Image > Dual Image Configuration. Switch Management Tools 273
-
 1
1 -
2
-
3
-
4
-
5
-
6
-
7
-
8
-
9
-
10
-
11
-
12
-
13
-
14
-
15
-
16
-
17
-
18
-
19
-
20
-
21
-
22
-
23
-
24
-
25
-
26
-
27
-
28
-
29
-
30
-
31
-
32
-
33
-
34
-
35
-
36
-
37
-
38
-
39
-
40
-
41
-
42
-
43
-
44
-
45
-
46
-
47
-
48
-
49
-
50
-
51
-
52
-
53
-
54
-
55
-
56
-
57
-
58
-
59
-
60
-
61
-
62
-
63
-
64
-
65
-
66
-
67
-
68
-
69
-
70
-
71
-
72
-
73
-
74
-
75
-
76
-
77
-
78
-
79
-
80
-
81
-
82
-
83
-
84
-
85
-
86
-
87
-
88
-
89
-
90
-
91
-
92
-
93
-
94
-
95
-
96
-
97
-
98
-
99
-
100
-
101
-
102
-
103
-
104
-
105
-
106
-
107
-
108
-
109
-
110
-
111
-
112
-
113
-
114
-
115
-
116
-
117
-
118
-
119
-
120
-
121
-
122
-
123
-
124
-
125
-
126
-
127
-
128
-
129
-
130
-
131
-
132
-
133
-
134
-
135
-
136
-
137
-
138
-
139
-
140
-
141
-
142
-
143
-
144
-
145
-
146
-
147
-
148
-
149
-
150
-
151
-
152
-
153
-
154
-
155
-
156
-
157
-
158
-
159
-
160
-
161
-
162
-
163
-
164
-
165
-
166
-
167
-
168
-
169
-
170
-
171
-
172
-
173
-
174
-
175
-
176
-
177
-
178
-
179
-
180
-
181
-
182
-
183
-
184
-
185
-
186
-
187
-
188
-
189
-
190
-
191
-
192
-
193
-
194
-
195
-
196
-
197
-
198
-
199
-
200
-
201
-
202
-
203
-
204
-
205
-
206
-
207
-
208
-
209
-
210
-
211
-
212
-
213
-
214
-
215
-
216
-
217
-
218
-
219
-
220
-
221
-
222
-
223
-
224
-
225
-
226
-
227
-
228
-
229
-
230
-
231
-
232
-
233
-
234
-
235
-
236
-
237
-
238
-
239
-
240
-
241
-
242
-
243
-
244
-
245
-
246
-
247
-
248
-
249
-
250
-
251
-
252
-
253
-
254
-
255
-
256
-
257
-
258
-
259
-
260
-
261
-
262
-
263
-
264
-
265
-
266
-
267
-
 268
268 -
 269
269 -
 270
270 -
 271
271 -
 272
272 -
 273
273 -
 274
274 -
 275
275 -
 276
276 -
 277
277 -
 278
278 -
279
-
280
-
281
-
282
-
283
-
284
-
285
-
286
-
287
-
288
-
289
-
290
-
291
-
292
-
293
-
294
-
295
-
296
-
297
-
298
-
299
-
300
-
301
-
302
-
303
-
304
-
305
-
306
-
307
-
308
-
309
-
310
-
311
-
312
-
313
-
314
-
315
-
316
-
317
-
318
-
319
-
320
-
321
-
322
-
323
-
324
-
325
-
326
-
327
-
328
-
329
-
330
-
331
-
332
-
333
-
334
-
335
 |
 |