Netgear FS728TLP Web Management User Guide - Page 309
VLAN Sample Configuration, > VLAN > Advanced > Port PVID Configuration
 |
View all Netgear FS728TLP manuals
Add to My Manuals
Save this manual to your list of manuals |
Page 309 highlights
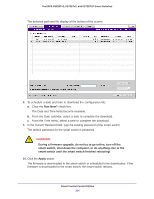
ProSAFE FS526Tv2, FS726Tv2, and FS728TLP Smart Switches • If the port through which the packet enters is not a member of the VLAN that is specified by the packet's VLAN ID tag and has ingress-filtering enabled, the packet is dropped. • If the port through which the packet enters is a member of the VLAN that is specified by the packet's VLAN ID tag and has ingress-filtering enabled, the packet can be sent to other ports with the same VLAN ID. • Packets leaving the smart switch are either tagged or untagged, depending on the setting for that port's VLAN membership properties. A U for a port means that packets leaving the smart switch from that port are untagged. Inversely, a T for a port means that packets leaving the smart switch from that port are tagged with the VLAN ID that is associated with the port. VLAN Sample Configuration This example demonstrates several VLAN scenarios and describes how the smart switch handles tagged and untagged traffic. To create two new VLANs, change the port membership for default VLAN 1, and assign port members to the two new VLANs: 1. Select Switching > VLAN > Basic > VLAN Configuration. The Basic VLAN Configuration screen displays. 2. Create the following VLANs: • A VLAN with VLAN ID 10 • A VLAN with VLAN ID 20 For more information about creating VLANs, see Manage Custom VLANs on page 80. 3. Select Switching > VLAN > Advanced > VLAN Membership. The VLAN Membership screen displays. 4. Specify the VLAN membership as follows: • For the default VLAN with VLAN ID 1, specify the following members: port 7 untagged (U) and port 8 (U). • For the VLAN with VLAN ID 10, specify the following members: port 1 (U), port 2 (U), and port 3 tagged (T). • For the VLAN with VLAN ID 20, specify the following members: port 4 (U), port 5 (T), and port 6 (U). For more information about adding members to a VLAN, see Manage VLAN Memberships on page 82. 5. Select Switching > VLAN > Advanced > Port PVID Configuration. The Port PVID Configuration screen displays. 6. Specify the PVIDs for ports e1 and e4: • Port e1. PVID 10. • Port e4. PVID 20. Configuration Examples 309
-
 1
1 -
2
-
3
-
4
-
5
-
6
-
7
-
8
-
9
-
10
-
11
-
12
-
13
-
14
-
15
-
16
-
17
-
18
-
19
-
20
-
21
-
22
-
23
-
24
-
25
-
26
-
27
-
28
-
29
-
30
-
31
-
32
-
33
-
34
-
35
-
36
-
37
-
38
-
39
-
40
-
41
-
42
-
43
-
44
-
45
-
46
-
47
-
48
-
49
-
50
-
51
-
52
-
53
-
54
-
55
-
56
-
57
-
58
-
59
-
60
-
61
-
62
-
63
-
64
-
65
-
66
-
67
-
68
-
69
-
70
-
71
-
72
-
73
-
74
-
75
-
76
-
77
-
78
-
79
-
80
-
81
-
82
-
83
-
84
-
85
-
86
-
87
-
88
-
89
-
90
-
91
-
92
-
93
-
94
-
95
-
96
-
97
-
98
-
99
-
100
-
101
-
102
-
103
-
104
-
105
-
106
-
107
-
108
-
109
-
110
-
111
-
112
-
113
-
114
-
115
-
116
-
117
-
118
-
119
-
120
-
121
-
122
-
123
-
124
-
125
-
126
-
127
-
128
-
129
-
130
-
131
-
132
-
133
-
134
-
135
-
136
-
137
-
138
-
139
-
140
-
141
-
142
-
143
-
144
-
145
-
146
-
147
-
148
-
149
-
150
-
151
-
152
-
153
-
154
-
155
-
156
-
157
-
158
-
159
-
160
-
161
-
162
-
163
-
164
-
165
-
166
-
167
-
168
-
169
-
170
-
171
-
172
-
173
-
174
-
175
-
176
-
177
-
178
-
179
-
180
-
181
-
182
-
183
-
184
-
185
-
186
-
187
-
188
-
189
-
190
-
191
-
192
-
193
-
194
-
195
-
196
-
197
-
198
-
199
-
200
-
201
-
202
-
203
-
204
-
205
-
206
-
207
-
208
-
209
-
210
-
211
-
212
-
213
-
214
-
215
-
216
-
217
-
218
-
219
-
220
-
221
-
222
-
223
-
224
-
225
-
226
-
227
-
228
-
229
-
230
-
231
-
232
-
233
-
234
-
235
-
236
-
237
-
238
-
239
-
240
-
241
-
242
-
243
-
244
-
245
-
246
-
247
-
248
-
249
-
250
-
251
-
252
-
253
-
254
-
255
-
256
-
257
-
258
-
259
-
260
-
261
-
262
-
263
-
264
-
265
-
266
-
267
-
268
-
269
-
270
-
271
-
272
-
273
-
274
-
275
-
276
-
277
-
278
-
279
-
280
-
281
-
282
-
283
-
284
-
285
-
286
-
287
-
288
-
289
-
290
-
291
-
292
-
293
-
294
-
295
-
296
-
297
-
298
-
299
-
300
-
301
-
302
-
303
-
 304
304 -
 305
305 -
 306
306 -
 307
307 -
 308
308 -
 309
309 -
 310
310 -
 311
311 -
 312
312 -
 313
313 -
 314
314 -
315
-
316
-
317
-
318
-
319
-
320
-
321
-
322
-
323
-
324
-
325
-
326
-
327
-
328
-
329
-
330
-
331
-
332
-
333
-
334
-
335
 |
 |
