Netgear FS728TLP Web Management User Guide - Page 297
Con the IP Address Settings of the Smart Switch, Web Browser Access
 |
View all Netgear FS728TLP manuals
Add to My Manuals
Save this manual to your list of manuals |
Page 297 highlights
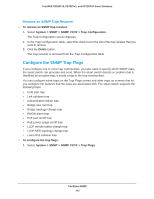
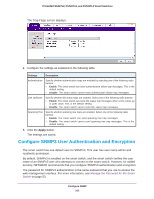
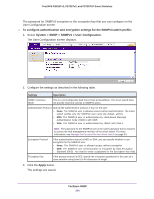
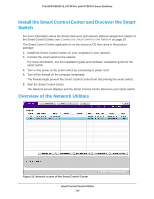
ProSAFE FS526Tv2, FS726Tv2, and FS728TLP Smart Switches On the Network screen, after you have selected the smart switch by clicking the table row that displays the smart switch, you can perform the following network-related functions: • DHCP Refresh. If the smart switch receives its IP address information from a DHCP server, click the DHCP Refresh button to force the smart switch to release the current bindings and request new address information from the DHCP server. • Reboot Device. Click the Reboot Device button to reboot the smart switch. • Web Browser Access. Click the Web Browser Access button to launch a web browser and connect to the web management interface for the smart switch. • Configure Device. Click the Configure Device button to change network information for the smart switch, including the IP address, DHCP client mode, system name, and location. For more information, see the following section, Configure the IP Address Settings of the Smart Switch. • Change Password. Click the Change Password button to set a new password for the smart switch. For more information, see Change the Password for Accessing the Smart Switch on page 298. Configure the IP Address Settings of the Smart Switch To change the IP address information for the smart switch: 1. On the computer on which the Smart Control Center is installed, turn off the firewall temporarily. The firewall might prevent the Smart Control Center from discovering the smart switch. 2. Start the Smart Control Center. The Network screen displays and the Smart Control Center discovers your smart switch. 3. If the discovery function of the Smart Control Center does not operate automatically when you start the Smart Control Center, click the Discover button. 4. Select the smart switch by clicking the table row that displays the smart switch. 5. Click the Configure Device button. The screen expands to display additional fields at the bottom of the screen. 6. Under DHCP, select the Disabled radio button. Smart Control Center Utilities 297
-
 1
1 -
2
-
3
-
4
-
5
-
6
-
7
-
8
-
9
-
10
-
11
-
12
-
13
-
14
-
15
-
16
-
17
-
18
-
19
-
20
-
21
-
22
-
23
-
24
-
25
-
26
-
27
-
28
-
29
-
30
-
31
-
32
-
33
-
34
-
35
-
36
-
37
-
38
-
39
-
40
-
41
-
42
-
43
-
44
-
45
-
46
-
47
-
48
-
49
-
50
-
51
-
52
-
53
-
54
-
55
-
56
-
57
-
58
-
59
-
60
-
61
-
62
-
63
-
64
-
65
-
66
-
67
-
68
-
69
-
70
-
71
-
72
-
73
-
74
-
75
-
76
-
77
-
78
-
79
-
80
-
81
-
82
-
83
-
84
-
85
-
86
-
87
-
88
-
89
-
90
-
91
-
92
-
93
-
94
-
95
-
96
-
97
-
98
-
99
-
100
-
101
-
102
-
103
-
104
-
105
-
106
-
107
-
108
-
109
-
110
-
111
-
112
-
113
-
114
-
115
-
116
-
117
-
118
-
119
-
120
-
121
-
122
-
123
-
124
-
125
-
126
-
127
-
128
-
129
-
130
-
131
-
132
-
133
-
134
-
135
-
136
-
137
-
138
-
139
-
140
-
141
-
142
-
143
-
144
-
145
-
146
-
147
-
148
-
149
-
150
-
151
-
152
-
153
-
154
-
155
-
156
-
157
-
158
-
159
-
160
-
161
-
162
-
163
-
164
-
165
-
166
-
167
-
168
-
169
-
170
-
171
-
172
-
173
-
174
-
175
-
176
-
177
-
178
-
179
-
180
-
181
-
182
-
183
-
184
-
185
-
186
-
187
-
188
-
189
-
190
-
191
-
192
-
193
-
194
-
195
-
196
-
197
-
198
-
199
-
200
-
201
-
202
-
203
-
204
-
205
-
206
-
207
-
208
-
209
-
210
-
211
-
212
-
213
-
214
-
215
-
216
-
217
-
218
-
219
-
220
-
221
-
222
-
223
-
224
-
225
-
226
-
227
-
228
-
229
-
230
-
231
-
232
-
233
-
234
-
235
-
236
-
237
-
238
-
239
-
240
-
241
-
242
-
243
-
244
-
245
-
246
-
247
-
248
-
249
-
250
-
251
-
252
-
253
-
254
-
255
-
256
-
257
-
258
-
259
-
260
-
261
-
262
-
263
-
264
-
265
-
266
-
267
-
268
-
269
-
270
-
271
-
272
-
273
-
274
-
275
-
276
-
277
-
278
-
279
-
280
-
281
-
282
-
283
-
284
-
285
-
286
-
287
-
288
-
289
-
290
-
291
-
 292
292 -
 293
293 -
 294
294 -
 295
295 -
 296
296 -
 297
297 -
 298
298 -
 299
299 -
 300
300 -
 301
301 -
 302
302 -
303
-
304
-
305
-
306
-
307
-
308
-
309
-
310
-
311
-
312
-
313
-
314
-
315
-
316
-
317
-
318
-
319
-
320
-
321
-
322
-
323
-
324
-
325
-
326
-
327
-
328
-
329
-
330
-
331
-
332
-
333
-
334
-
335
 |
 |
