Netgear FVS338 FVS338 Reference Manual - Page 144
Using a SNMP Manager, Everyone, IP address range, Only this PC, Apply, IP Address, Community
 |
UPC - 606449037197
View all Netgear FVS338 manuals
Add to My Manuals
Save this manual to your list of manuals |
Page 144 highlights
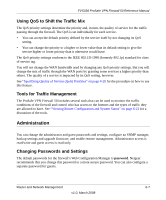
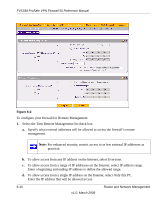
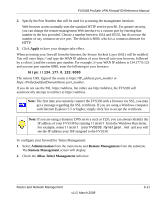
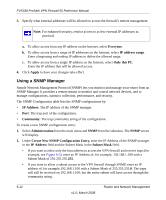
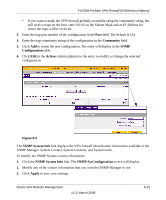
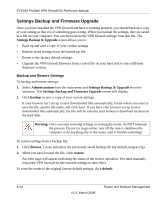
FVS338 ProSafe VPN Firewall 50 Reference Manual 3. Specify what external addresses will be allowed to access the firewall's remote management. Note: For enhanced security, restrict access to as few external IP addresses as practical. a. To allow access from any IP address on the Internet, select Everyone. b. To allow access from a range of IP addresses on the Internet, select IP address range. Enter a beginning and ending IP address to define the allowed range. c. To allow access from a single IP address on the Internet, select Only this PC. Enter the IP address that will be allowed access. 4. Click Apply to have your changes take effect. Using a SNMP Manager Simple Network Management Protocol (SNMP) lets you monitor and manage your router from an SNMP Manager. It provides a remote means to monitor and control network devices, and to manage configurations, statistics collection, performance, and security. The SNMP Configuration table lists the SNMP configurations by: • IP Address: The IP address of the SNMP manager. • Port: The trap port of the configuration. • Community: The trap community string of the configuration. To create a new SNMP configuration entry: 1. Select Administration from the main menu and SNMP from the submenu. The SNMP screen will display. 2. Under Create New SNMP Configuration Entry, enter the IP Address of the SNMP manager in the IP Address field and the Subnet Mask in the Subnet Mask field. • If you want to allow only the host address to access the VPN firewall and receive traps (for example, see Figure 6-3), enter an IP Address of, for example, 192.168.1.100 with a Subnet Mask of 255.255.255.255. • If you want to allow a subnet access to the VPN firewall through SNMP, enter an IP address of, for example,192.168.1.100 with a Subnet Mask of 255.255.255.0. The traps will still be received on 192.168.1.100, but the entire subnet will have access through the community string. 6-12 v1.0, March 2008 Router and Network Management
-
 1
1 -
2
-
3
-
4
-
5
-
6
-
7
-
8
-
9
-
10
-
11
-
12
-
13
-
14
-
15
-
16
-
17
-
18
-
19
-
20
-
21
-
22
-
23
-
24
-
25
-
26
-
27
-
28
-
29
-
30
-
31
-
32
-
33
-
34
-
35
-
36
-
37
-
38
-
39
-
40
-
41
-
42
-
43
-
44
-
45
-
46
-
47
-
48
-
49
-
50
-
51
-
52
-
53
-
54
-
55
-
56
-
57
-
58
-
59
-
60
-
61
-
62
-
63
-
64
-
65
-
66
-
67
-
68
-
69
-
70
-
71
-
72
-
73
-
74
-
75
-
76
-
77
-
78
-
79
-
80
-
81
-
82
-
83
-
84
-
85
-
86
-
87
-
88
-
89
-
90
-
91
-
92
-
93
-
94
-
95
-
96
-
97
-
98
-
99
-
100
-
101
-
102
-
103
-
104
-
105
-
106
-
107
-
108
-
109
-
110
-
111
-
112
-
113
-
114
-
115
-
116
-
117
-
118
-
119
-
120
-
121
-
122
-
123
-
124
-
125
-
126
-
127
-
128
-
129
-
130
-
131
-
132
-
133
-
134
-
135
-
136
-
137
-
138
-
 139
139 -
 140
140 -
 141
141 -
 142
142 -
 143
143 -
 144
144 -
 145
145 -
 146
146 -
 147
147 -
 148
148 -
 149
149 -
150
-
151
-
152
-
153
-
154
-
155
-
156
-
157
-
158
-
159
-
160
-
161
-
162
-
163
-
164
-
165
-
166
-
167
-
168
-
169
-
170
-
171
-
172
-
173
-
174
-
175
-
176
-
177
-
178
-
179
-
180
-
181
-
182
-
183
-
184
-
185
-
186
-
187
-
188
-
189
-
190
-
191
-
192
-
193
-
194
-
195
-
196
-
197
-
198
 |
 |
