Netgear GS748TS GS7xxTS User Manual - Page 108
Switching > VLAN > Basic > VLAN Configuration, VLAN ID, VLAN Name, APPLY
 |
UPC - 606449049480
View all Netgear GS748TS manuals
Add to My Manuals
Save this manual to your list of manuals |
Page 108 highlights
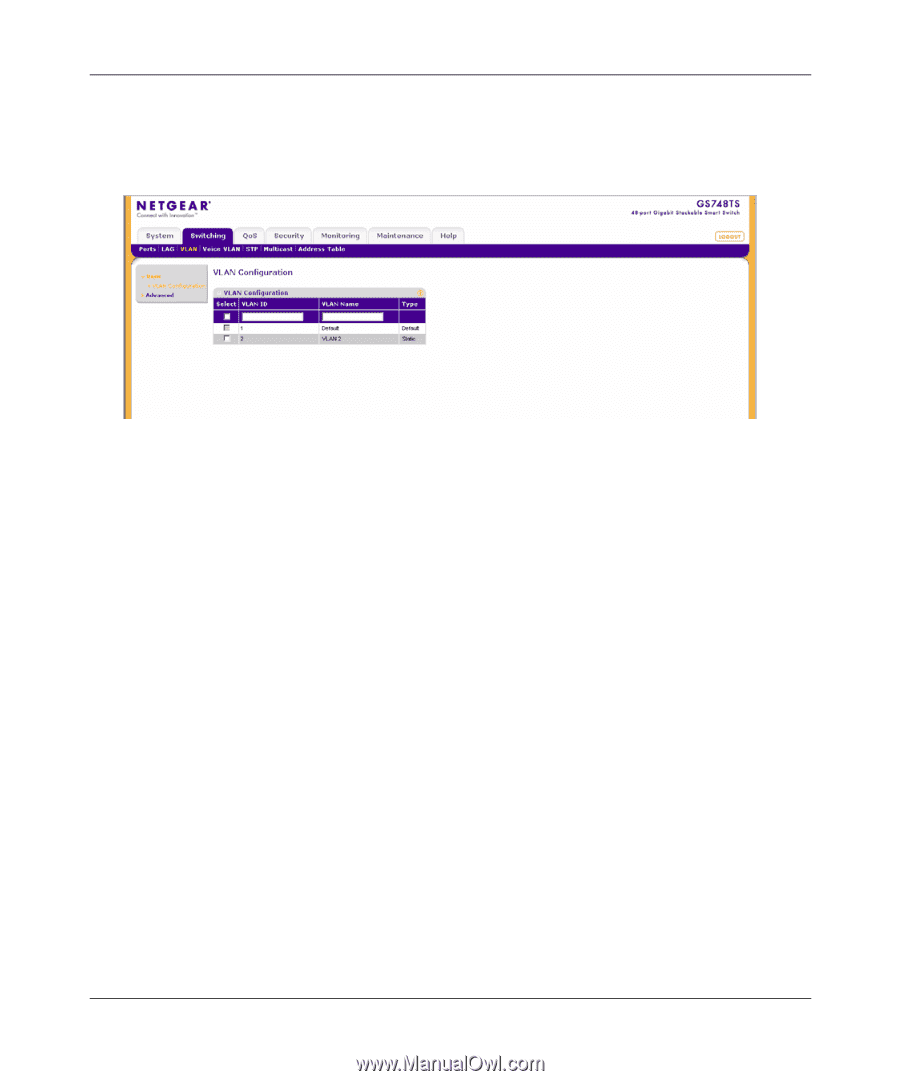
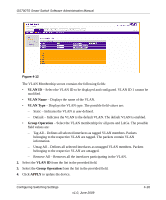
GS700TS Smart Switch Software Administration Manual To define VLAN properties: 1. Click Switching > VLAN > Basic > VLAN Configuration. The Basic VLAN Configuration screen displays: Figure 4-10 The Basic VLAN Configuration screen contains the following fields: • VLAN ID - Enter the VLAN ID. The field range is 2-4093. • VLAN Name - Enter the user-defined VLAN name. • Type - Displays the VLAN type. The possible field values are: - Static - Indicates the VLAN is user-defined. - Default - Indicates the default VLAN ID is 1. It cannot be modified by the user. 2. Select the VLAN entry. 3. Enter the VLAN ID and VLAN Name in the provided fields in the first row. 4. Click APPLY to update the device. To add a new VLAN: 1. Click Switching > VLAN > Basic > VLAN Configuration. The Basic VLAN Configuration screen displays. 2. Enter the VLAN ID and VLAN Name in the provided fields in the first row. 3. Click ADD to update the device. 4-15 v1.0, June 2009 Configuring Switching Settings
-
 1
1 -
2
-
3
-
4
-
5
-
6
-
7
-
8
-
9
-
10
-
11
-
12
-
13
-
14
-
15
-
16
-
17
-
18
-
19
-
20
-
21
-
22
-
23
-
24
-
25
-
26
-
27
-
28
-
29
-
30
-
31
-
32
-
33
-
34
-
35
-
36
-
37
-
38
-
39
-
40
-
41
-
42
-
43
-
44
-
45
-
46
-
47
-
48
-
49
-
50
-
51
-
52
-
53
-
54
-
55
-
56
-
57
-
58
-
59
-
60
-
61
-
62
-
63
-
64
-
65
-
66
-
67
-
68
-
69
-
70
-
71
-
72
-
73
-
74
-
75
-
76
-
77
-
78
-
79
-
80
-
81
-
82
-
83
-
84
-
85
-
86
-
87
-
88
-
89
-
90
-
91
-
92
-
93
-
94
-
95
-
96
-
97
-
98
-
99
-
100
-
101
-
102
-
 103
103 -
 104
104 -
 105
105 -
 106
106 -
 107
107 -
 108
108 -
 109
109 -
 110
110 -
 111
111 -
 112
112 -
 113
113 -
114
-
115
-
116
-
117
-
118
-
119
-
120
-
121
-
122
-
123
-
124
-
125
-
126
-
127
-
128
-
129
-
130
-
131
-
132
-
133
-
134
-
135
-
136
-
137
-
138
-
139
-
140
-
141
-
142
-
143
-
144
-
145
-
146
-
147
-
148
-
149
-
150
-
151
-
152
-
153
-
154
-
155
-
156
-
157
-
158
-
159
-
160
-
161
-
162
-
163
-
164
-
165
-
166
-
167
-
168
-
169
-
170
-
171
-
172
-
173
-
174
-
175
-
176
-
177
-
178
-
179
-
180
-
181
-
182
-
183
-
184
-
185
-
186
-
187
-
188
-
189
-
190
-
191
-
192
-
193
-
194
-
195
-
196
-
197
-
198
-
199
-
200
-
201
-
202
-
203
-
204
-
205
-
206
-
207
-
208
-
209
-
210
-
211
-
212
-
213
-
214
-
215
-
216
-
217
-
218
-
219
-
220
-
221
-
222
-
223
-
224
-
225
-
226
-
227
-
228
-
229
-
230
-
231
-
232
 |
 |