Netgear GS748TS GS7xxTS User Manual - Page 217
Advanced > Alarms, Monitoring > RMON
 |
UPC - 606449049480
View all Netgear GS748TS manuals
Add to My Manuals
Save this manual to your list of manuals |
Page 217 highlights
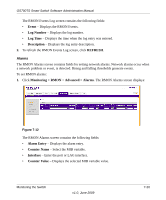
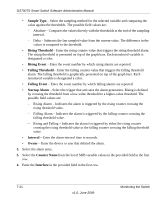
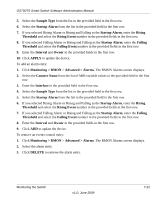
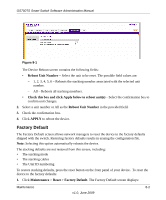
GS700TS Smart Switch Software Administration Manual 5. Select the Sample Type from the list in the provided field in the first row. 6. Select the Startup Alarm from the list in the provided field in the first row. 7. If you selected Rising Alarm or Rising and Falling as the Startup Alarm, enter the Rising Threshold and select the Rising Event number in the provided fields in the first row. 8. If you selected Falling Alarm or Rising and Falling as the Startup Alarm, enter the Falling Threshold and select the Falling Event number in the provided fields in the first row. 9. Enter the Interval and Owner in the provided fields in the first row. 10. Click APPLY to update the device. To add an alarm entry: 1. Click Monitoring > RMON > Advanced > Alarms. The RMON Alarms screen displays. 2. Select the Counter Name from the list of MIB variable values in the provided field in the first row. 3. Enter the Interface in the provided field in the first row. 4. Select the Sample Type from the list in the provided field in the first row. 5. Select the Startup Alarm from the list in the provided field in the first row. 6. If you selected Rising Alarm or Rising and Falling as the Startup Alarm, enter the Rising Threshold and select the Rising Event number in the provided fields in the first row. 7. If you selected Falling Alarm or Rising and Falling as the Startup Alarm, enter the Falling Threshold and select the Falling Event number in the provided fields in the first row. 8. Enter the Interval and Owner in the provided fields in the first row. 9. Click ADD to update the device. To remove an events control entry: 1. Click Monitoring > RMON > Advanced > Alarms. The RMON Alarms screen displays. 2. Select the alarm entry. 3. Click DELETE to remove the alarm entry. Monitoring the Switch v1.0, June 2009 7-22
-
 1
1 -
2
-
3
-
4
-
5
-
6
-
7
-
8
-
9
-
10
-
11
-
12
-
13
-
14
-
15
-
16
-
17
-
18
-
19
-
20
-
21
-
22
-
23
-
24
-
25
-
26
-
27
-
28
-
29
-
30
-
31
-
32
-
33
-
34
-
35
-
36
-
37
-
38
-
39
-
40
-
41
-
42
-
43
-
44
-
45
-
46
-
47
-
48
-
49
-
50
-
51
-
52
-
53
-
54
-
55
-
56
-
57
-
58
-
59
-
60
-
61
-
62
-
63
-
64
-
65
-
66
-
67
-
68
-
69
-
70
-
71
-
72
-
73
-
74
-
75
-
76
-
77
-
78
-
79
-
80
-
81
-
82
-
83
-
84
-
85
-
86
-
87
-
88
-
89
-
90
-
91
-
92
-
93
-
94
-
95
-
96
-
97
-
98
-
99
-
100
-
101
-
102
-
103
-
104
-
105
-
106
-
107
-
108
-
109
-
110
-
111
-
112
-
113
-
114
-
115
-
116
-
117
-
118
-
119
-
120
-
121
-
122
-
123
-
124
-
125
-
126
-
127
-
128
-
129
-
130
-
131
-
132
-
133
-
134
-
135
-
136
-
137
-
138
-
139
-
140
-
141
-
142
-
143
-
144
-
145
-
146
-
147
-
148
-
149
-
150
-
151
-
152
-
153
-
154
-
155
-
156
-
157
-
158
-
159
-
160
-
161
-
162
-
163
-
164
-
165
-
166
-
167
-
168
-
169
-
170
-
171
-
172
-
173
-
174
-
175
-
176
-
177
-
178
-
179
-
180
-
181
-
182
-
183
-
184
-
185
-
186
-
187
-
188
-
189
-
190
-
191
-
192
-
193
-
194
-
195
-
196
-
197
-
198
-
199
-
200
-
201
-
202
-
203
-
204
-
205
-
206
-
207
-
208
-
209
-
210
-
211
-
 212
212 -
 213
213 -
 214
214 -
 215
215 -
 216
216 -
 217
217 -
 218
218 -
 219
219 -
 220
220 -
 221
221 -
 222
222 -
223
-
224
-
225
-
226
-
227
-
228
-
229
-
230
-
231
-
232
 |
 |