Netgear GS748TS GS7xxTS User Manual - Page 57
SNMPv3, Engine ID, System > SNMP > SNMPv1/v2, Trap Configuration, DELETE, System
 |
UPC - 606449049480
View all Netgear GS748TS manuals
Add to My Manuals
Save this manual to your list of manuals |
Page 57 highlights
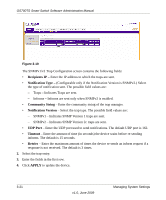
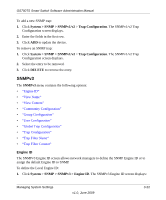
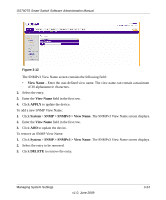
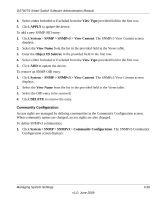
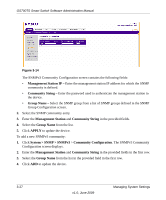
GS700TS Smart Switch Software Administration Manual To add a new SNMP trap: 1. Click System > SNMP > SNMPv1/v2 > Trap Configuration. The SNMPv1/v2 Trap Configuration screen displays. 2. Enter the fields in the first row. 3. Click ADD to update the device. To remove an SNMP trap: 1. Click System > SNMP > SNMPv1/v2 > Trap Configuration. The SNMPv1/v2 Trap Configuration screen displays. 2. Select the entry to be removed. 3. Click DELETE to remove the entry. SNMPv3 The SNMPv3 menu contains the following options: • "Engine ID" • "View Name" • "View Content" • "Community Configuration" • "Group Configuration" • "User Configuration" • "Global Trap Configuration" • "Trap Configuration" • "Trap Filter Name" • "Trap Filter Content" Engine ID The SNMPv3 Engine ID screen allows network managers to define the SNMP Engine ID or to assign the default Engine ID to SNMP. To define the Local Engine ID: 1. Click System > SNMP > SNMPv3 > Engine ID. The SNMPv3 Engine ID screen displays: Managing System Settings v1.0, June 2009 3-22
-
 1
1 -
2
-
3
-
4
-
5
-
6
-
7
-
8
-
9
-
10
-
11
-
12
-
13
-
14
-
15
-
16
-
17
-
18
-
19
-
20
-
21
-
22
-
23
-
24
-
25
-
26
-
27
-
28
-
29
-
30
-
31
-
32
-
33
-
34
-
35
-
36
-
37
-
38
-
39
-
40
-
41
-
42
-
43
-
44
-
45
-
46
-
47
-
48
-
49
-
50
-
51
-
 52
52 -
 53
53 -
 54
54 -
 55
55 -
 56
56 -
 57
57 -
 58
58 -
 59
59 -
 60
60 -
 61
61 -
 62
62 -
63
-
64
-
65
-
66
-
67
-
68
-
69
-
70
-
71
-
72
-
73
-
74
-
75
-
76
-
77
-
78
-
79
-
80
-
81
-
82
-
83
-
84
-
85
-
86
-
87
-
88
-
89
-
90
-
91
-
92
-
93
-
94
-
95
-
96
-
97
-
98
-
99
-
100
-
101
-
102
-
103
-
104
-
105
-
106
-
107
-
108
-
109
-
110
-
111
-
112
-
113
-
114
-
115
-
116
-
117
-
118
-
119
-
120
-
121
-
122
-
123
-
124
-
125
-
126
-
127
-
128
-
129
-
130
-
131
-
132
-
133
-
134
-
135
-
136
-
137
-
138
-
139
-
140
-
141
-
142
-
143
-
144
-
145
-
146
-
147
-
148
-
149
-
150
-
151
-
152
-
153
-
154
-
155
-
156
-
157
-
158
-
159
-
160
-
161
-
162
-
163
-
164
-
165
-
166
-
167
-
168
-
169
-
170
-
171
-
172
-
173
-
174
-
175
-
176
-
177
-
178
-
179
-
180
-
181
-
182
-
183
-
184
-
185
-
186
-
187
-
188
-
189
-
190
-
191
-
192
-
193
-
194
-
195
-
196
-
197
-
198
-
199
-
200
-
201
-
202
-
203
-
204
-
205
-
206
-
207
-
208
-
209
-
210
-
211
-
212
-
213
-
214
-
215
-
216
-
217
-
218
-
219
-
220
-
221
-
222
-
223
-
224
-
225
-
226
-
227
-
228
-
229
-
230
-
231
-
232
 |
 |