Oki MC770 MC770/780 User Guide - Advanced - Page 240
RECEIVE] or [SCAN]., Press the [LOG] tab and then, [SEND] or
 |
View all Oki MC770 manuals
Add to My Manuals
Save this manual to your list of manuals |
Page 240 highlights
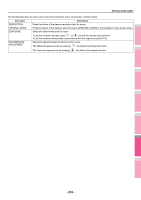
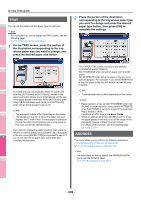
SETTING ITEMS (USER) Item name Description E-MAIL 1 Press this button to enter the E-mail address of the contact. You can enter an address of up to 192 alphanumeric characters. CORP. Press this button to enter the company name of the contact. You can enter up to 64 characters. DEPT. 2 Press this button to enter the department name of the contact. You can enter up to 64 characters. KEYWORD Press this button to enter a keyword for the contact. This keyword can be used to search for this contact. You can enter up to 256 characters. Note 3 • [FIRST NAME] or [LAST NAME], and [FAX NO.] or [E- MAIL] are mandatory items. The contact will not be registered if any of them are missing. • When you press a button other than [FAX NO.] and [2ND FAX], the on-screen keyboard is displayed. For details of the on-screen keyboard, see the following page: 4 P.321 "On-screen keyboard" • When you press [FAX NO.] or [2ND FAX], the on- screen numeric keypad is displayed. For details of the on-screen numeric keypad, see the following page: P.321 "On-screen numeric keypad" 3 Press [OPTION] to specify the default settings for fax transmission. 5 Note • This step is available only when the FAX Unit is installed. 4 Press [OK] to register the contact. 6 The following information can be registered from the Send Log: • Remote fax numbers that were directly dialed, or that were searched from the LDAP server • E-mail addresses that were manually entered, or that were searched from the LDAP server The following information can be registered from the Receive Log: • Remote fax numbers that were directly dialed, or that were searched from the LDAP server for a polling reception • E-mail address of the sender The following information can be registered from the Scan Log: • E-mail addresses that were manually entered 1 Press [JOB STATUS] on the touch panel. 2 Press the [LOG] tab and then, [SEND] (or [RECEIVE] or [SCAN]). The SEND (or RECEIVE or SCAN) LOG list is displayed. 3 Select the job that includes the fax number or E-mail address you want to register into the address book, and press [ENTRY]. 7 The contact is registered in the address book. Registering contacts from Log lists You can register information such as remote fax numbers and E-mail addresses in the address book from the Send/Receive Log screen. - 240 -
-
 1
1 -
2
-
3
-
4
-
5
-
6
-
7
-
8
-
9
-
10
-
11
-
12
-
13
-
14
-
15
-
16
-
17
-
18
-
19
-
20
-
21
-
22
-
23
-
24
-
25
-
26
-
27
-
28
-
29
-
30
-
31
-
32
-
33
-
34
-
35
-
36
-
37
-
38
-
39
-
40
-
41
-
42
-
43
-
44
-
45
-
46
-
47
-
48
-
49
-
50
-
51
-
52
-
53
-
54
-
55
-
56
-
57
-
58
-
59
-
60
-
61
-
62
-
63
-
64
-
65
-
66
-
67
-
68
-
69
-
70
-
71
-
72
-
73
-
74
-
75
-
76
-
77
-
78
-
79
-
80
-
81
-
82
-
83
-
84
-
85
-
86
-
87
-
88
-
89
-
90
-
91
-
92
-
93
-
94
-
95
-
96
-
97
-
98
-
99
-
100
-
101
-
102
-
103
-
104
-
105
-
106
-
107
-
108
-
109
-
110
-
111
-
112
-
113
-
114
-
115
-
116
-
117
-
118
-
119
-
120
-
121
-
122
-
123
-
124
-
125
-
126
-
127
-
128
-
129
-
130
-
131
-
132
-
133
-
134
-
135
-
136
-
137
-
138
-
139
-
140
-
141
-
142
-
143
-
144
-
145
-
146
-
147
-
148
-
149
-
150
-
151
-
152
-
153
-
154
-
155
-
156
-
157
-
158
-
159
-
160
-
161
-
162
-
163
-
164
-
165
-
166
-
167
-
168
-
169
-
170
-
171
-
172
-
173
-
174
-
175
-
176
-
177
-
178
-
179
-
180
-
181
-
182
-
183
-
184
-
185
-
186
-
187
-
188
-
189
-
190
-
191
-
192
-
193
-
194
-
195
-
196
-
197
-
198
-
199
-
200
-
201
-
202
-
203
-
204
-
205
-
206
-
207
-
208
-
209
-
210
-
211
-
212
-
213
-
214
-
215
-
216
-
217
-
218
-
219
-
220
-
221
-
222
-
223
-
224
-
225
-
226
-
227
-
228
-
229
-
230
-
231
-
232
-
233
-
234
-
 235
235 -
 236
236 -
 237
237 -
 238
238 -
 239
239 -
 240
240 -
 241
241 -
 242
242 -
 243
243 -
 244
244 -
 245
245 -
246
-
247
-
248
-
249
-
250
-
251
-
252
-
253
-
254
-
255
-
256
-
257
-
258
-
259
-
260
-
261
-
262
-
263
-
264
-
265
-
266
-
267
-
268
-
269
-
270
-
271
-
272
-
273
-
274
-
275
-
276
-
277
-
278
-
279
-
280
-
281
-
282
-
283
-
284
-
285
-
286
-
287
-
288
-
289
-
290
-
291
-
292
-
293
-
294
-
295
-
296
-
297
-
298
-
299
-
300
-
301
-
302
-
303
-
304
-
305
-
306
-
307
-
308
-
309
-
310
-
311
-
312
-
313
-
314
-
315
-
316
-
317
-
318
-
319
-
320
-
321
-
322
-
323
-
324
-
325
-
326
-
327
-
328
-
329
-
330
-
331
-
332
-
333
-
334
-
335
-
336
-
337
-
338
-
339
-
340
-
341
-
342
-
343
-
344
-
345
-
346
-
347
-
348
-
349
-
350
-
351
-
352
-
353
-
354
-
355
-
356
-
357
 |
 |
