Pioneer AVIC-D1 Owner's Manual - Page 21
Basic Operation - installation manual
 |
UPC - 012562739496
View all Pioneer AVIC-D1 manuals
Add to My Manuals
Save this manual to your list of manuals |
Page 21 highlights
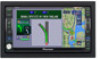
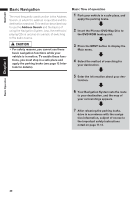
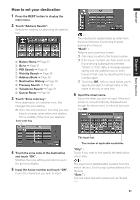
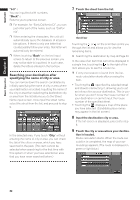
NAVI/AV Chapter 1 Basic Operation Chapter 1 Basic Operation Flow from Startup to Termination • If the program is not installed, see page 107 and install the program. At first, please confirm the positions of the following features using the "Hardware Manual". • DVD-ROM loading slot • MAP button • DEST button • OPEN/CLOSE button 1 Start the engine. After a little time, the navigation opening screen comes on for a few seconds. Then, a message screen is displayed. ❒ If the disc is not set, the message asking to insert the disc appears. After you set the disc correctly, your Navigation System starts up. 2 Press and hold the OPEN/CLOSE button. OPEN/CLOSE button 4 Press the MAP button to switch the Navi- gation map screen. Pressing the AV button switches between the navigation map screen and the audio screen. 5 Check the details of the cautionary mes- sage and touch "OK". You can operate the Navigation System by touching keys displayed on the screen. If the route is already set, it changes to route guidance mode. The map of your surroundings is displayed. ➲ How to read the current position screen ➞ Page 29 ➲ Setting the time ➞ Page 108 ❒ Touch keys which are not available at this time are grayed out. ❒ Be sure to touch the touch keys with a fin- ger. Touch keys cannot be operated by a pen or similar object. 6 Press the DEST button. Displays the main menu. 7 Allows you to assign a destination and being route guidance. The LCD panel fully opens, and the DVD-ROM loading slot appears. 3 Insert the Pioneer DVD Map Disc to the DVD-ROM loading slot. The LCD panel closes automatically. ❒ Make sure the DVD-ROM loading slot is empty before inserting a DVD Map Disc. ➲ Specifying the address and searching the destination ➞ Page 20 ➲ Searching the destination by map ➞ Page 33 ➲ Other search methods ➞ Page 35 to 38 8 Turn off the vehicle engine. This Navigation System is also turned off. ❒ Until the vicinity of the destination is reached, the set route will not be deleted even if the engine is turned off. 19
-
 1
1 -
2
-
3
-
4
-
5
-
6
-
7
-
8
-
9
-
10
-
11
-
12
-
13
-
14
-
15
-
 16
16 -
 17
17 -
 18
18 -
 19
19 -
 20
20 -
 21
21 -
 22
22 -
 23
23 -
 24
24 -
 25
25 -
 26
26 -
27
-
28
-
29
-
30
-
31
-
32
-
33
-
34
-
35
-
36
-
37
-
38
-
39
-
40
-
41
-
42
-
43
-
44
-
45
-
46
-
47
-
48
-
49
-
50
-
51
-
52
-
53
-
54
-
55
-
56
-
57
-
58
-
59
-
60
-
61
-
62
-
63
-
64
-
65
-
66
-
67
-
68
-
69
-
70
-
71
-
72
-
73
-
74
-
75
-
76
-
77
-
78
-
79
-
80
-
81
-
82
-
83
-
84
-
85
-
86
-
87
-
88
-
89
-
90
-
91
-
92
-
93
-
94
-
95
-
96
-
97
-
98
-
99
-
100
-
101
-
102
-
103
-
104
-
105
-
106
-
107
-
108
-
109
-
110
-
111
-
112
-
113
-
114
-
115
-
116
-
117
-
118
-
119
-
120
-
121
-
122
-
123
-
124
-
125
-
126
-
127
-
128
-
129
-
130
-
131
-
132
-
133
 |
 |
