Pioneer AVIC-D1 Owner's Manual - Page 62
Setting the Vehicle Dynamics, Display, Checking the Navigation Status, Checking sensor learning - screen calibration
 |
UPC - 012562739496
View all Pioneer AVIC-D1 manuals
Add to My Manuals
Save this manual to your list of manuals |
Page 62 highlights
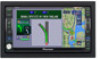
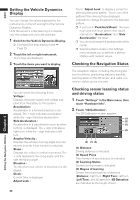
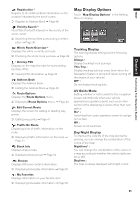
NAVI Setting the Vehicle Dynamics Display You can change the values displayed by the instruments on the left and right of the Vehicle Dynamics Display. Until the sensor's initial learning is complete, only the voltage and clock are available. 1 Switch to the Vehicle Dynamics Display. ➲ Changing the map display mode ➞ Page 29 2 Touch the left or right instrument. Touch keys are displayed. 3 Touch the items you want to display. Touch "Adjust Look" to display a screen for selecting the panel pattern. Touch one of the patterns from among those displayed onscreen to change the panel to the selected pattern. ❒ If you touch "Peak Hold Reset", the maxi- mum and minimum (green line) values indicated in "Acceleration" and "Side Acceleration" are reset. ❒ You cannot change the speedometer at the center. ❒ Selecting Demo mode in the Settings menu enables you to perform a demonstration with random values. Checking the Navigation Status The navigation status, including the driving status of a vehicle, positioning status by satellite, learning status of the 3D sensor, and cable connection status can be checked. You can select the following items. Voltage : Displays the power supply and voltage supplied from the battery to this system. Acceleration : Acceleration in a forward direction is displayed. The + sign indicates acceleration while the - sign indicates deceleration. Side Acceleration : Acceleration in a side direction such as when turning, is displayed. The + sign indicates a right turn, while the - sign indicates a left turn. Angular Velocity : Displays the vehicle's turning angle over one second (how far it has turned in a second). Slope : Displays the vehicle's vertical movement. The + side represents the rising angle, and the side the falling angle. Direction : The direction your vehicle is traveling in is displayed. Clock : Current time is displayed. Adjust Look : Checking sensor learning status and driving status 1 Touch "Settings" in the Main menu, then touch "Hardware Info". 2 Touch "3D Calibration". The 3D Calibration screen appears. (1) (2) (3) (4) (6) (7) (5) (1) Distance Driving distance is indicated. (2) Speed Pulse Total number of speed pulses is indicated. (3) Learning Status Current driving mode is indicated. (4) Degree of learning Sensor learning situations of distance (Distance), right turn (Right Turn), left turn (Left Turn), and 3D detection (3D Detection) are indicated by the length of bars. Editing the Navigation Utilities Chapter 4 60
-
 1
1 -
2
-
3
-
4
-
5
-
6
-
7
-
8
-
9
-
10
-
11
-
12
-
13
-
14
-
15
-
16
-
17
-
18
-
19
-
20
-
21
-
22
-
23
-
24
-
25
-
26
-
27
-
28
-
29
-
30
-
31
-
32
-
33
-
34
-
35
-
36
-
37
-
38
-
39
-
40
-
41
-
42
-
43
-
44
-
45
-
46
-
47
-
48
-
49
-
50
-
51
-
52
-
53
-
54
-
55
-
56
-
 57
57 -
 58
58 -
 59
59 -
 60
60 -
 61
61 -
 62
62 -
 63
63 -
 64
64 -
 65
65 -
 66
66 -
 67
67 -
68
-
69
-
70
-
71
-
72
-
73
-
74
-
75
-
76
-
77
-
78
-
79
-
80
-
81
-
82
-
83
-
84
-
85
-
86
-
87
-
88
-
89
-
90
-
91
-
92
-
93
-
94
-
95
-
96
-
97
-
98
-
99
-
100
-
101
-
102
-
103
-
104
-
105
-
106
-
107
-
108
-
109
-
110
-
111
-
112
-
113
-
114
-
115
-
116
-
117
-
118
-
119
-
120
-
121
-
122
-
123
-
124
-
125
-
126
-
127
-
128
-
129
-
130
-
131
-
132
-
133
 |
 |