Pioneer AVIC-D1 Owner's Manual - Page 45
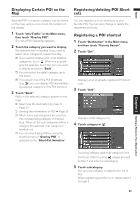
Displaying Certain POI on the, Registering/deleting POI Short, Registering a POI shortcut
 |
UPC - 012562739496
View all Pioneer AVIC-D1 manuals
Add to My Manuals
Save this manual to your list of manuals |
Page 45 highlights
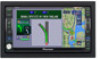
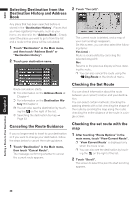
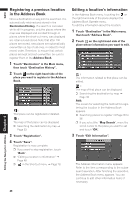
NAVI Displaying Certain POI on the Map Selected POI in a certain category can be shown on the map, and you can check the location on the display. 1 Touch "Info/Traffic" in the Main menu, then touch "Overlay POI". The list of POI categories appears. 2 Touch the category you want to display. The selected item is marked. If you want to select other categories, repeat this step. ❒ If you want to display with more detailed categories, touch . When the subcategory list appears, touch the item you want to display and touch "Back". ❒ You can select the detail category up to 100 items. ❒ If you touch one of the POI shortcuts (e.g. ), you can display POI immediately by selected category on the POI shortcut. 3 Touch "Back". POI's in the selected category appear on the map. ➲ Searching the destination by map ➞ Page 33 ➲ Viewing the information of POI ➞ Page 33 ❒ When some sub-categories are selected, the corresponding category is marked blue. When all the sub-categories within a category are selected, that category is marked red. ❒ You can also display POI by using the shortcut menu if "Overlay POI" is selected on the "Short-Cut Selection". Registering/deleting POI Shortcuts You can register up to six shortcuts to your favorite POI. You can also change or delete the registered shortcuts. Registering a POI shortcut 1 Touch "Destination" in the Main menu, and then touch "Vicinity Search". 2 Touch "Set". Displays a list of already registered POI shortcuts. 3 Touch "Add". Displays a POI category list. 4 Touch category or . Chapter 3 Setting a Route to Your Destination Touching category adds that category to the shortcuts. After touching , please proceed to Step 5 and select a subcategory. 5 Touch subcategory. The selected category is added to the list of POI. When registering another icon, repeat steps 3 through 5. 43
-
 1
1 -
2
-
3
-
4
-
5
-
6
-
7
-
8
-
9
-
10
-
11
-
12
-
13
-
14
-
15
-
16
-
17
-
18
-
19
-
20
-
21
-
22
-
23
-
24
-
25
-
26
-
27
-
28
-
29
-
30
-
31
-
32
-
33
-
34
-
35
-
36
-
37
-
38
-
39
-
 40
40 -
 41
41 -
 42
42 -
 43
43 -
 44
44 -
 45
45 -
 46
46 -
 47
47 -
 48
48 -
 49
49 -
 50
50 -
51
-
52
-
53
-
54
-
55
-
56
-
57
-
58
-
59
-
60
-
61
-
62
-
63
-
64
-
65
-
66
-
67
-
68
-
69
-
70
-
71
-
72
-
73
-
74
-
75
-
76
-
77
-
78
-
79
-
80
-
81
-
82
-
83
-
84
-
85
-
86
-
87
-
88
-
89
-
90
-
91
-
92
-
93
-
94
-
95
-
96
-
97
-
98
-
99
-
100
-
101
-
102
-
103
-
104
-
105
-
106
-
107
-
108
-
109
-
110
-
111
-
112
-
113
-
114
-
115
-
116
-
117
-
118
-
119
-
120
-
121
-
122
-
123
-
124
-
125
-
126
-
127
-
128
-
129
-
130
-
131
-
132
-
133
 |
 |
